

Here’s what you will get by following this guide:
- The Server Pilot interface to manage your server
- A really fast server using the latest tech to make your WordPress site as fast as possible
- A real CRON job to process your imports/backups more quickly and efficiently
- Free SSL certificate
- Very low monthly cost – e.g. $5pcm per server
- Your current site migrated to this new server on a dev domain
- Instructions to flip the switch and make your dev site live when you’re convinced of the performance gains
If you’ve been following me a while, you’ll know I offer a fork of the Mercury stack. When it comes to server-side performance of your WordPress site, here are the default elements you get with most hosts:
- Apache – serves images, css, javascript and other static files and processes PHP
- PHP 5.6 – processes the PHP instructions in the WordPress core and all the plugin files, interacts with your MySQL database and constructs HTML to be passed to Apache
- MySQL 5.6 – stores your data, options, posts, products, users, settings amongst other things. Takes commands from PHP and tries its best to serve up the results as quickly as it can.
The Super Speedy Plugins Fast WordPresss stack (Mercury fork) on the other hand has this:
- Cloudflare – serves static files (images, css, javascript) from free CDN locations around the world
- Nginx – instead of Apache – lighter, faster, less memory, scales better, responds quicker
- Fail2ban – bans IP addresses for a day when bots try to hack your site – bots can *hammer* your site with thousands of hits per minute, so this really helps performance
- PHP 7 – about 3 – 5 times faster at processing most PHP code compared to 5.6
- PerconaDB – almost twice as fast as MySQL 5.6, and doesn’t suffer dips in performance like MySQL does when it does its garbage cleanup
There used to be some extras in there – like Varnish in front of Nginx, Memcached behind it – but these have since been removed. Varnish because Cloudflare is really doing its job for it, Memcached because PHP 7 is not yet fully compatible.
Table of Contents
- A quick technical side-note about Nginx, fail2ban and Cloudflare
- A quick technical side-note about MySQL and PerconaDB
- The problem with my Mercury fork
- Server Pilot to the rescue
- How Server Pilot Works
- Step by Step Guide to Migrating to Server Pilot + Digital Ocean
- 1) Create a Digital Ocean Droplet
- 2) Create a secure root password
- 3) Connect Server Pilot to your server
- 4) Configure your DNS
- 5) Create your WordPress installation using Server Pilot
- 6) Add your dev domain
- Here’s a note for how to connect to your new site using FileZilla to access your files
- Migrating your site to the new server
- Option 1) Migrating your site using UpdraftPlus
- Option 2) Migrate with direct transfer of files to your new site using SSH
- Option 3) For ultra-manual migration approach if UpdraftPlus ever doesn’t work, you can do:
- Search/Replace in your database to change all www.superspeedyplugins.com references to www.superspeedyplugins.com
- How to make your site live
A quick technical side-note about Nginx, fail2ban and Cloudflare
There are some elements which are difficult to notice – like Nginx was rebuilt to include the originator IP so that fail2ban can work properly. Fail2ban will ban IP addresses based on certain patterns of activity – failing to log in 5 times, hitting xmlrpc.php multiple times etc. If you’re using Cloudflare, the IP address as far as Nginx is concerned is the Cloudflare IP address. Without the rebuild, that means you end up banning every user who comes to your website from that part of the world using that Cloudflare IP. With the nginx rebuilt, you get the original users IP address passed through properly so fail2ban can ban the correct IP address.
A quick technical side-note about MySQL and PerconaDB
Most hosts will give you MySQL 5.5 or MySQL 5.6. 5.5 came out in 2010, 5.6 came out in 2013 and 5.7 came out in 2015. While they may sound like minor revisions, they are major. 5.5 does not support fulltext indexes if you are using the InnoDB database structure. The InnoDB database structure is what you should be using as it’s faster than MyISAM (the other option). These are storage engines, like having a filing cabinet versus having a pile of papers on your desk.
5.6 and 5.7 also include major performance enhancements over the previous versions, so you really want the latest version. But the story doesn’t end there. MySQL has two main forks – versions made by other people/companies which have different features yet are 100% compatible with the original. These forks are Maria DB and Percona DB. Both are almost twice as fast as MySQL.
I prefer Percona DB for the query analysis toolkit provided – you can get a league table of which queries are hitting the server the hardest over time.
The problem with my Mercury fork
I’ve built a few of these installs for people and unfortunately I’ve had to keep the price quite high – it takes me time and it costs a lot in support too. I’m on a mission to make WordPress the fastest platform on the planet so this is far from ideal. I did make a DIY guide so users can install it themselves, which a lot of people used, but it was complicated – too complicated for many.
I tried going with the Ajenti interface to simplify things for people, but that wasn’t really perfect either – and there’s still the problem of the builds taking my time. I’ve semi-automated a lot of this – built snapshots to a certain level where I can then run fewer commands to get users up and running, but it still takes my time. To scale this, it needs to take none of my time yet still bring you all the performance benefits.
Server Pilot to the rescue
A client of mine brought Server Pilot to my attention. What Server Pilot does is make it *easy* to install WordPress onto Digital Ocean. What the rest of this article will show you, is how to do that and then upgrade your server so you get most of the Mercury stack and a really fast server for very little money with a great interface to manage it.
Server Pilot will be free for most of you (they give you 1 user account free, they charge for extra when your business grows), and $5pcm Digital Ocean droplets will suffice for most of you – see the table below for a guide to droplet choice.
I *love* Digital Ocean – the speed of the servers they provide, the interface, the pricing, the speed of creating a new server, the snapshots, the location choices – everything about them is great.
Now with Server Pilot adding PHP 7 support, you can get blazingly fast speeds for next to nothing and you can do it yourself!
How Server Pilot Works
Create a new droplet, then give the IP address and root password to Server Pilot (see guide below for extra security on this) and it will set up and install your WordPress website for you. Choose PHP 7 in the interface, add a free Cloudflare in front and upgrade your database to Percona DB or Maria DB and you will be seriously flying.
Here’s the stack Server Pilot uses:
- Nginx
- Apache
- PHP (5.5, 5.6, 7.0 or 7.1)
- MySQL 5.7 (5.7 is good – better than 5.6 which is way better than 5.5)
You’ll notice Apache in there as well as Nginx. They are using Nginx to process web requests, serve static files etc, then pass through the PHP requests to Apache. This alleviates the majority of the performance problems Apache suffers from due to its architecture and is a nice elegant solution.
They also offer PHP 7 which is 3-5 times faster at processing PHP code. And they give you the latest version of MySQL – 5.7. So it will be far faster than your normal hosting.
All that remains is to add Cloudflare in front and configure THAT to do what fail2ban would otherwise do, and then upgrade your MySQL installation to Percona DB.
Step by Step Guide to Migrating to Server Pilot + Digital Ocean
This guide will take you through, step by step, migrating your existing WordPress site over to Server Pilot with a new temporary domain so you can test out the performance gains.
You can also follow this guide to create a brand new WordPress site – there are steps you can skip if you are not migrating and these are noted throughout the guide.
For the purposes of this guide, I will migrate https://www.superspeedyplugins.com over to https://www.superspeedyplugins.com.
At the end of the guide, I’ll show you how to swap your dev site to live once you’re convinced of your new found performance gains and you’re ready to flip the switch.
1) Create a Digital Ocean Droplet
If you don’t already have a Digital Ocean account, sign up through this affiliate link to get $10 credit (2 months free!)
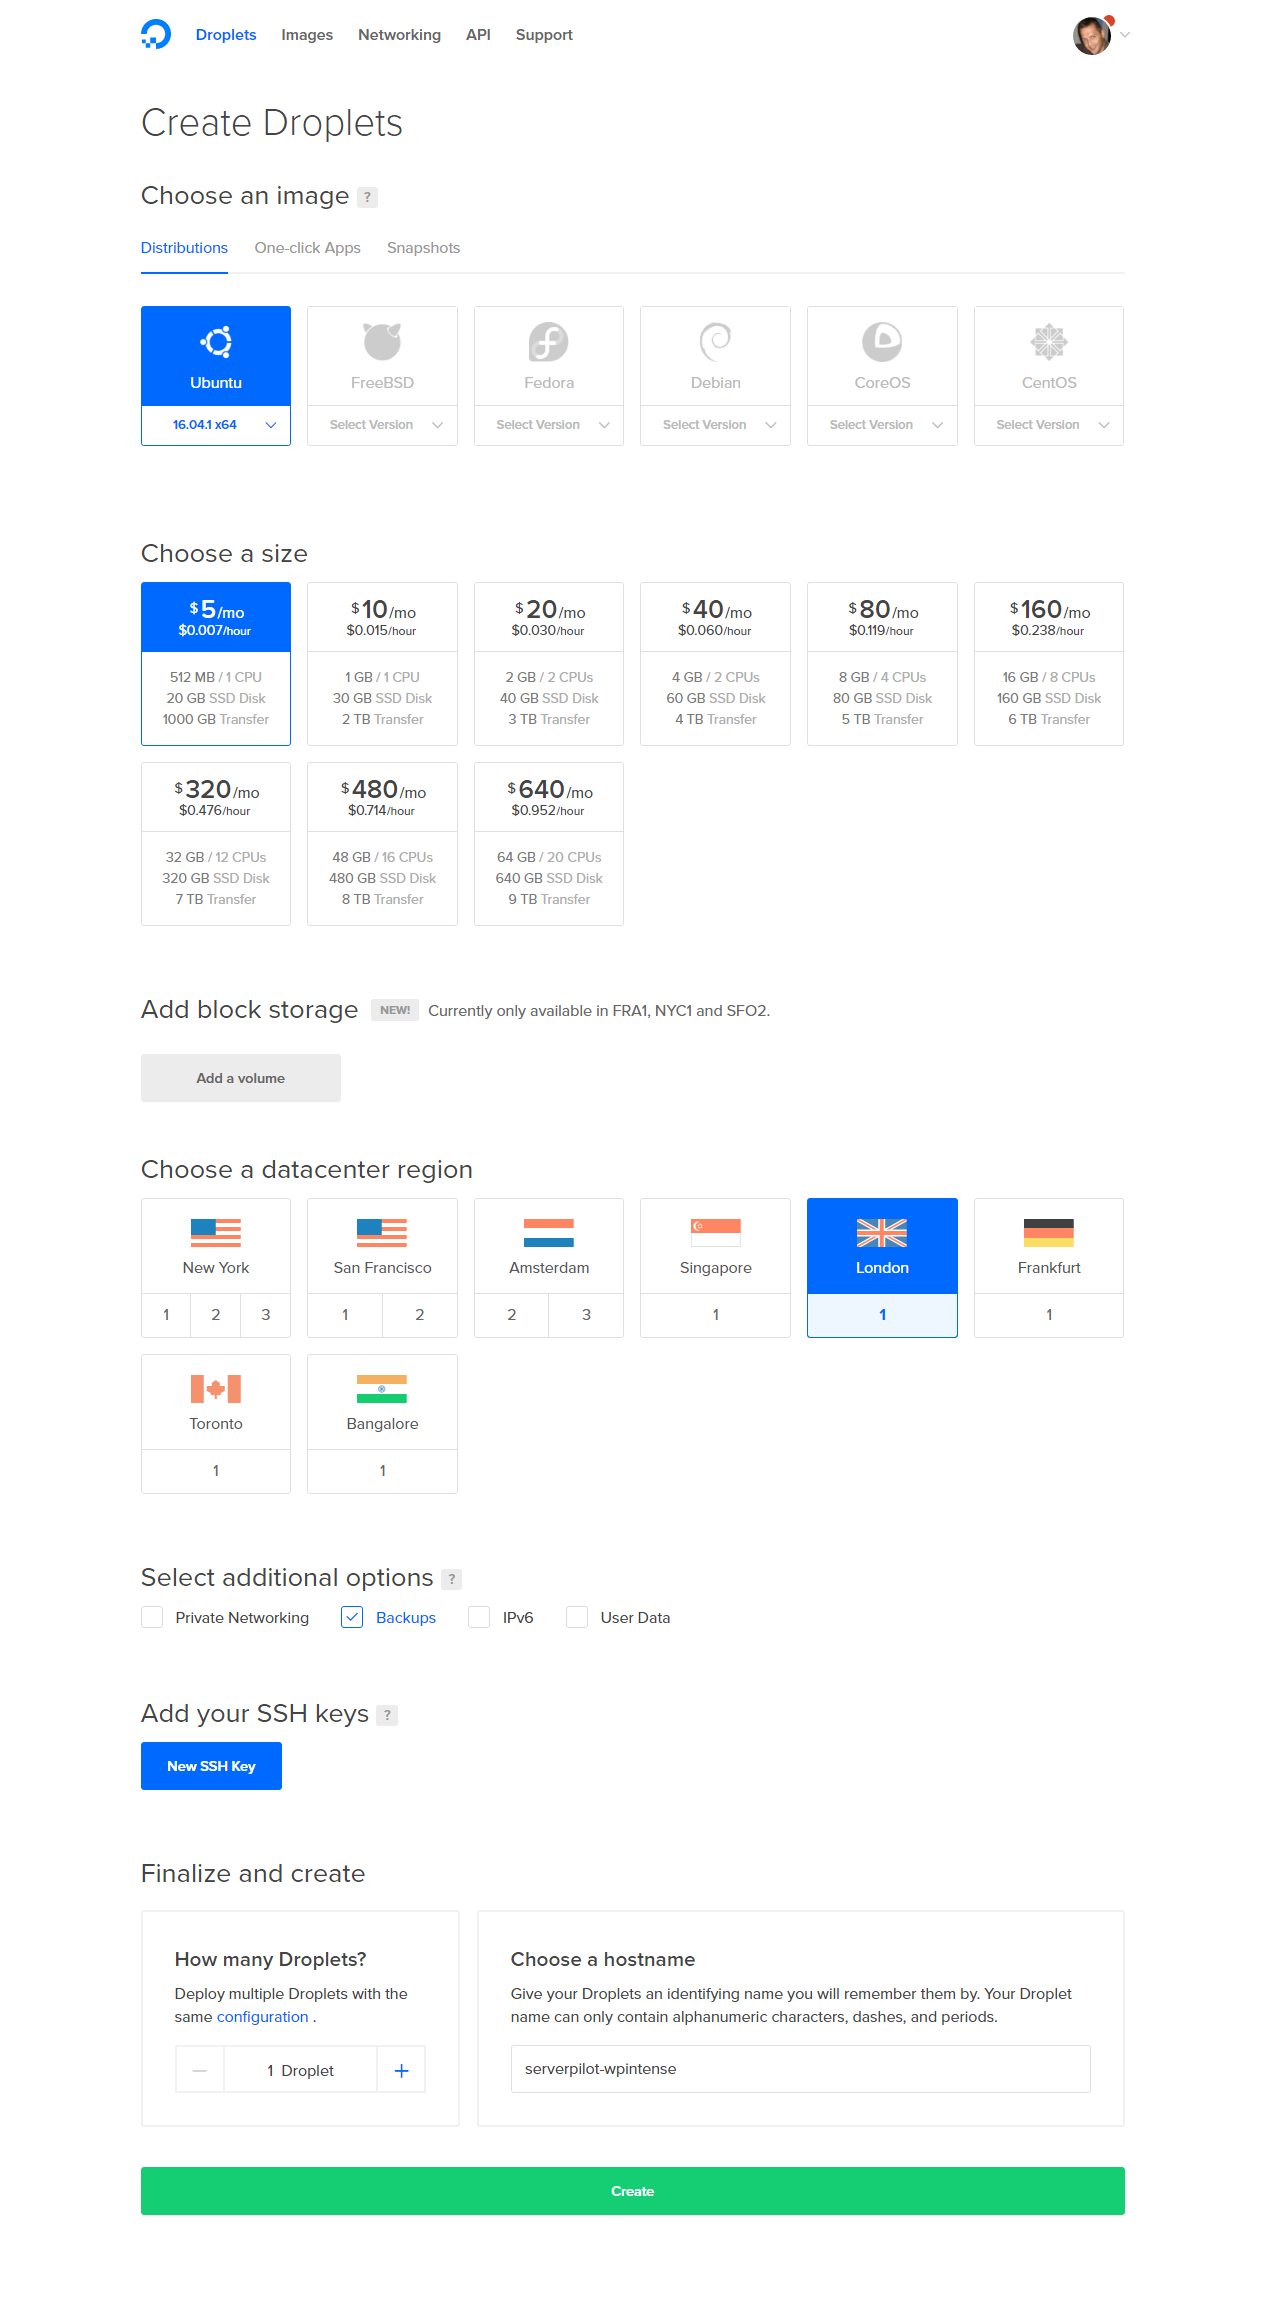
Click the button to create a droplet and then:
Choose Ubunutu 16.04 – this gets you the latest of everything
The size you choose depends on database size, traffic volume and import activity. Here are some rough examples based just on database size and import activity (Datafeedr or WP All Import). Choose larger if you have high user traffic.
- $5pcm droplet – can handle 20,000 products/posts
- $10pcm droplet – can handle 100,000 products/posts
- $20pcm droplet – can handle 500,000 products/posts
- $40pcm droplet – can handle 2 million products/posts
- $80pcm droplet – you get the idea.
At any point, you can click a button to have your droplet upgraded within a few minutes. So start out with the smallest you need and you will be very surprised at the performance results you get.
Choose whichever location you wish – the closer to your customers the better.
Choose backups if you wish, although you can use UpdraftPlus if you like with off-site backups.
Choose a name – e.g. serverpilot-wpintense is what I called mine.
Don’t bother with the SSH keys since Server Pilot uses username + password.
Click Create. You will be emailed the root password.
2) Create a secure root password
Digital Ocean will have emailed your root password to you. Your server’s root password gives 100% total access to your server to do whatever you like with it. You don’t want it falling into the wrong hands.
You can skip this step if you don’t mind sleepless nights, but if like me you worry about the fact your email gets *everywhere* – onto every device you own, your PC, your laptops, your tablets, your phones – then you’ll realise your server is not secure until you create your own root password that doesn’t exist in your email history.
Here’s how:
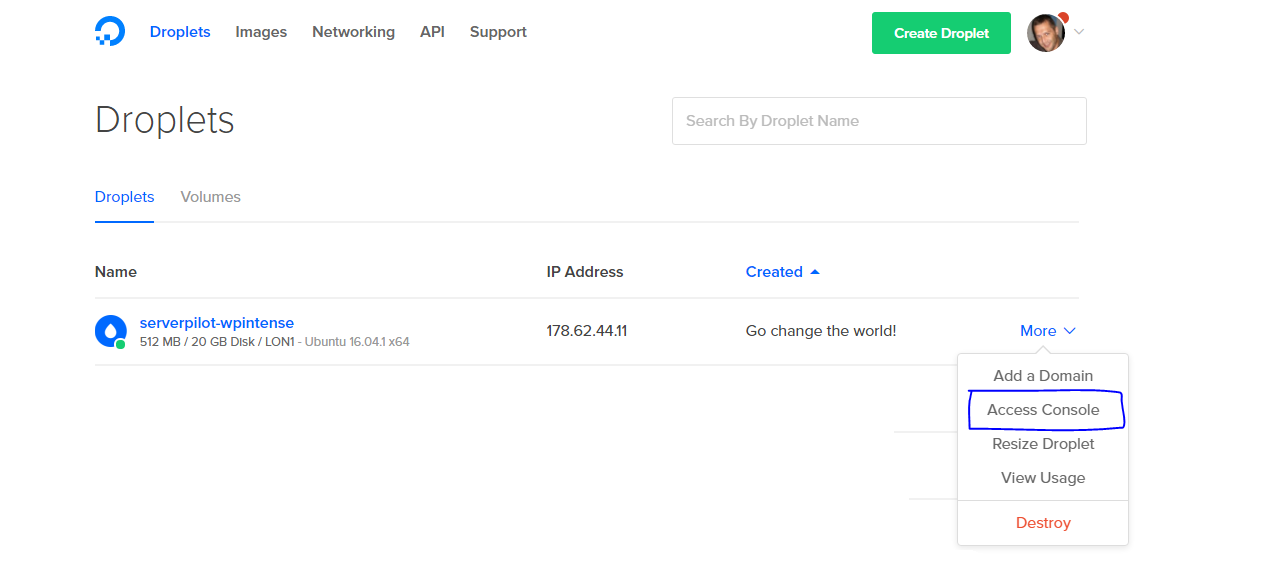
- On the page after your droplet has been created, click the More button then Access Console.
- Now enter the username: root then the password that was emailed to by Digital Ocean. You will have to type it twice.
- Then it will ask you for your new root password. You will have to type this twice.
Note: Nothing appears on the screen as you’re typing the password – no stars, nothing – and you can’t copy/paste using the Digital Ocean console. Advanced users can connect using Putty instead and that way you can right click the Putty screen to paste your old and new passwords.
3) Connect Server Pilot to your server
If you don’t yet have a Server Pilot account, create one through my affiliate link here: https://www.serverpilot.io/?refcode=dd41ab931d8a – it will get you $10 credit. You probably won’t need to ever use this however, since most of you will just need the free plan.
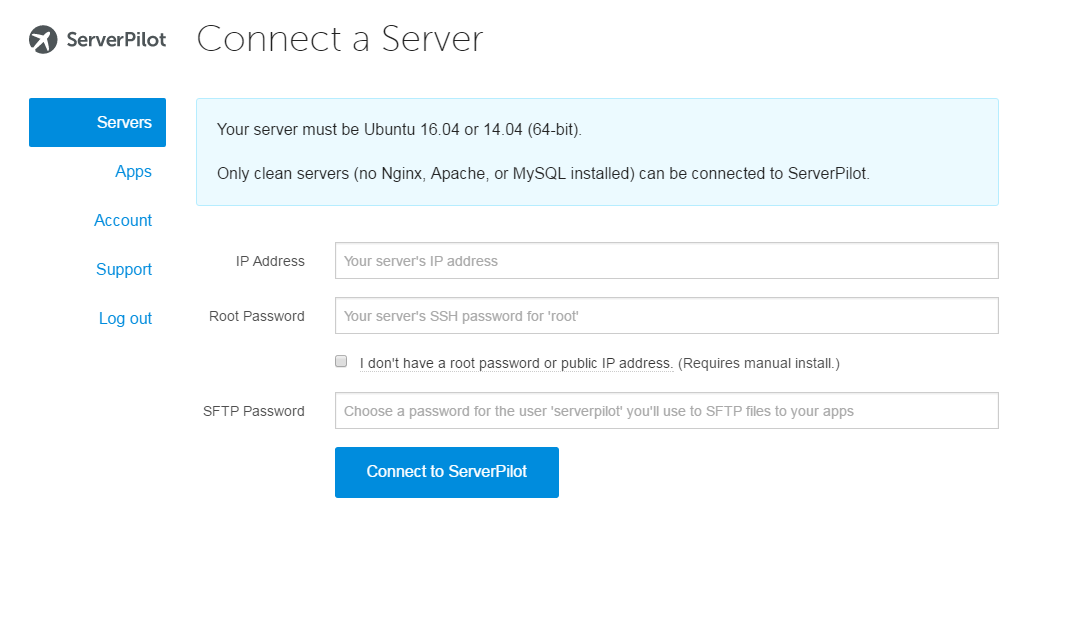
Once you are logged in, click the big massive Connect Server button in the top right.

You will have 3 fields to complete:
- IP Address – copy/paste the IP address from the email sent to you by Digital Ocean
- Root password – enter the root password you configured in the previous step, or the original Digital Ocean provided root password if you are living dangerously and skipped Step 2
- SFTP password – enter another new password here. When/if you use Filezilla to connect to your server to view/edit your files, you will use this password.
4) Configure your DNS
We are going to make a temporary website – a development website – somewhere you can see the performance of your new server in action before you flip the switch to make it live.
So – visit your DNS provider (the place you bought your website URL) and add a new A Record to your domain. I will show you how to configure Cloudflare later in this guide, but to get you set up quickly, add the A record on your existing DNS provider.
The A record will have two values – the name and the IP address. The name is the subdomain you are going to use, so in this example ‘dev’ and the IP address you can copy/paste from your digital ocean email. So in my example, creating an A record for dev means www.superspeedyplugins.com requests will go to this new server’s IP address.
If you are creating a *new* server instead of migrating, just edit your existing A records (there should be 2 of them) and change the IP addresses to those of your new server.

5) Create your WordPress installation using Server Pilot
By the time you have configured your DNS, Server Pilot will have finished building your server. Head on back to that page and you will see this:
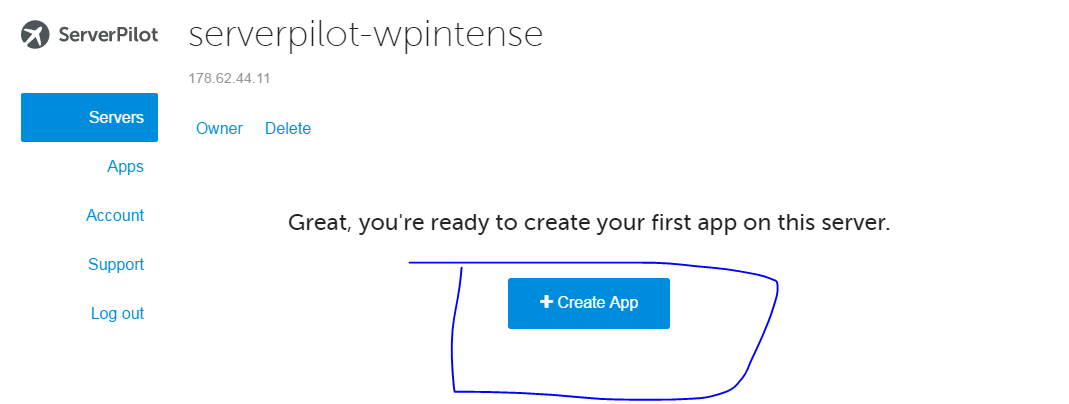
Click that big Create App button then you’ll get a form to complete:
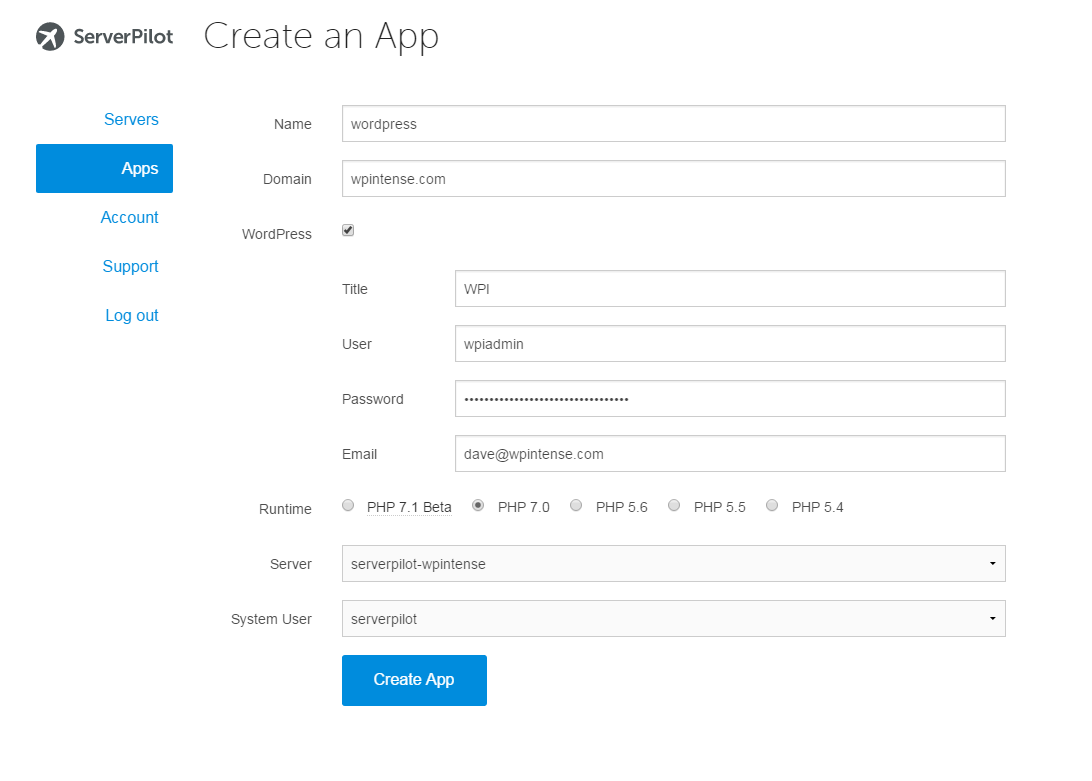
- Name – it’s for display in Server Pilot, so I use wordpress
- Domain – enter your domain as if your server were live, even if migrating. e.g. don’t enter www.superspeedyplugins.com, enter www.superspeedyplugins.com. This is so SSL certificates are created properly for your new server. We will add the dev domain as an additional step in a minute.
- Tick the WordPress box
- Enter a title – if you’re migrating from another hosting company then this doesn’t matter much as we’ll be overwriting the database with your backup from live
- User & password – enter a WordPress username and password – if you’re migrating from another host, these will be overwritten when you restore from your backup but to keep the Server Pilot interface working with your migrated site enter your current WP admin username and password.
- Choose PHP 7.0
- The remaining fields will be autoselected so click Create App
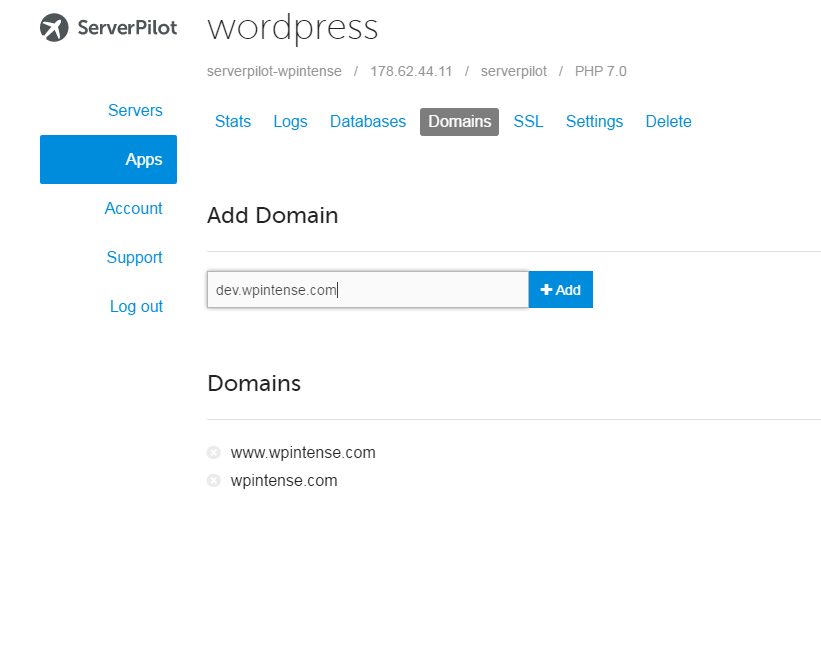
6) Add your dev domain
If you are migrating, add your temporary dev domain so you can copy from live to dev and test before you flip the switch.
Click the Domains tab and enter your dev domain, e.g. www.superspeedyplugins.com and click Add
Here’s a note for how to connect to your new site using FileZilla to access your files
- Download, install and open Filezilla
- Click File menu -> Site Manager
- Click New Site and type in a name, e.g. Super Speedy Plugins Server Pilot
- In the host box, enter the IP address for your new server
- Choose SFTP in the protocol dropdown box
- Choose logon type Normal
- Enter username: serverpilot
- Paste or type the SFTP password you configured earlier
- Click Connect
- Click OK to say you trust this host
- You will be in the /srv/users/ folder – navigate to /srv/users/serverpilot/apps/wordpress/public (if you named your app wordpress earlier) – this is where all your site’s files exist and is the root of your domain
Migrating your site to the new server
You can log into your new server now. If you’re not migrating, you can skip the next steps.
I’ve outlined a three options below – many folks like the Duplicator plugin but I find it breaks like every time I use it, but then my databases are large. If you have a smaller database, the Duplicator plugin may be easier for you to use. I tried it for transferring www.superspeedyplugins.com to www.superspeedyplugins.com but it broke again. I prefer Updraft plus because it just works every time. For larger sites, I use SSH.
Option 1) Migrating your site using UpdraftPlus
Create a backup of your live site
- Log into your live site
- Install UpdraftPlus
- Create a backup
- Download the backup files
Restore to your live site
- Log into your new dev site
- Install Updraft plus
- On the Existing Backups tab for Updraft Plus, click the link to Upload backup files and choose your backup files
- Refresh the page once it’s completed uploading
- Click to restore and tick everything to restore
- Because you have a different domain in use, it will warn you it’s a migration, not a restoration – just skip that – we will search/replace manually below to complete the migration
Option 2) Migrate with direct transfer of files to your new site using SSH
Your database files might be very large. Better to transfer them directly rather than down through your broadband and back up through your broadband. Here’s how:
Create a backup of your live site
- Log into your live site
- Install UpdraftPlus
- Create a backup
Transfer files directly
- SSH onto your new site (use putty to connect using your serverpilot username)
- Navigate to your updraft folder (e.g. cd /srv/users/serverpilot/apps/cartgrabber-wordpress/public/wp-content/updraft)
- Run: SFTP oldipaddress
- Confirm yes you trust it
- Navigate to the updraft folder – e.g. cd /var/www/html/yourdomain.com/wp-content/updraft. You can use following commands to help you figure out where you are: ls, cd
- Run: get backup*
The files will transfer directly – far more quickly than down to your computer then back up to your new server.
Restore to your live site
- Log into your new dev site
- Install Updraft plus
- On the Existing Backups tab click ‘rescan folder’ – this will find the backups you manually copied over
- Click to restore and tick everything to restore
- Because you have a different domain in use, it will warn you it’s a migration, not a restoration – just skip that – we will search/replace manually below to complete the migration
Option 3) For ultra-manual migration approach if UpdraftPlus ever doesn’t work, you can do:
- SSH to your old site, navigate to the webroot folder
- Run: zip -r backup.zip wp-content
- Run: mysqldump -u username -p dbname > backup.sql (then hit enter and then enter password)
- SSH to your new site
- SFTP oldipaddress
- Navigate to webroot
- Run: get backup*
- Extract these zip files to somewhere then copy the wp-content/* to your new wp-content folder
- Then replace the DB using: mysql -u username -p dbname < backup.sql
Note: The above approach presumes everything custom in your site is in wp-content. If it’s in /assets/ or somewhere instead, you’ll also need to copy those files over.
Search/Replace in your database to change all www.superspeedyplugins.com references to www.superspeedyplugins.com
Now that your site is copied across, you need to replace everything in the database referring to the old domain name so we can test the new website first, before putting it live.
This is the only tricky part about using Updraft Plus and in fact if this is too tricky for you, you can go UpdraftPlus premium and it includes this functionality in the plugin.
- Download the Interconnectit search/replace script from here: https://interconnectit.com/products/search-and-replace-for-wordpress-databases/
- Extract the files, upload the folder to your /srv/users/serverpilot/apps/wordpress/public folder using Filezilla (see details for how to connect in Duplicator steps)
- Visit your sitedomain.com/searchfolder – e.g. https://www.superspeedyplugins.com/searchreplace
- It will automatically pick up database credentials
- Enter www.yourdomain.com in the search box and dev.yourdomain.com in the replace box
- Hit Live run and wait
Now you can log into your dev site and see an exact replica of your live site, except it’s much faster.
How to make your site live
Once you are happy that the performance of your new hosts outperforms your old hosts, you can flip the switch. Here’s how to do it with zero downtime:
- Run the search replace script again by opening http://www.yourdomain.com/searchreplace
- Enter dev.yourdomain.com in the search box, www.yourdomain.com in the replace box
- Hit live run and wait
- Visit your DNS and edit the A records for www.yourdomain.com and yourdomain.com to point to your new IP address
- Once you have completed this final search replace and confirmed you are live, you should delete the searchreplace folder interconnectit script as it’s a major security hole leaving it there.
That’s it – you’re live!
I’ve got to catch a flight, but I will add the extra stuff to this page including:
- Configuring cloudflare
- Configuring real cron
- Upgrading to PerconaDB
- Additional performance steps you can take to optimise what server pilot give you out the box
But even without these extra steps, you’ll find that PHP 7, Ubuntu 16.04 and MySQL 5.7 give you major speed boosts compared to other hosts. You’ll get an extra 80ish% once you upgrade to Percona DB too for your database queries, and I’ll cover that ASAP right here in this guide.


So, if you can only follow blindly (in the age of google,stackexchange,etc) then you may be on the wrong path here… but, if you can do a bit of research and want to practice your critical thinking, well, then pls proceed 😉
re CloudFlare: google it, there are a ton of guides for CF
re real cron: read some other articles at this site about this relatively simple tweak, google it. (also, for devs, esp if multisite: https://github.com/humanmade/Cavalcade )
re PerconaDB: take a look, adapt for percona, try it 🙂
https://serverpilot.io/community/articles/connect-to-mysql-remotely.html
https://serverpilot.io/community/articles/how-to-use-a-dedicated-mysql-server.html
https://vioxdigital.com/upgrade-mysql-mariadb-10-1-serverpilot-and-ubuntu-14-04/
Cheers, Max
Yeap, I agree with the rest, this article definitely deserves an applause but also has to be finished. It’s been what a year now? – still no updates about cloudflare + persona DB. I did however find this article here:
https://www.superspeedyplugins.com/2017/06/12/installing-and-configuring-fastest-possible-wordpress-stack-digital-ocean/
I’m not a developer, I’m only able to blindly follow instructions that’s all. If you could add couple of lines here regarding Persona DB would be awesome. But still, Thanks for the article!!
RunCloud.io may also be of interest for a LEMP stack, and if everyone asks them to add PerconaDB as an option that could complete the picture.
Obviously not backed by a giant like ServerPilot – but in my testing it worked fine with Linode.com VPS and OHV.com Bare Metal if you really need that raw power too.
* https://runcloud.io
* https://www.digitalocean.com/community/tutorials/how-to-install-a-fresh-percona-server-or-replace-mysql
Redis is easy enough to install on DO. You just need your root password that was setup on DO to do so.
https://serverpilot.io/community/articles/how-to-install-redis.html
https://serverpilot.io/community/articles/how-to-install-the-php-redis-extension.html
https://serverpilot.io/community/articles/how-to-use-redis-with-wordpress.html
ServerPilot is pretty fast but the stack still has Apache in it, with NGNIX out front, rather than going with a LEMP stack.
https://serverpilot.io/community/articles/how-to-create-a-lemp-stack-only-nginx-no-apache.html
Are these being updated?
I’ve got to catch a flight, but I will add the extra stuff to this page including:
Configuring cloudflare
Configuring real cron
Upgrading to PerconaDB
Additional performance steps you can take to optimise what server pilot give you out the box
I don’t have time to update this article right now, but you can find the relevant info here https://www.superspeedyplugins.com/2017/06/12/installing-and-configuring-fastest-possible-wordpress-stack-digital-ocean/
Hi Dave,
I am going to migrate very soon. Can you update this post so that it uses maria, redis and hhvm ? Vultr might even be better for the RAM it has. Could be used for redis.
Check out my latest guide, it has the info you need although there’s no need for HHVM anymore with PHP 7. https://www.superspeedyplugins.com/2017/06/12/installing-and-configuring-fastest-possible-wordpress-stack-digital-ocean/
I recommend Redis for object caching, although I still think you should stick to disk-based caching for page caching, although better is having Varnish serving up the recently caches pages too as per the guide I linked.
I am Looking for some expert to serve and Configure Fastest VULTR or CLOUDFLARE VPS but i didnt find any one.. As above guide was awesome but as i am non technical i dont know such commands … please contact if some one know @ [email protected]
Find these guys are in India also, easyengine.io. Contact Virtubox https://easyengine.io/easyexperts/virtubox
I ‘ve set up a fast vps with their stack. If you neet any help you can ask me also.
gk
I can’t personally vouch for easyengine but I’ve heard others saying good things
Hey Dave waiting for this update. I read it back in August and I tried it out. Performance gains were good but I’ve been waiting for the “Full guide” before I pull the trigger on this. I ran into this article again now in Dec and see it’s not been updated yet. Hoping you find the time to update this guide as I’d like to see how much better things can get!
Hi – I’ve got an update to this in the works. I’m actually working on something that will make this all much simpler too – it will let you create a snapshot really quickly and then to configure you just enter your domain name and it’ll be done (also point your A record).
When that comes out, this article will get updated at the same time.
I came across your website some time ago and having been following this article with much interest. Like Ariel I’m awaiting an update, so can you give any ETA when the article will get an update?
Hey guys, hope you’re enjoying Dave’s awesome tutorial. In case you’re interested in more guides such as this one, have a look at this link:
https://www.superspeedyplugins.com/category/how-to-guides/
Hi Dave,
Thanks very much for the step by step tutorial. I have got everything going and set up a test site. Everything looks great and the site loads very quickly. I am getting ready to now move my biggest site.
I look forward to reading the next few guides you mentioned at the end. Thank you.
Any update on this?
I will update soon – I’ve got a couple of very nice things coming in this area to make things far quicker and easier for everyone. One is a pre-built snapshot you can use to build a high-performance droplet, the other is an automatic migration tool to copy your current live site over to a digital ocean high performance config (various options, percona, maria, php7, hhvm etc) so you can test out performance with different setups prior to migration. i.e. the copy will move everything over to dev.yourdomain.com and then will automatically measure the page-speed of various pages to show you the speed boost you’re getting. Cool right?
When are you going to update this guide with these extra steps? It would be very helpful. I hope you will find some time.
Hopefully soon – working very hard trying to get Price Comparison Pro v3 live!
Hi Dave,
Thanks for this great tutorial!
I managed to setup a DO droplet and migrate one of my wordpress site to Digital Ocean with Server Pilot. Also I managed to upgrade succesfully to the Percona DB. Only thing left is configuring Cloudflare and real cron.
However I like Server Pilot’s services, I was wondering: Do you think it’s possible to get the same stack setup without server Pilot the following way? Would that be the exact same stack? The way I am talking about is this one:
1. Create DO account
2. Choose WordPress on 16.04 One-Click App instead of Ubuntu 16.04 on droplet creation
3. Install NGinx manually using this tutorial: https://www.digitalocean.com/community/tutorials/how-to-install-nginx-on-ubuntu-16-04
4. Upgrade to PerconaDB using this tutorial: https://www.digitalocean.com/community/tutorials/how-to-install-a-fresh-percona-server-or-replace-mysql
Really curious what you think of this method and if the result would be the same. Thanks for your reply in advance and keep up the good work!
Yes – it’s possible – I wrote the ServerPilot article to show people how to do it really easily, but personally I prefer to build them manually.
You can see my full guide for building an awesome stack here manually – https://www.superspeedyplugins.com/2015/02/04/diy-mercury-installation-super-fast-wordpress-performance/
Also, I got one other question:
In the domain’s DNS I added a dev.domain.com A record to redirect to the DO droplet’s IP. That works all fine.
After restoring backups on the DO wordpress install using UpdraftPlus, the subdomain’s site (dev.domain.com) works immediately: I can login and everything works fine. Also the new subdomain (dev.domain.com) is set as the wordpress address (main url) etc. So it seems the domain has been changed to the subdomain automatically already. Is that possible? Does this mean replacing the http://www.domain.com with dev.domain.com using InterConnectit’s tool isn’t necessary anymore?
Thanks again for your reply already!
This domain thing DOES happen automatically when using ServerPilot – they have a wildcard to catch the current domain so you don’t need to search/replace
Will you reintroduce memcached into your WPI Stack when memcached is fully PHP7 compatible?
Yes – there are some various attempts at solutions, some of which I’ve tried, none which have worked for me yet. But yes – memcached helps W3 total cache a lot
Hi Dave, thanks for this awesome post!
I found a plugin for checking PHP 7 compatibility on your WordPress site:
https://wordpress.org/plugins/php-compatibility-checker/
Quote from plugin developer: “In most cases, PHP 5.6 code should be able to run on PHP 7 with no issue. Assuming a plugin or theme has correctly hooked into WordPress, backwards compatibility will not be an issue.”
Thanks for this – very useful – I wrote a little bit about the main plugins that were incompatible at the time with solutions to fix compatibility – they’re fairly straightforward fixed – http://www.affiliatewebdesigners.com/2016/01/26/upgrading-to-php7-with-wordpress/