

This article presumes you have a fresh Ubuntu 16.04 server and you can log into it. I recommend using SSH keys if you can, but that doesn’t affect this article.
Table of Contents
Install PerconaDB
Run the following commands to install PerconaDB:
wget https://repo.percona.com/apt/percona-release_0.1-4.<span class="k">$(</span>lsb_release -sc<span class="k">)</span>_all.deb
dpkg -i percona-release_0.1-4.$(lsb_release -sc)_all.deb
apt-get update
apt-get upgrade
apt-get install percona-server-server-5.7 -q -y
Note: The Percona installation will ask you for a root password. This is the root password for your database and nothing to do with the root password for your server. If you wish, leave the password blank and it will still be secure because remote logins will be disabled.
Install Nginx and PHP 7
Run the following to install Nginx and PHP 7:
apt-get install nginx -y
apt-get install php -y
apt-get install -y tmux curl wget nginx php7.0-fpm php7.0-cli php7.0-curl php7.0-gd php7.0-intl
apt-get install -y php7.0-mysql php-memcached php7.0-mbstring php7.0-zip php7.0-xml
# now we need to temporarily set up nginx to work over HTTP so we can install WordPress and create SSL certificates
git clone https://github.com/dhilditch/wordpress-rocket-stack /root/wordpress-rocket-stack/
cp /root/wordpress-rocket-stack/etc/nginx/* -R /etc/nginx/
rm /etc/nginx/sites-enabled/default.conf
ln -s /etc/nginx/sites-available/install.wordpress.rocketstack.conf /etc/nginx/sites-enabled/
wget https://wordpress.org/latest.zip -P /var/www/
apt-get install unzip
unzip /var/www/latest.zip -d /var/www/
mv /var/www/wordpress /var/www/rocketstack
chown www-data:www-data /var/www/rocketstack -R
rm /var/www/latest.zip</pre>
<pre>#if we are on a single CPU host, run the following
mkdir /etc/systemd/system/nginx.service.d
printf "[Service]nExecStartPost=/bin/sleep 0.1n" > /etc/systemd/system/nginx.service.d/override.conf
systemctl daemon-reload
service nginx restart
Ok – so now point your domain name at the IP address of your server, and when you visit you should see the WordPress installation screen.
We need a database, and we also would like SSL for *after* WordPress installation – unfortunately, installing WordPress using SSL is buggy, but it’s easy to switch AFTER installation.
Connect to mysql using:
mysql
Or if you entered a password for root, you’ll need to connect using this:
mysql -u root -P
Then run the following SQL:
create database rocketstack;
grant all privileges on rocketstack.* to rs@localhost identified by 'CHOOSEASTRONGPASSWORD';
Visit your domain URL through a browser and you’ll see the WordPress installation screen. Choose your language, then the 2nd screen will ask you for the database name, database user name, and database password – use the strong password you used in the last line.

Once you have entered those details, continue through to finish your WordPress installation. Once done, we will install SSL and the rest of the components.
Install SSL using Letsencrypt
Letsencrypt gives you free SSL certificates and I’ve simplified the scripting of this for you.
git clone https://github.com/letsencrypt/letsencrypt /opt/letsencrypt
mkdir /var/www/acme/
chown www-data:www-data /var/www/acme
Edit /etc/nginx/snippets/acme-challenge.conf and replace yourdomain.com with your actual domain – this is on one line, and that line looks like this:
return 307 $scheme://acme.yourdomain.com$request_uri?redirect=yes;
So, if for example you have the domain www.superspeedyplugins.com, it would become:
return 307 $scheme://acme.www.superspeedyplugins.com$request_uri?redirect=yes;
service nginx restart
/opt/letsencrypt/letsencrypt-auto certonly -a webroot --webroot-path=/var/www/acme/ -d yourdomain.com -d www.yourdomain.com --agree-tos
crontab -e
0 5 1 * * /opt/letsencrypt/letsencrypt-auto certonly -a webroot --webroot-path=/var/www/acme/ -d yourdomain.com -d www.yourdomain.com --renew-by-default
Now, we want to disable the temporary nginx conf file used and replace them with the production settings.
Edit the file /etc/nginx/sites-available/varnish.rocketstack.conf and replace the 2 SSL lines with the correct location of your newly generated SSL files – this involves simply replacing yourdomain.com on these 2 lines:
ssl_certificate /etc/letsencrypt/live/yourdomain.com/fullchain.pem;
ssl_certificate_key /etc/letsencrypt/live/yourdomain.com/privkey.pem;
Once you have edited that file, we will remove the temporary nginx config and enable production config.
ln -s /etc/nginx/sites-available/wordpress.rocketstack.conf /etc/nginx/sites-enabled/
ln -s /etc/nginx/sites-available/varnish.rocketstack.conf /etc/nginx/sites-enabled/
rm /etc/nginx/sites-enabled/install.wordpress.rocketstack.conf
service nginx restart
Install and configure Varnish
apt-get install varnish
cp /root/wordpress-rocket-stack/etc/varnish/default.vcl /etc/varnish/default.vcl
service varnish restart
Installing Redis
apt-get install redis-server
apt-get install php-redis
maxmemory 128mb
maxmemory-policy allkeys-lru
service redis-server restart
service php7.0-fpm restart
Optimising PerconaDB Config
[mysqld]
key_buffer = 512M
max_allowed_packet = 512M
thread_stack = 192K
thread_cache_size = 8
query_cache_limit = 512M
query_cache_size = 4192M #(or 0 can improve performance, it depends)
innodb_buffer_pool_size = 20000M #(according to your memory - as a guide, use 60% of your memory here)
innodb_buffer_pool_instances = 16 #(according to how many cores you have)
innodb_io_capacity = 5000 #(because Digital Ocean use fast SSDs so we don't want InnoDB to be limited)
[mysqld]
key_buffer = 51M
max_allowed_packet = 51M
thread_stack = 19K
thread_cache_size = 8
query_cache_limit = 51M
query_cache_size = 419M
innodb_buffer_pool_size = 2000M
innodb_buffer_pool_instances = 16
innodb_io_capacity = 5000
Installing and configuring fail2ban
sudo apt-get install fail2ban
cp /etc/fail2ban/jail.conf /etc/fail2ban/jail.local
Create /etc/fail2ban/filter.d/wordpress.conf and add the following lines:
[Definition]
failregex = ^.*POST.*(wp-login.php|xmlrpc.php).* (403|499)
Then edit /etc/fail2ban/jail.conf:
Change bantime at top to 86400 (1 day instead of 10 minutes)

Find [nginx-http-auth] and add below it:
enabled=true
So, it should look something like this:
[nginx-http-auth]

enabled = true
filter = nginx-http-auth
port = http,https
logpath = /var/log/nginx/error.log
Add the following after the nginx section in the jail.conf:
[wordpress]
enabled = true
port = http,https
filter = wordpress
logpath = /var/log/nginx/*access.log
maxretry = 10
Then restart fail2ban with:
service fail2ban restart
Installing and configuring W3 Total Cache
I’ve tried all of the caching plugins, but the free version of W3 Total Cache is the best – just be sure to avoid using it to compress files (we already compress through Nginx) and don’t use their minification (if you want minification, use Cloudflare instead).
Here are the settings I tend to use:
Page caching: Disk Enhanced
Object caching: Redis
Browser Caching: Yes, then modify browser caching settings to enable adding the expires header and all other headers, but untick ‘compress’ files.
Reverse proxy: Tick the checkbox and enter 127.0.0.1 in the textarea so your local varnish cache can be purged.
Cloudflare Configuration
The above configuration files include configuration to pass through the correct IP addresses from your visitors, even when using Cloudflare, meaning fail2ban will work properly, but there are still some Cloudflare settings to edit:
Caching -> Browser expiration -> change to 1 year
Caching -> Caching Level -> change to No Query String
Speed -> Autominify -> tick JS and CSS
Speed -> Rocket Loader -> change to automatic
Crypto -> SSL -> Change to FULL
Results with GTMetrix
The GTMetrix score, like all the page-speed analysers (Pingdom etc) doesn’t actually take server-response-speed into account in their score. That might sound odd, and it is.
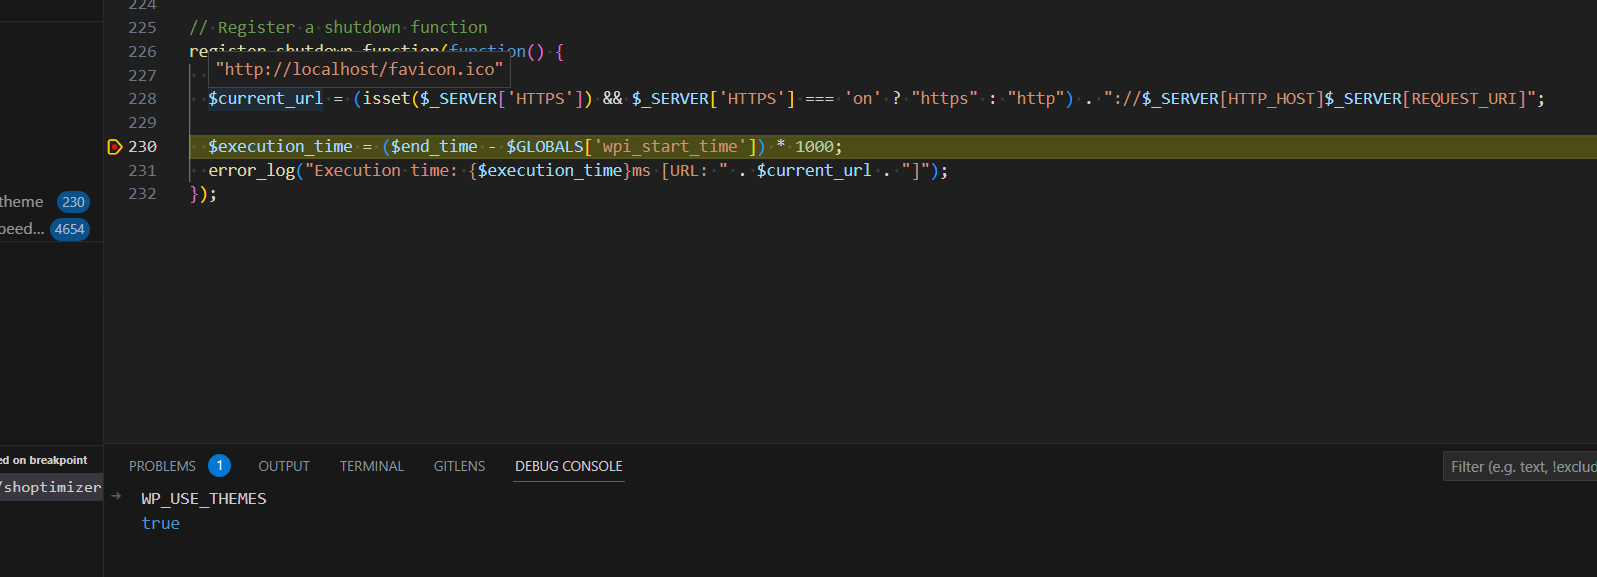
The speed that matters the MOST for your website being able to scale is the TTFB – time to first byte. It’s important that uncached this stays below 500ms. You can install the Query Monitor plugin and you’ll see the uncached TTFB along your admin bar.
Running GTMetrix over a site I installed the above stack onto, I get the following results:

Note: you have to click the ‘Waterfall’ tab to view the TTFB speed:

That’s it.


Hi, i have restart php-fpm, but the problem also raises.
Check out our later stack build: https://www.superspeedyplugins.com/2018/10/20/installing-the-fastest-wordpress-stack-ubuntu-18-mysql-8/
Hi, i have install a wordpress according your this guide, but found a problem. I can’t upload large files to media library, i shows HTTP error. I have modified settings in php.ini or wp-config.php. Have you been experienced similar problem? Thank you!
After you modify php.ini, you’ll need to restart php with: service php-fpm restart
When new update guide coming out ?
It’s out now – https://www.superspeedyplugins.com/2018/10/20/installing-the-fastest-wordpress-stack-ubuntu-18-mysql-8/
Awesome guide. Was just curious about when you might be releasing the update guide for Ubuntu 18.04. Thanks for the great guides and tutorials
I have released it – check it here: https://www.superspeedyplugins.com/2018/10/20/installing-the-fastest-wordpress-stack-ubuntu-18-mysql-8/
Hey Dave
Any eta on the new guide? Really like your work and looking forward to trying the new setup.
It has been released – benchmarks coming soon too – https://www.superspeedyplugins.com/2018/10/20/installing-the-fastest-wordpress-stack-ubuntu-18-mysql-8/
Can’t wait to read the new guide. Using some of your plugins. Great work
New guide it out – check it out – https://www.superspeedyplugins.com/2018/10/20/installing-the-fastest-wordpress-stack-ubuntu-18-mysql-8/
Hey David,
That’s super good to hear a new guide is coming out soon for 2018!
Looking forward to the new updated guide and thanks for sharing your knowledge with all of us.
Cheers,
Dylan
New guide for Ubuntu 18 is live – https://www.superspeedyplugins.com/2018/10/20/installing-the-fastest-wordpress-stack-ubuntu-18-mysql-8/
Hello David,
Thanks for sharing you set up! It is fast!
But a year has passed and allot of updates have come out. So what is your fastest server stack for WordPress today?
I’m going to install a new set up on Linux 18.04: Nginx, MariaDB, PHP 7.2, FastCGI, fail2ban, Cloudflare, SSL (Letsencrypt), WordPress, NGINX Cache plugin.
Would you change or add anything? For example redis? Or does FastCGI fully replaces redis, varnish and w3 TC?
Best regards,
Paul
Hi – there’s a new guide coming out soon for Ubuntu 18 + the latest MySQL – still running perf comparisons of MySQL versus PerconaDB etc, but it should be out before the end of September
Hi David,
ETA on Ubuntu 18 this guide? Counting down days 🙏
Thanks
Hi – it’s out – sorry about the delay – https://www.superspeedyplugins.com/2018/10/20/installing-the-fastest-wordpress-stack-ubuntu-18-mysql-8/
Can’t wait till it releases! That would be great.
Thanks,
Tharindu
It’s released – https://www.superspeedyplugins.com/2018/10/20/installing-the-fastest-wordpress-stack-ubuntu-18-mysql-8/
I would like run a separate symfony app on a subdomain. I created a directory in /var/www. Created a conf file in /etc/nginx/sites-available which points to that directory. Created a symlink in /etc/nginx/sites-enabled which points to the conf file. Created an A record for the subdomain which points to the server IP address.
However when I try to add SSL using “/opt/letsencrypt/letsencrypt-auto certonly -a webroot –webroot-path=/var/www/acme/ -d mydomain.com -d http://www.mydomain.com -d mysubdomain.mydomain.com –agree-tos” I get:
Using the webroot path /var/www/acme for all unmatched domains.
Waiting for verification…
Cleaning up challenges
Failed authorization procedure. mysubdomain.mydomain.com (http-01): urn:ietf:params:acme:error:unauthorized :: The client lacks sufficient authorization :: Invalid response from http://mysubdomain.mydomain.com/.well-known/acme-challenge/myguid……
What happens if you only try to create an SSL cert for the subdomain, rather than creating one for the top level domains too?
I have created the stack followed every step and my site was faster than ever. But when I added Cloudflare it gone from 0.6s to 4 sec. Every settings like you have posted here in the post. What should I do?
That is odd. If you hit the little ‘bypass’ arrow to get the arrow to go around the cloud (DNS settings in cloudflare) does this fix the issue temporarily?
Awesome post, thank you for sharing! Will try this out when i will setup my next server
Great article. A lot of your design choices mimic mine. However, there is one setting in W3TC that I configure differently, and that is Page Cache Method. I’ve gone with Disk: Basic, which then allows me the use HTTP/2 Push in Minify. But because you’re using Cloudflare for minification, this is a moot change.
Disk: basic or disk enhanced are good. Another advantage of disk:basic is you can cache pages with query strings (like search results).
I have a new setup coming out soon which avoids the need for W3 total cache entirely and instead uses Nginx fast-cgi cache which is a lot faster.
Hello David,
Great article, impressed by your support provided via comment system.
Question:
Have you any experience with FREE Cloudflare plan affecting SEO (because of ip shared between bad neighbours) ?
regards
Sorry, I’m not aware of any issues with SEO. Have you heard of issues from other sources?
Admirer of your work Dave!
We’re aiming to replicate this and the clustered version with stack templates using https://d2c.io for one-click deployment to any host.
If you’re interested to join and follow or use that, please email me with a GitLab ID to be added to repos.
@Aleks, course tutorial is outdate. You must replace the fastcgi_pass in the github files you have cloned in accordance with the configuration of the php7 fpm pool .conf.
Tested it, the installation works with it.
Hi John, I think I’m having the same problem that you’re addressing in your answer here, though I don’t quite follow how to fix it. I’m getting 502 on an Ajax function (although the rest of the site works fine).
Could you give any more detail on the fastcgi_pass thing you’ve mentioned? I just don’t follow what you mean – ie. could you specify which github files should be changed?
Is the .conf file you’re referring to this one? … /etc/php/7.0/fpm/pool.d/www.conf – if so, what is the config info I need to take from there?
Hi, can we used UFW Firewall with these setup ? UFW Firewall rule ? Which port we opened ?
is this the file to change php version?
/etc/nginx/sites-available/varnish.rocketstack.conf
cause I don’t see anything there
in overall this sucks. 502 Bad Gateway. That’s the result.
Do I need these plugins too?
1. https://wordpress.org/plugins/vcaching/
2. https://wordpress.org/plugins/nginx-helper/
Why this website is saying that varnish is not enabled? Here: http://www.isvarnishworking.com/
Log into your server, run: service –status-all then check if varnish is running. re: those other plugins, you can use them if you wish, but I personally prefer W3 Total Cache.
Why I have 2 different PHP versions? How do I fix it? Image attached: https://pasteboard.co/HmoZc7K.jpg
Console: php -v > php 7.2 but in WordPress it shows 7.0 …. wow
Because of compatibility issues, they made it possible to install multiple PHP versions at the same time. You control which version your website uses by editing your nginx configuration files.
Ok, I’ve managed to install everything by following your tutorial.
I also went ahead and updated php version to 7.2 including first lines in your article; php7.0-fpm php7.0-cli php7.0-curl etc. I just replace them with 7.2. Currently I’m waiting for the Cloudflare DNS to go through, however I still see the same problem I had before > too aggressive caching. I can’t upload a theme. I can’t install plugins. I can see it’s been uploaded, then the % drops and starts again, drops and starts again, then white screen appears > the link has expired… But the site is fast, I confirm.
I think I’m doing something wrong. I tried last time too > when I’ve managed to even install caching plugin. At the end I’ve deleted the droplet. Something strange happened, no matter what I upload or update > it gives “Briefly unavailable” and nothing happens after it. Also when I update plugins > wordpress still shows that they need to updated. I fu*d up caching I think.
Do I need anything before the line like “sudo” or “nano” or something. Cause when I copy paste what you provide. One line works (something happens) – other, nothing happens
wget https://wordpress.org/latest.zip -P /var/www/
apt-get install unzip
unzip /var/www/latest.zip -d /var/www/
mv /var/www/wordpress /var/www/rocketstack > when I type sudo before > it write no such file or directory
chown www-data:www-data /var/www/rocketstack -R
rm /var/www/late
hello, first of all I want to thank you for this great tutorial, thank you very much.
but I had a few problems installing it, the first one appeared every time I tried to follow their commands, and made them perfectly.
Error 1:
root@meusitevps:~# rm /etc/nginx/sites-enabled/default.conf
rm: cannot remove ‘/etc/nginx/sites-enabled/default.conf’: No such file or directory
The second error appeared only the last time I re-done the tutorial.
Error 2:
root@meusitevps:~# apt-get update
Reading package lists… Done
E: Could not get lock /var/lib/apt/lists/lock – open (11: Resource temporarily unavailable)
E: Unable to lock directory /var/lib/apt/lists/
root@meusitevps:~# apt-get upgrade
Reading package lists… Done
Building dependency tree
Reading state information… Done
Calculating upgrade… Done
The following package was automatically installed and is no longer required:
grub-pc-bin
Use ‘apt autoremove’ to remove it.
0 upgraded, 0 newly installed, 0 to remove and 0 not upgraded.
root@meusitevps:~# ^C
root@meusitevps:~# apt autoremove grub-pc-bin
Reading package lists… Done
Building dependency tree
Reading state information… Done
The following packages will be REMOVED:
grub-pc-bin
0 upgraded, 0 newly installed, 1 to remove and 1 not upgraded.
After this operation, 3,006 kB disk space will be freed.
Do you want to continue? [Y/n] y
(Reading database … 54349 files and directories currently installed.)
Removing grub-pc-bin (2.02~beta2-36ubuntu3.17) …
Finally I would like to know until how much accesses this config hangs with a basic server 1ram / 1core because I think the varnish in mine is not working, or maybe I configured Jmeter wrong.
http://www.mediafire.com/view/kk19kun9vce1ko3/Grupo_de_Usu%C3%A1rios1.png
http://www.mediafire.com/view/dg5acf2hjdkip84/Ver_Resultados_em_Tabela2.png
http://www.mediafire.com/view/xsw7a7i72a7a4s7/Ver_Resultados_em_Tabela3.png
how would be the best way to test the server if varnish and other caches are working?
thks for all !!
Hi – before you delete the file, you can check if it’s there first.
For Varnish, see my cluster article, replace Varnish with Nginx FastCGI Cache – it’s the same speed and easier to configure.
I’ll find time some point soon to update this article with info for Nginx FastCGI Cache but check the sidebar and you can see the configuration for it. It’s pretty easy. FYI, you can run: service varnish stop – to eliminate the potential of any issues with varnish if you suspect they are coming from there.
mysql not available
Hi – check if your my.cnf has [mysqld] at the top.
I’m so glad this stack, it is much faster then easy engine. thanks a lot 🙂
I have one problem. I’m use avada theme. After installation this, I can not change any options in avada theme. When I try, I have this message “There was a problem with your action. Please try again or reload the page.”
I deactivated all plugins and I tried again but it does not work. I need your help. Thanks,
Hi – can you check if it’s a varnish config error? It sounds like ajax might be failing.
Try this:
service varnish stop
Let me know if it fixes.
I tried but it doesn’t fix it. also I stopped redis service. it’s same.
By following your tutorial I got the WP site up and running. Thanks. Although I would recommend to add an additional section in your post explaining HOW TO INCREASE PHP LIMITS. Right now I can’t upload anything, wp screams > it’s too big and wide and fuzzy 🙂
I typed like this:
sudo nano /etc/php/7.0/fpm/php.ini
changed and nothing works. I think I’m doing something wrong.
P.S. Still confused about the last part of your article > w3 caching. You said to enable browser cache, but disable compress > what compress? Did you mean gzip compression? Cause I don’t see any other “compress” things in there.
Yes – disable compression through W3 Total Cache as nginx is handling this compression part and does it better and quicker.
re: PHP files, once you have edited the php.ini file you need to restart the PHP service. You can restart it with this command:
Hi, Your guide is awesome.
i’m following your guide to deploy my wp server.
i have some problem, i decide to not use varnish and mix configuration from your nginx varnish conf with wordpress conf. When i turn on ssl on wordpress settings, my site got error redirect (ERR_TOO_MANY_REDIRECTS).
here my last nginx conf: https://github.com/raditzlawliet/example-wp-setup/blob/master/etc/nginx/sites-available/example.conf
Can you give an example configuration to use nginx without varnish setup?
Thanks,
Hi – for your SSL issue, maybe you’re using a Cloudflare proxied SSL? If so, WordPress will not know by default that it is on SSL and will keep redirecting.
As for nginx config using the fastgi cache rather than Varnish, I have a config available on github that I link to from my cluster guide:
https://www.superspeedyplugins.com/2018/01/09/setting-up-a-wordpress-cluster-for-huge-sites/
I’m using your cluster configuration
here my latest nginx conf: https://github.com/raditzlawliet/example-wp-setup/blob/master/etc/nginx/sites-available/example-2.conf
it’s now working, but when i going to wp-admin and login it’s redirect to 404. something i miss to configure or else?
oh i forgot to turn on
rewrite /wp-admin$ $scheme://$host$uri/ permanent;
and relog my wp site, its now working 🙂
btw, can help me review my conf, it’s fine to use conf like that?
If you need bespoke help, you can fill out a quote request here:
https://www.superspeedyplugins.com/request-quote/wpintense/
For the Cloudflare SSL issue, please make sure you read my guide about it here:
https://www.affiliatewebdesigners.com/2015/03/08/add-cloudflare-ssl-to-woocommerce-checkout-page-avoiding-the-redirect-loop/
Yeah, Thanks!
in the end using your conf from cluster article and modify little to fit my conf and this last conf:
https://github.com/raditzlawliet/example-wp-setup/blob/master/etc/nginx/sites-available/example-2.conf
sometime error 404 comes from wp it self, i must logout and login again.
i have plan to using stack cloudflare > nginx > web > php > redis > percona mysql + w3 cache. looks like it’s good enough for my site.
currently integration with cloudflare, still workaround with error ERR_SSL_VERSION_OR_CIPHER_MISMATCH. are you have idea why this error appear?
Cool – you got your SSL redirects fixed then?
What issues are you having with your conf? Did you look at the conf from the cluster article?
Hi,
I’m not using cloudflare (at right moment, maybe after this error done). only using letsencrypt like in your guide. and also my site error loop redirect when i have settings my WP (from dashboard>settings) into https://
from your guide im skip few step from install varnish only.
is it possible to use this steps for centos 7 64bit server.
how to enable php7.2 with auto fallback to php5,if the app wont support php7?
how to enable http/2?
can we failproof cassandra instead of perconadb?
can we use this steps to setup wordpress cluster 4continents interconnected in openshift kubernetes paas?
please give your valuable advise.you r real genius among wordpress community
Hey David,
I’m revisiting this tutorial after almost 6 Months. This was the first tutorial I followed to optimize my own server and making a WordPress install on it.
It would be great if you can update this tutorial with PHP 7.2 and HTTP/2 Support.
See me other answer here where I’ve included a link to upgrade to 7.2 after following this guide.
I have to second this….
You can upgrade to 7.2 really easily. https://askubuntu.com/questions/856793/upgrade-to-the-specific-php-7-1-7-2-from-php-7-0-in-ubuntu-16-04
Hi David, Thank you so much for the write-up. I followed your steps to the “T” but I’m getting errors with the mysql settings. I made sure they are under the [mysql] section, but when i add them and try running mysql, i get “mysql: [ERROR] unknown variable ‘key_buffer=51M'”. If I comment that out, it takes the “max_allowed_packet = 51M” fine, but everything else throws the unknown variable error”
Hi – please check in your my.cnf file – it may be on your setup that it’s placed the server config into a different file. What you are looking for is:
[mysqld]
After this is where you can place your settings.
I had this error when I try to do “mysql -p”
mysql: [ERROR] unknown variable ‘key_buffer=16M’
Ensure the key_buffer values go in the my.cnf (or included file from there) which has [mysqld] and place it after that. This is where settings for the MySQL daemon go.
Nice guide,
I has several sites and want to migrate these to this new one droplet. How can I do that? I tried to duplicate the hosts files, but is not working yet!
Regards,
Danilo.
Hi – it’s possible to do many websites within one droplet, but personally I prefer one droplet per website. Separation of concerns – it helps you identify and solve any performance issues you ever experience.
If you take a look at this guide, it should help you: https://www.digitalocean.com/community/tutorials/how-to-set-up-nginx-server-blocks-virtual-hosts-on-ubuntu-16-04
Another quick question David, re: “Optimising PerconaDB Config” section you mention “Adjust the above according to how much RAM you have. The above is based on a 30GB server, so if you have 4GB, divide all the M values by 10”
I’m not sure about the logic here.. what should I do if I only have 1GB of RAM?
If you only have 1GB RAM, the last thing you want is disk-thrashing. These settings should work for you:
Hey David,
Thanks heaps for the tutorial!
Just wondering if I can update the php version to 7.1 and if so how should I go about doing that?
Thanks
Hi – the guide here to upgrade to 7.1 works – if you want to upgrade to 7.2, just replace all 7.1’s with 7.2. You should also re-run the commands from above for all the related php packages replacing 7.0 with 7.2.
https://askubuntu.com/questions/856793/upgrade-to-the-specific-php-7-1-7-2-from-php-7-0-in-ubuntu-16-04
Hi David,
You are right. I changed my SSL modein Cloudflate to Full, and it worked. Thanks a lot for the help.
Note: I’m Brazilian, sorry, my English.
Your English is excellent. I’m glad it’s working for you and thanks for the comment, I’m sure it’ll come in useful for others too.
Hi,
after the installation displays error, (ERR_TOO_MANY_REDIRECTS)
Works only using IP number.
How to solve? What are the possible problems?
The domain is registered in Cloudflare, does it have something related?
Yes – probably on cloudflare you have a Flexible SSL installed. Probably you have your site domain set as HTTPS in your WordPress settings. If cloudflare is your SSL, without FULL or STRICT mode on, you will be sending plain/non-ssl traffic to your server and it will be redirecting to HTTPS and repeating forever.
So – change your SSL mode on Cloudflare to FULL and you should be good. You can check out my article here on my sister site:
https://www.affiliatewebdesigners.com/2015/03/08/add-cloudflare-ssl-to-woocommerce-checkout-page-avoiding-the-redirect-loop/
Hey David, Thanks a lot for this guide. I really want to configure my New WordPress site using your article but I encountered an error while doing the stuff.
I am getting the following error while creating the mysql database using the commands provided by you: ERROR 1045 (28000): Access denied for user ‘root’@’localhost’ (using password: NO)
That means that when you set up your PerconaDB you entered a password for your root user. I personally don’t do this and what happens then is that you get ‘inferred’ authentication because root is logged in.
Anyway, if you append -P to all the commands it will then ask you for the password and you’ll need to enter the password that you created when you set up PerconaDB.
how many way for Installing and configuring the WordPress on Ubuntu ?
Plenty – but this tutorial you’ve commented on is my fastest at this point in time.
Great tutorial, thanks! May I ‘suggest/ask’ 2 little different options ? Maybe your experience is learning me something new or I have to consider a slightly different setup :
1. How about using Apache2 as dynamic content server and add Nginx as a reverse – caching – server ? even with Varnish, Redis as configured your way ?
2. I read somewhere it is helping a lot when you are on a dedicated, colocated or virtual server and add / install a proxy like TinyProxy to speed-up the traffic to the server. A few days ago I tried this situation and honestly I am completely surprised about the speed of running WordPress this way. In my situation it is really a big difference. Does this sound logical or is it complete nonsense ?
Hopefully you do not mind but I am writing this down here but I am providing a few – non-commercial – on social media based services for really large groups of people. I had to learn most configurations with Nginx, Apache2, Varnish, HaProxy, ProxySql, MariaDb Galera Clusters etc by practicing.
Most of the times all setups are working great but I like to learn a bit and especially know why certain setups are preferred. Just curious!
Thanks again.
1) Yes this is an option. It’s not one I like because of how much more RAM Apache uses, but if you need .htaccess compatibility, then yeah you can set up nginx as a caching engine and SSL end point and use Apache to generate pages.
2) You can set up Nginx as a reverse proxy if you wish instead of TinyProxy. When you say you are getting better speed using TinyProxy, is this when you have Apache at the backend?
Hey David,
Can we use Redis for “Database Cache” option in W3TC for better results? Currently using Memcached for Database cache and Redis for Object cache options.
You won’t see any difference. Redis and Memcached are very much similar, especially when you’re on a single server. I would personally prefer to use just one caching store to reduce maintenance and updates, but other than that it’s fine.
Having said that, I’m not really a fan of using BOTH database caching AND object caching. If you’re going to pick one, pick Object Caching. Database Caching is useful if plugins are not coded to allow object caching to be used, but Object Caching is more performant because not only is the DB query cached, but also whatever object structure that is created as a result is also cached.
nice 🙂
(and, assuming InnoDB, size your server so that buffer pool can be appropriately sized: @see https://dba.stackexchange.com/questions/27328/how-large-should-be-mysql-innodb-buffer-pool-size )
Cheers, Max
David,
Have you tried wp rocket instead of W3 Total Cache?
Yes I have. To be honest, they’re much of a muchness. WP Rocket defo needs less configuration, and there’s less danger with WP Rocket of breaking your site, but W3 Total Cache gives more options.
But really page-caching should be handled at the nginx/varnish level. Recently I’ve been using Nginx fastcgi_cache instead of Varnish and it’s working well – it’s easier than Varnish to configure and gives way better performance than either W3 Total Cache or WP Rocket because it’s running before PHP or MySQL even gets involved. I have a video about Nginx fastcgi_cache configuration coming out soon.
Hi, thank you for your excellent posts.
Has this video (Nginx fastcgi_cache configuration) by any change found its way to internet yet?
Hi – no it has not, not yet, been busy coding, handling support tickets and bringing our new hire Freddy up to speed.
I’ll hopefully get it released this week.
Hey David,
Thanks a lot for this guide. I really want to configure my New WordPress site using your article but I encountered an error while doing the stuff.
I am getting the following error while creating the mysql database using the commands provided by you:
ERROR 1045 (28000): Access denied for user 'root'@'localhost' (using password: NO)Presumably that means you chose a password for your root user when setting up PerconaDB? I leave that blank so that Percona uses authentication based on the fact I’m logged in as root.
Anyway – where the command says mysql you can append -p, e.g. mysql -p
This will make mysql ask you for a password. You can right click in the putty window to paste the password if you have it stored in your clipboard.
Hey David,
Thanks a ton for quick reply and working solution. I am having two queries:
1. Currently, I am using DO $10 Plan which comes with 1 CPU so I have run the following command as you explained:
mkdir /etc/systemd/system/nginx.service.dprintf "[Service]\nExecStartPost=/bin/sleep 0.1\n" > /etc/systemd/system/nginx.service.d/override.conf
systemctl daemon-reload
So, will there be any need to make changes if I shift to Multi-CPU Plan in future?
2. For Current $10 DIgital Ocean Plan what should be the best PerconaDB Config?
1. No – this is to cover a bug that exists for single-cpu servers. No need to change this for multi-cpu servers
2. Best config really depends how much work is happening in your db versus PHP.
Probably something like this would work well for you:
I would like to add more issues that I have been facing after setting up WordPress and W3TC as guided in the article.
Following are the Two errors with my setup:
1. W3TC Cache isn’t working properly. I added a few codes in Head Section of my Theme and Even in Yoast SEO and they didn’t reflect on my website, no matter how many times I cleared whole cache.
The Workaround was Deactivating the plugin, restarting the server, activating the plugin again. I had to do this to reflect every single change on the frontend of my site.
2. I am having a weird issue with Adsense Ads on my site. Sometimes a single Ad Unit Loads out of 3-4 Units and mostly none of the ad unit loads. Tried deactivating the cache plugin and restarting the server but it didn’t work too.
It would be extremely Thankful if you may have a look at my site examsmate.in to help with these issues. I can also provide any log if you want.
Thanks a lot for the help David. I am more than happy to finally setting up a WordPress site on Cloud Server with the fastest possible LEMP for WP.
There is just one concern for now. When I added your suggested configuration to “/etc/mysql/my.cnf” , my site failed to open and shown “MYSQLI_REAL_CONNECT(): (HY000/2002)”
Then I added these Configs just below [mysql] line in “/mysql/conf.d/mysql.conf” and no error was shown. Is there anything wrong or is it done properly?
How you’ve done it is correct. The files changed slightly in the percona installation since the original article. I’ve updated the article to reflect the changes. You can also add these entires to my.cnf so long as you add [mysql] above the config.
Thanks very much for this, I have some wee problems but I got around them. Now I am able to prove the theme is slow..
My question is one of emails? would you host emails for the website separate or add them in the server? Also what do you recommend to get them up and running?
For emails, don’t host them on your own server. Sending emails is no trivial thing – there’s quite a bit to set up to get it right, and if your server is unknown then some emails will still bounce to some recipients even if you set everything up perfectly.
To make your life WAAAY easier, use a third-party email service like SparkPost or SendGrid – take a look at both of them and choose which one you prefer. Both are good, both offer free plans, both have WordPress plugins to get everything set up, both have guides to configuring your DNS properly for good email delivery.
I think I am being dumb. I signed up to SendGrid and intergrated with WordPress but for the life of me have no idea what to do. This looks great but I need to work out how to see emails, I assume I use an email client like gmail.
SendGrid is a great choice to enable your site to send emails out to users. SendGrid is nothing to do with you receiving emails, just the ability to send emails.
There are 2 techniques to be able to receive emails at your domain – one technique is to set up email forwarding – e.g. from your domain provider, they often have the option to forward emails to another email address. I use this on some of my domains, and I set up emails to forward to my gmail account.
The 2nd technique is to use a service like that provided by Zoho – they offer a free ‘mailbox’ service which is what I think you’re after – note: your DNS/Domain provider may provide an easier, free mailbox, although frequently they charge for mailboxes. Anyway, with Zoho you can set up a free mailbox and they guide you through the changes you need to make in your DNS settings. Once set up, you can then either use Zoho directly or you can set up your mailbox to forward emails to your gmail account.
Thank you very much! Zoho it is
Meu parabéns, muito bom!!!
Obrigado.
Nevermind, the issue is from the my.cnf file in /etc/mysql not having [mysql] at the top of the file.
David,
At server reboot Percona/MySQL fails to start and seems to point to the mysql.socket not being available. What could be going on?
Thanks so much for this Dave.
Just want to check if there are any changes that need to be addressed if using this for a Multisite?
No changes required – Multisite is an application-level system, so it’s unaffected by your choice of stack.
Hi. Thanks for the awesome tutorial. I’m yet to try though.
Is this the same as the product https://www.superspeedyplugins.com/product/wpi-fast-wordpress-stack/?
Also, is the let’s encrypt certificate automatically renewed? Thanks.
It’s the same config as the Rocket Stack. The LetsEncrypt cert auto renews – there’s a step detailed to create a monthly cron job to run the renewal.
You are awesome!!!
I tried installing. Was very fast.
But while migrating data from my old site which is apache based broke the site. I tried updraft plus and all in one WP migration. Both of them failed. Does this not work with restoring from old site? Or is there another plugin you recommend? Your help would be really appreciated. Thanks.
Sorry about the delay in replying – had an awful chest infection for 3 weeks. Updraft Plus is normally very reliable, BUT if your site is huge, you might be running out of disk space?
I’ve regularly encountered issues moving large sites around from server to server which is why I wrote this article that I think you’ll find very handy:
https://www.superspeedyplugins.com/2017/05/18/migrating-huge-wordpress-sites-reliably/
Almost flawlessly worked through this tutorial succesfully, except for the fail2ban configuration part:
Change nginx enabled=true (instead of false) -> I can’t find this value anywhere in the file. Should I just add it there?
Add the following after the nginx section in the jail.conf -> Can’t find this nginx section here. How can I recognize or find it?
Did you copy the jail.conf or jail.local file from the cloned repository? It contains the nginx section, as well as specific filters to catch the vast majority of WordPress bots.
same issue. followed to a T but no nginx section in jail.conf and also filter.d was empty
I’ve updated the post above – create wordpress.conf using the values above in /etc/fail2ban/filter.d/wordpress.conf and I meant to say [nginx-http-auth] rather than just [nginx]
Do you mean by running this command: cp /etc/fail2ban/jail.conf /etc/fail2ban/jail.local ?
Also, the wordpress.conf file doesn’t exist in /etc/fail2ban/filter.d/, I had to create it myself.
I followed your guide precisely, but somehow this last part is not going perfectly for me.
Thanks for your help!
I also couldn’t find the nginx enabled value, neither did I find the nginx section in jail.conf. Also the wordpress.conf was not there. Am I doing something wrong?
It should have read ‘create wordpress.conf’ rather than ‘edit wordpress.conf’ and add the lines above.
Then you can add the [wordpress] section to jail.local or jail.conf. Also, I’ve updated the [nginx] part to reference [nginx-http-auth] which is the filter you need to enable.
Hi David, could you please remove my last name from the comment above? Apparently when logged in, first and last name are shown as comment name. Thanks!
I’ve now changed this site-wide.
Hi Dave! Great blog post! How can I host all 3 websites of mine on 1 single droplet with this rocketstack setup? All 3 are wordpress websites naturally. Thanks, Frank.
Hi Frank – the easiest way is to download another copy of wordpress_latest.zip, extract it to another folder in /var/www/ then make copies of the two files in /etc/nginx/sites-available/ (the varnish and the rocketstack ones).
Enter the domain names in those files and change the server location to point to the new folder.
I personally don’t like installing multiple websites on one server – servers are so cheap now I don’t see much point – and separation of concerns really helps if you ever have performance issues from one of the websites.
Would it not be easier to install the “one-click” LEMP on 16.04 droplet image from Digital Ocean and install and configure PerconaDB, Varnish, Redis, fail2ban and Letsencrypt afterwards? Or would that result in a much different setup?
Besides that, would it also be possible to have multiple WordPress installs under different users on the same droplet using this server stack?
Thanks for your reply in advance. Looking forward to it!
Yeah sure – you can do it that way too – of course – there’s many ways to skin this cat – I’ve shown how to do it from scratch.
re: Multiple wordpress installs, if you’re planning to have different users on the one droplet, you should probably choose a server-management tool too so that you have an interface for your users. Which one you choose will/may limit your stack behind the admin tool however.
Thanks for your replies Dave!
I guess it’s a lot of work to manage users, user quota etc from the command line, right? We don’t want to offer a server management interface to our clients, but were considering installing a server management tool to be able to manage users and their limits easily ourselves 🙂
Would you (based on the possible performance loss or another reason) advise us to learn managing users and user quota from the command line or would you recommend installing a server management tool?
Another question: Do you prefer Nginx only instead of Nginx as a reverse proxy for Apache in general?
Thanks already for your reply, very much appreciated!
I’ve seen situations where people make nginx + apache work – specifically, the only real reason to do this is if you absolutely need .htaccess rules which apache provides.
Otherwise, apache is a memory hog and should be avoided.
Edit: re: managing users, it depends on your server-admin skill levels and the volume of users you’ll be managing. And it depends what you’re aiming for with these users. You can’t give servers reboot capabilities when there are multiple users on the server, amongst of whole bunch of other stuff – I’m in the practice, now that droplets are so cheap, of using 1 droplet per website, so that would be my primary recommendation, but if you’re aiming to have 20 to 100 users on one droplet in order to get economies of scale, then sure it’ll work better perf-wise with this stack, but still, one or more users will run some batch jobs which screw stuff up for others which is where the admin tools can be handy to make it trivial to restrict and control resource usage.
Depends what you’re doing. Personally, as a user, I’d prefer a whole droplet to myself. I can reboot it, install stuff, add whatever, reconfigure, all without affecting others. And I have confidence that my resources are my own and any perf issues are not because of contention.
Hi Dave,
Thanks for this awesome post!
I was wondering if you have any advise on a server management tool to go with this setup, like Vesta, Froxlor or ISPManager. Really curious which server management tool would you advise.
Thanks for your reply in advance.
I’ve used Ajenti in the past, but personally I prefer to modify the files directly – much more control and confidence that the server-management tool isn’t ruining performance.
Also – once you start using a server management tool, (with all the ones I’ve tried) it becomes impossible to alter the config files manually since it needs to have exclusive control.
But yes – there’s nothing to stop you adding the ones you listed provided you can live with the constraints above.
Hi Dave,
Very interesting article, but there’s little info about the setup. For the average webmaster it will be hard to control and debug… and the paid services are out of reach for many. I’m curious why you use Varnish when in the serverpilot guide you use cloudflare to replace it . I’m setting up a daily deals site, and some posts need to be changed or deleted every day, so I’m curious how long pages are pages cached, or how to configure it. Or maybe I can decide not to use it and just skip the varnish setup? And what about redis? Perhaps the serverpilot setup is more suitable for those less familiar with configuring a server?
Varnish only caches pages for a VERY short amount of time – circa 5 minutes typically. It’s used to handle RUSH traffic.
For page-caching, using something like W3 Total Cache you can control how long the page cache exists, and you can also provide an XML sitemap to prime the cache.
For sure, the Server Pilot set up is probably simpler – especially because Varnish cache can be technical to configure if there are any plugins that need configured that aren’t included in my scripts.
Redis is awesome for object caching – even with page caching in W3 Total Cache I will typically use disk-based caching because this allows W3 Total Cache to pump these pages out without loading all of WordPress core (if you use Redis for page caching, it has to load all of WordPress core).
The drawback of serverpilot is that when you install other applications on the server then serverpilot could screw them up. So I will probably go far this rocketstack. My only concern is the caching, having read about Simple Ajax Chat in the cache busting list: what happens if a logged in admin views a front-end page. Will the admin bar at the top, any admin edit buttons on the page, etc. get cached, so the next visitor will see that, or how does that work? As that’s no admin url, there’s no url parameters, and it doesn’t look like the extra content is added via js. Is it possible to just disable / override varnish for the time being? And how does one test plugins and themes for cache busting behavior?
Yes – you can just skip installing varnish. Or follow the full guide and just switch varnish off. It’s clever enough that if Varnish isn’t working, is broken, or is off, then nginx just passes the web requests directly to PHP/WordPress.
re: Simple Ajax Chat – I highly recommend you use a different plugin.
re: Admin bar – these don’t get cached because there are varnish rules to avoid caching for logged in users.
re: testing for cache busting behaviour – typically most plugins don’t even qualify for needing testing – i.e. most plugins apply content to your pages that applies to all users. Plugins that require testing are the ones that create different content per user – e.g. shopping baskets, user wishlists, users recently viewed products, or plugins that do messaging between users (or between users and admin). To test, view a page (logged out) with user-specific content in browser 1 (e.g. add something to your wishlist, or send a message with simple ajax chat or similar), then immediately view the same page in browser 2 (also logged out). If browser 2 sees browser 1’s user-specific content then they have not implemented their code in a page-caching compatible way.
What is better for a large woocommerce affiliate store – MariaDB or PerconaDB?
Both are far better than plain MySQL, but PerconaDB is better because it comes with better performance analysis tools.
Thank you very much for this guide. What i wish to see if possible is another layer of how to control and maintain this installation in order to avoid having a broken website/server.
That would be really fabulous if you could explain.
Thanks,
Luigi