

If you have a huge site, chances are you also do a lot of data processing – imports, exports, calculations etc.
These kind of batch processing jobs that max out the CPU and disk are the mortal enemy of real-time transactions. Your web visitors demand real-time interaction and fast response from your site, so if you are running imports and maxing out your CPU and disk on the same server hosting your web traffic then your users are regularly going to encounter slowness. This leads to loss of interest from your visitors, loss of sales and loss of SEO rank.
Ultimately, to solve this, once you have exhausted scaling up, you need to architect a better solution.
Table of Contents
- Scaling Up WordPress – check before building your cluster!
- Scaling Out with a WordPress Cluster
- Step by step guide to building your cluster
- Create 3 Ubuntu 16.04 servers
- Install PerconaDB XtraDB Cluster on your cluster-nodes
- Configure private networking
- Configure replication
- Bootstrap your cluster
- Install Nginx and PHP 7 on all 3 nodes
- Install GlusterFS for file replication
- Install Unison for file replication
- Configure SSH so nodes can connect to each other
- Authenticate each node
- Replicate the web folder files using Unison
- Install WordPress files onto Node 1 only
- Configure Nginx to load your WordPress site on each node
- Set up your Load Balancer
- Configure WordPress
- Set up WordPress Cron on only node 1
- Set up SSL on your load balancer
- Update your Site URL in WordPress
- Go forth and conquer!
Scaling Up WordPress – check before building your cluster!
If you are considering building a cluster, it means you think you can’t get more speed from a single server. If you have not yet used our Super Speedy Pack yet then you should definitely try that before building a cluster. We built our Super Speedy Pack to solve search, filtering and underlying scalability issues exhibited in WordPress and WooCommerce.
It is not uncommon for customers with large sites to get 10x or more speed boost from our Super Speedy Plugin pack so prior to building your cluster, check out our Super Speedy Plugin pack.
Scaling Out with a WordPress Cluster
You need to separate the batch processing from the realtime stuff. That means you need a minimum of 2 servers. 1 server processes all the data imports, exports, calculations, category counts, etc – the data is replicated to the 2nd server and that server serves your web traffic.
If you’re going to the bother of getting 2 servers, you’re better off going further and getting 3 servers. It’s very little extra hassle and then gives you the ability to have 3 servers online at once with no batch processing, or 1 or 2 of the servers handling batch processing and the remaining ones serving web traffic.
Using this model, you can also easily switch servers offline to upgrade them without interrupting visitors to your website. That means you can be online 100% of the time!
Note that this setup technically uses 4 servers – the 4th server being a load balancer. Instead of this server, you could use the Digital Ocean load balancer feature/server instead but I provide details below for installing this easily.
If you’re looking at building a cluster for more speed, you may find our plugin pack will help give you the speed boost you need.
Step by step guide to building your cluster
This is the guide I use to install these clusters, so hopefully it helps some of you out there who wish to go huge with your WordPress sites.
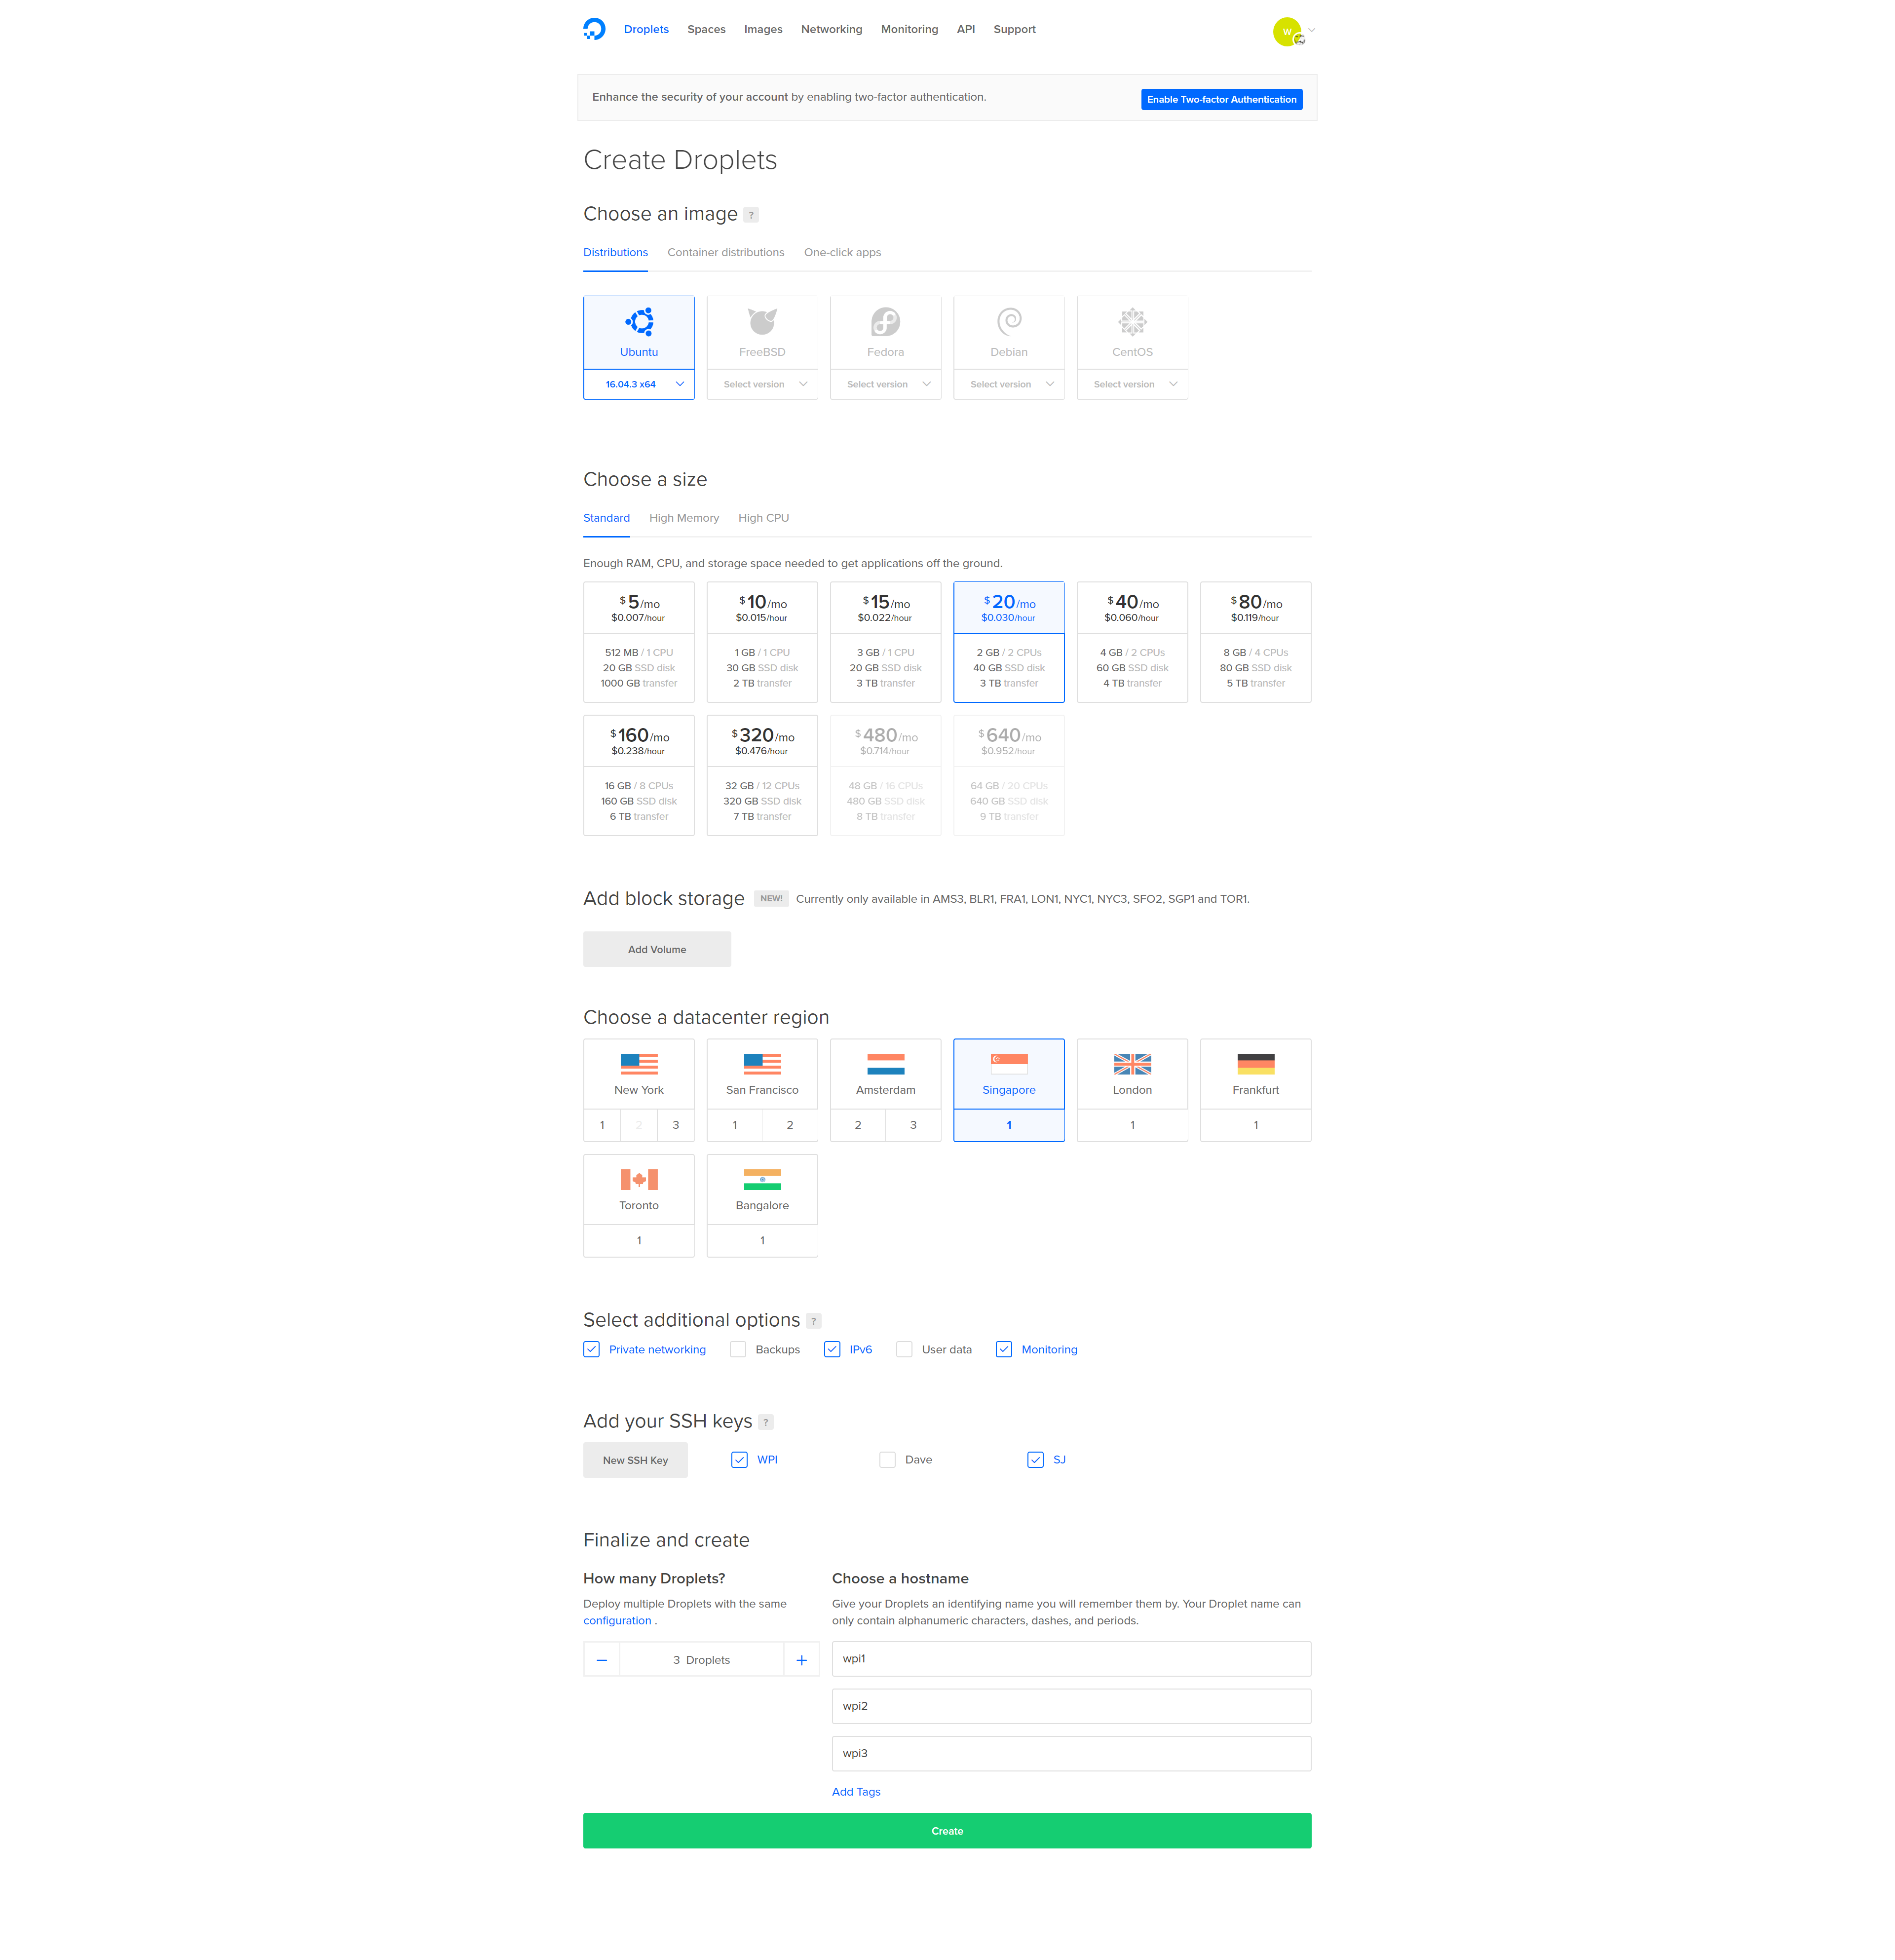
Create 3 Ubuntu 16.04 servers
I like Digital Ocean, so this guide is using their hosting, but you can use any host provided they offer private networking and Ubuntu 16.04.
Create 3 Ubuntu 16.04 (or 3 servers on any platform) – they make it easy to make multiple at once – make sure to enable private networking and add your ssh key.
Install PerconaDB XtraDB Cluster on your cluster-nodes
Log into your 3 droplets and run the following commands on each node:
wget https://repo.percona.com/apt/percona-release_0.1-4.$(lsb_release -sc)_all.deb
dpkg -i percona-release_0.1-4.$(lsb_release -sc)_all.deb
apt-get update
apt-get upgrade
apt-get install percona-xtradb-cluster-57
Note: You will be asked to enter a new root password for the cluster. To make life easier, use the same password for each PerconaDB node, or leave the root password blank and it will infer security if you log in as root and connect.
Configure private networking
We want the nodes to share data over the private network, rather than out and in from your hosting company. This prevents crazy bandwidth costs, speeds things up and improves security.
Even though private networking is already enabled, we need to be able to reliably use eth1 (rather than eth0) as the private network device.
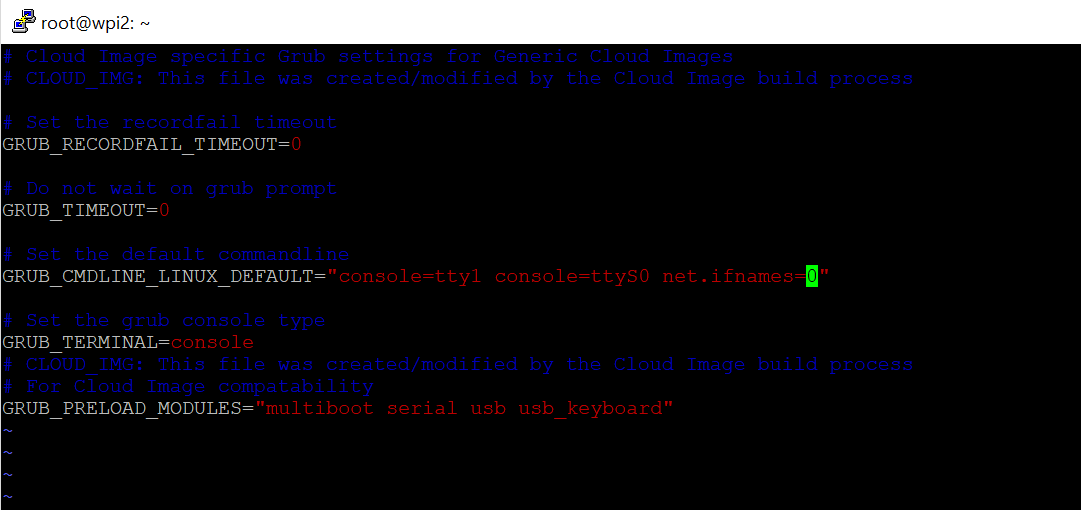
On each node edit the grub networking file. I prefer vi to edit files, but you can use nano or even edit the files with Filezilla.
vi /etc/default/grub.d/50-cloudimg-settings.cfg
Find the line that begins GRUB_CMDLINE_LINUX_DEFAULT and alter it as follows (add net.ifnames=0):
GRUB_CMDLINE_LINUX_DEFAULT="console=tty1 console=ttyS0 net.ifnames=0"
Save the file then run the update grub command and reboot (only time I know of where you need to reboot a linux box!).
update-grub
shutdown -r now
Repeat the above for all your nodes. Then you can check config with this:
ifconfig -a
You should see the public IP address against eth0 and the private address against eth1.
You can also view each ethernet devices configuration here:
cat /etc/network/interfaces.d/50-cloud-init.cfg
The file above will already be configured if you selected private networking when you created the droplet.
Take a note of the private IP address for each of your 3 nodes. This information is also available from your Digital Ocean interface when you click through to each droplet.
You can test private networking is working by pinging the private IP address of another node from one of the nodes:
ping 10.130.45.161
Configure replication
Firstly, we need a replication user. Create this user on all 3 nodes.
Log into mysql:
mysql
or if you chose a password for your mysql server earlier, use this:
mysql -u root -p
Enter the root DB password you chose earlier then create a new user for replication purposes (choose a strong password and note it down so we can add it to the configuration files):
CREATE USER 'sstuser'@'localhost' IDENTIFIED BY 'password';
GRANT RELOAD, LOCK TABLES, PROCESS, REPLICATION CLIENT ON *.* TO 'sstuser'@'localhost';
FLUSH PRIVILEGES;
Next exit MySQL by typing ‘exit’ then hitting enter, then stop MySQL on all 3 nodes using:
service mysql stop
On node1, customise the configuration file below according to your private IP addresses and replication user password enter it into this file:
vi /etc/mysql/percona-xtradb-cluster.conf.d/wsrep.cnf
- Enter the 3 private IP addresses for wsrep_cluster_address, separated by commas.
- Enter node 1 private IP address for wsrep_node_address.
- Enter the sst password for wsrep_sst_auth.
- Change the name of the node on the line wsrep_node_name
Your file will end up looking something like this (lines in bold are the lines you need to alter from the default config):
[mysqld]
# Path to Galera library
wsrep_provider=/usr/lib/galera3/libgalera_smm.so

# Cluster connection URL contains IPs of nodes
#If no IP is found, this implies that a new cluster needs to be created,
#in order to do that you need to bootstrap this node
wsrep_cluster_address=gcomm://10.130.45.161,10.130.47.4,10.130.47.11

# In order for Galera to work correctly binlog format should be ROW
binlog_format=ROW

# MyISAM storage engine has only experimental support
default_storage_engine=InnoDB

# Slave thread to use
wsrep_slave_threads= 8

wsrep_log_conflicts

# This changes how InnoDB autoincrement locks are managed and is a requirement for Galera
innodb_autoinc_lock_mode=2

# Node IP address
wsrep_node_address=10.130.45.161
# Cluster name
wsrep_cluster_name=pxc-cluster

#If wsrep_node_name is not specified, then system hostname will be used
wsrep_node_name=pxc-cluster-node-1

#pxc_strict_mode allowed values: DISABLED,PERMISSIVE,ENFORCING,MASTER
pxc_strict_mode=ENFORCING

# SST method
wsrep_sst_method=xtrabackup-v2

#Authentication for SST method
wsrep_sst_auth="sstuser:password"
Note: You will also need to remove the # comment from the beginning of the lines with the wsrep_node_address and the wsrep_sst_auth.
Copy the contents of the file and then save it. Configure node 2 and node 3 by editing the same file on those nodes and altering 2 rows from the file above:
- Change wsrep_node_address to be the private IP address of node 2 (or node 3 for that node)
- Change wsrep_node_name to pxc-cluster-node-2 or pxc-cluster-node-3
Once you’ve done this, you’re ready to bootstrap your cluster.
Bootstrap your cluster
On node 1, run the following command:
/etc/init.d/mysql bootstrap-pxc
Check it’s running by logging into mysql and running this command:
show status like 'wsrep%';
Note: The above command can be useful in future to check for replication status – you can see things like how many items are queued to be replicated amongst other details.
On node 2 and 3, run the following:
/etc/init.d/mysql start
You now have a Percona cluster with 3 nodes replicating data to each other.
Install Nginx and PHP 7 on all 3 nodes
On each node, install Nginx and PHP 7 using the following sequence of commands:
apt-get install nginx
apt-get install php7.0
apt-get install php7.0-curl
apt-get install php7.0-gd
apt-get install php7.0-intl
apt-get install php7.0-mysql
apt-get install php-memcached
apt-get install php7.0-mbstring
apt-get install php7.0-zip
apt-get install php7.0-xml
apt-get install php7.0-mcrypt
apt-get install unzip
A faster way to run all of the above would be using this single line:
apt-get install -y nginx php7.0 php7.0-curl php7.0-gd php7.0-intl php7.0-mysql php-memcached php7.0-mbstring php7.0-zip php7.0-xml php7.0-mcrypt unzip
Install GlusterFS for file replication
GlusterFS gives us the guarantee that all nodes see the same files. In the configuration below, each node will have a full copy of all the files from the other nodes, BUT if you decide to expand this outwards, you will start seeing space savings. For example, if your WordPress files take up 90GB then with 3 nodes, 90GB will be used per node.
If you had 9 nodes, then each node would only be using 30GB to store 90GB across the entire GlusterFS.
The way to think about this is that across the GlusterFS file network, there are 3 copies of each file for redundancy purposes. Then if 1 node is removed from the GlusterFS cluster, files will be copied to other nodes to bring the cluster back up to having triplicate redundancy.
Run the following commands on each node:
sudo add-apt-repository ppa:gluster/glusterfs-3.10
apt-get install glusterfs-server
apt-get install attr
Then run the following commands on node 1, adjusting the IP addresses to be the private IP addresses of node 2 and node 3 in your network:
gluster peer probe 10.130.47.4
gluster peer probe 10.130.47.11
Then create a gluster volume by running the command below with IP addresses altered to the private IP addresses of node 1, 2 and 3 in your network:
gluster volume create glustervolume replica 3 transport tcp 10.130.45.161:/gluster-storage 10.130.47.4:/gluster-storage 10.130.47.11:/gluster-storage force
gluster volume start glustervolume
Note: You can reduce the replica number if you want a faster file system but redundancy will be lowered. For example, with a 4-node configuration, replica 2 will mean 2 of the nodes can die and you can still rebuild your filesystem. If 3 die, you are out of luck. Here is an example 4 node config:
gluster volume create glustervolume replica 2 transport tcp 10.132.110.166:/gluster-storage 10.132.118.208:/gluster-storage 10.132.120.187:/gluster-storage 10.132.121.38:/gluster-storage force
You can find out more about the commands available here:
http://docs.gluster.org/en/latest/Administrator%20Guide/Setting%20Up%20Volumes/
Then on each node, create a folder and mount that folder, linking it to the glustervolume:
mkdir /var/www/wpicluster -p
mount -t glusterfs localhost:/glustervolume /var/www/wpicluster
You now have a glusterfs redundant file cluster where we can install WordPress.
Install Unison for file replication
After much testing, GlusterFS is not well-suited to WordPress file-replication. GlusterFS slows down a LOT when there are a lot of files in each directory. The guide has been updated to use Unison instead. This Unison setup uses a star schema for file replication, with node 1 at the centre of the star.
node 1 <--> node 2 file replication
node 1 <--> node 3 file replication
That means a file edit on node 3 will replicate to node 1 and then to node 2. A file edit on node 1 will replicate out directly to node 2 and 3. Because of this, it makes sense to make node 1 our wp-admin server where we upload plugin files. Because of this star schema for file replication, node 1 is your most important node. If it goes down, or you switch it off, file replication will be paused until you bring it back online.
On each node, install unison:
apt-get -y install unison openssh-server
This will allow us to run the replication commands later once we have installed the WordPress files.
Configure SSH so nodes can connect to each other
SSH access is required for Unison to be able to replicate files. Run the following on all 3 nodes:
ssh-keygen
Hit enter 3 times to accept 3 defaults inc 2 blank passwords for the keyfile so it works non-interactively
Now, grab a copy of the id_rsa.pub files for each node and paste them into the other 2 nodes authorized_keys file. Find the public keys of each node by running this command:
cat /root/.ssh/id_rsa.pub
Then paste those public keys into the authorized_keys file of the other 2 nodes:
vi /root/.ssh/authorized_keys
Authenticate each node
On node 1, run:
ssh ipofnode2
ssh ipofnode3
You will be asked if you wish to trust the other node. Answer yes.
Repeat this on node 2 and node 3, connecting to the other 2 nodes.
Replicate the web folder files using Unison
Now that we have ssh authentication, we can set up Unison to replicate the website files to node 2 and 3. Run the following commands on node 1 of your cluster:
unison /var/www ssh://10.130.47.4//var/www -owner -group
unison /var/www ssh://10.130.47.11//var/www -owner -group
Note: replace the IP addresses with your own and the folder names with your own.
Since you have no files yet in /var/www these commands will complete quickly.
Now set up a crontab/cron job for Unison. Run the following command:
crontab -e
Choose whatever editor you prefer when it asks you then append the following to the end of the file:
* * * * * unison -batch /var/www ssh://10.130.47.4//var/www &> /dev/null
* * * * * unison -batch /var/www ssh://10.130.47.11//var/www &> /dev/null
Change IP addresses and folder locations. Use internal IP addresses so traffic goes over the faster internal network card.
Install WordPress files onto Node 1 only
Because we are using file replication and we already have database replication in our cluster, we only need to install WordPress onto node 1. On node 1, run the following:
wget https://wordpress.org/latest.zip -P /var/www/
unzip /var/www/latest.zip -d /var/www/
mv /var/www/wordpress /var/www/wpicluster
chown www-data:www-data /var/www/wpicluster -R
rm /var/www/latest.zip
Note: Instead of /var/www/wpicluster you could use /var/www/yourdomain.com but if you do, ensure you alter the nginx config files in the next section.
Configure Nginx to load your WordPress site on each node
I’ve created some configuration files to make this part quicker and easier. The configuration files set Nginx up to work over port 80 – later, we will add SSL to our load balancer. This reduces load on our servers since they won’t have to decrypt SSL traffic.
The configuration files here also configure the Nginx fastcgi-cache, so you don’t need to install Varnish. They’re also domain-name independent, so no configuration required.
On all 3 nodes, run the following commands:
git clone https://github.com/dhilditch/wordpress-cluster /root/wordpress-cluster/
cp /root/wordpress-cluster/etc/nginx/* -R /etc/nginx/
ln -s /etc/nginx/sites-available/wpintense.cluster.conf /etc/nginx/sites-enabled/
mkdir /sites/wpicluster/cache -p
service nginx restart
Set up your Load Balancer
Digital Ocean provide a load balancer, but with that approach you have to manually renew your SSL certificates. Plus you get less control – we want control so we can send wp-admin traffic to node 1. So follow the instructions below to set up your own load balancer.
First, create a droplet with Ubuntu 16.04 again, private networking and your SSH keys.
Then log onto your load balancer droplet and run the following commands:
add-apt-repository ppa:nginx/stable
apt-get update
apt-get install nginx
Then create a new file at /etc/nginx/conf.d/loadbalancer.conf.
vi /etc/nginx/conf.d/loadbalancer.conf
This will automatically be loaded when you restart nginx. Enter the following in the file, adjusted for your private IP addresses.
upstream clusterwpadmin {
     server 10.130.45.161;
}
upstream clusternodes {
     ip_hash;
 server 10.130.47.4 max_fails=3;
 server 10.130.47.11 max_fails=3;
}
server {
     listen 80;
# this block is for letsencrypt
 root /var/www/html;
 location ~ /.well-known {
      allow all;
  try_files $uri $uri/ =404;
 }
 server_name _;
 #return 301 https://$host$request_uri;
 location ~ /wp-(admin/|login.phpb|cron.php) {
     proxy_pass http://clusterwpadmin;
 proxy_set_header X-Forwarded-Host $host;
 proxy_set_header X-Forwarded-Server $host;
 proxy_set_header X-Forwarded-For $proxy_add_x_forwarded_for;
 proxy_set_header X-Forwarded-Proto $scheme;
 proxy_set_header X-Real-IP $remote_addr;
 proxy_set_header Host $host;
 }
location / {
     proxy_pass http://clusternodes;
 proxy_set_header X-Forwarded-Host $host;
 proxy_set_header X-Forwarded-Server $host;
 proxy_set_header X-Forwarded-For $proxy_add_x_forwarded_for;
 proxy_set_header X-Forwarded-Proto $scheme;
 proxy_set_header X-Real-IP $remote_addr;
 proxy_set_header Host $host;
 }
}
server {
     listen 443 ssl;
 #ssl_certificate /etc/letsencrypt/live/yourdomain.com/cert.pem;
 #ssl_certificate_key /etc/letsencrypt/live/yourdomain.com/privkey.pem;
location ~ /wp-(admin/|login.phpb|cron.php) {
     proxy_pass http://clusterwpadmin;
 proxy_set_header X-Forwarded-Host $host;
 proxy_set_header X-Forwarded-Server $host;
 proxy_set_header X-Forwarded-For $proxy_add_x_forwarded_for;
 proxy_set_header X-Forwarded-Proto $scheme;
 proxy_set_header X-Real-IP $remote_addr;
 proxy_set_header Host $host;
 }
location / {
     proxy_pass http://clusternodes;
 proxy_set_header X-Forwarded-Host $host;
 proxy_set_header X-Forwarded-Server $host;
 proxy_set_header X-Forwarded-For $proxy_add_x_forwarded_for;
 proxy_set_header X-Forwarded-Proto $scheme;
 proxy_set_header X-Real-IP $remote_addr;
 proxy_set_header Host $host;
 }
}
#if a user connects to yourdomain.com:9443 they will be directed to node 1. This is where admins should connect to add plugins etc.
server {
     listen 9443 ssl;
 server_name _;
 #ssl_certificate /etc/letsencrypt/live/yourdomain.com/cert.pem;
 #ssl_certificate_key /etc/letsencrypt/live/yourdomain.com/privkey.pem;
location / {
     proxy_pass http://clusterwpadmin;
 proxy_set_header X-Forwarded-Host $host;
 proxy_set_header X-Forwarded-Server $host;
 proxy_set_header X-Forwarded-For $proxy_add_x_forwarded_for;
 proxy_set_header X-Forwarded-Proto $scheme;
 proxy_set_header X-Real-IP $remote_addr;
 proxy_set_header Host $host;
 }
}

Save that file then you can restart nginx using:
service nginx restart
SaveNow, log into your DNS provider and point your new domain name at the public IP address of your loadbalancer node.
Configure WordPress
Now that we have database and file replication set up, and a load balancer, we can go about starting the 5-minute install of WordPress.
On node 1, connect to mysql using:
mysql -p (or just mysql if no root password)
Note: you’ll be asked for your password, so paste it in – right-click in putty is paste, and it’ll look like nothing happened because it’s a password field, but it does paste.
create database wpicluster;
grant all privileges on wpicluster.* to wpi@localhost identified by 'CHOOSEASTRONGPASSWORD';
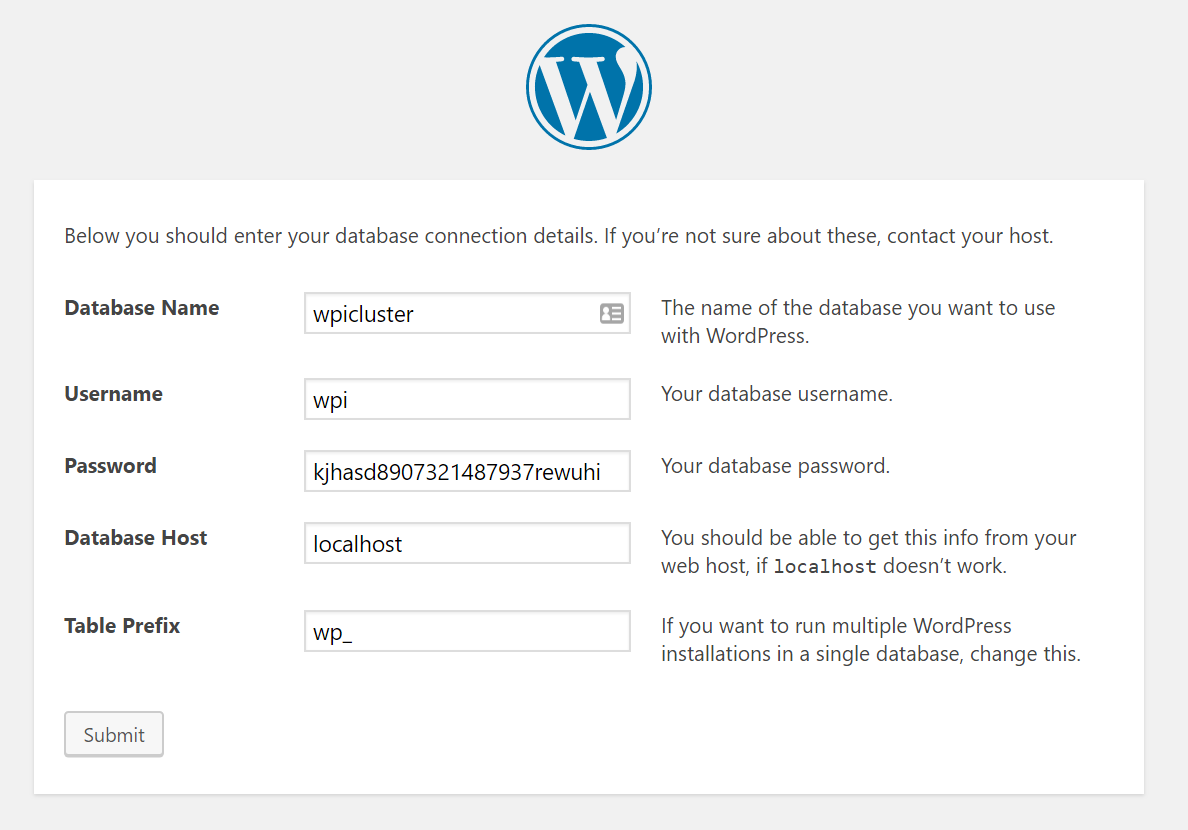
Visit the URL you chose earlier for your loadbalancer, e.g. http://www.yourdomain.com.
Choose your language, then enter the database name: wpicluster, the username: wpi and the password you chose in the GRANT command above.
Set up WordPress Cron on only node 1
WP Cron is awful. It relies on users visiting your site in order to run scheduled tasks. In this case, we don’t even want scheduled jobs running on node 2 or 3, so we’ll disable wp cron across all nodes and then implement a real cron job on node 1.
On node 1, edit /var/www/wpicluster/wp-config.php. This file edit will replicate to your other nodes.
vi /var/www/wpicluster/wp-config.php
and insert the following lines somewhere:
define('WP_DISABLE_CRON', true);
if (strpos($_SERVER['HTTP_X_FORWARDED_PROTO'], 'https') !== false) {
 $_SERVER['HTTPS']='on';
}
Note: Only the first line is to disable WP_CRON. The rest is for later when we forward traffic from our load balancer and we want to ensure WordPress knows to server up static files over HTTPS if that was what the user requested.
If you’re struggling to figure out where to put this code, you can stick it after the define(‘DB_NAME’, ….); line.
This wp-config.php update will replicate out to the other nodes using GlusterFS, so you don’t need to modify this on the other nodes.
Now run:
crontab -e
And add an extra line as follows:
* * * * * wget http://yourdomain.com:9443/wp-cron.php?doing_cron &> /dev/null
Set up SSL on your load balancer
Now get your free SSL certificates from LetsEncrypt. On your load balancer node, run the following:
add-apt-repository ppa:certbot/certbot
apt-get update
apt-get install certbot
certbot certonly --webroot --webroot-path=/var/www/html -d yourdomain.com -d www.yourdomain.com
You should get a note telling you CONGRATULATIONS. It will also tell you the location the key files were saved to. Now edit the loadbalancer.conf file from earlier to set up SSL. (WordPress installation does not work well over SSL which is why we add SSL after installation)
vi /etc/nginx/conf.d/loadbalancer.conf
Uncomment the ssl_certificate (x2) and ssl_certificate_key (x2) lines and replace the path with the paths provided by the output from LetsEncrypt.
Also uncomment the line “return 301 https://$host$request_uri;”
service nginx restart
Once you have edited the loadbalancer.conf file and restarted nginx, you will have a working SSL certificate on your load balancer.
Note: At this point, if you access your website with https, some CSS will appear broken. There is one final stage we have to complete in order to fix this, which is almost the final step in the entire process.
Update your Site URL in WordPress
Log into node1.yourdomain.com. Visit the WordPress dashboard, then Settings->General.
You will see 2 domain entries, both of which are probably currently tied to your node 1 subdomain, and both of which will be http instead of https.
Replace both of these entries with https://www.yourdomain.com.
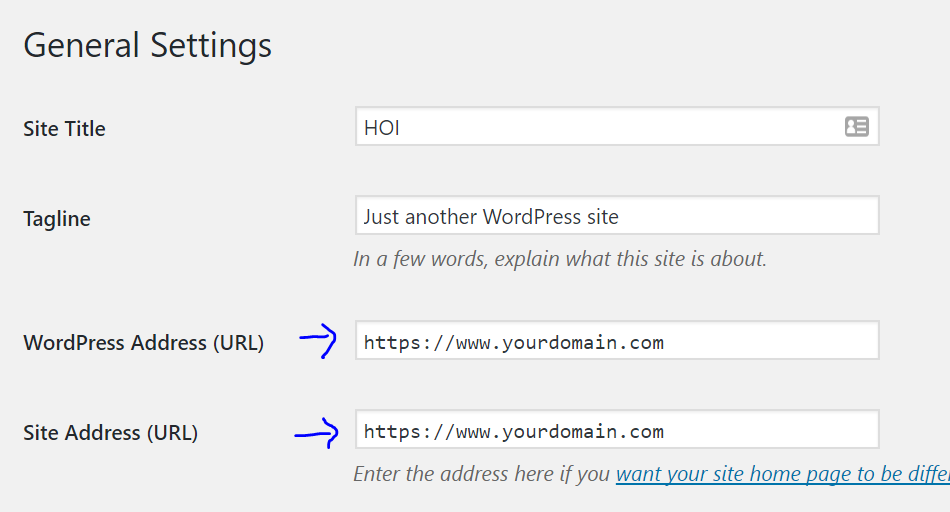
Note: Here you enter the domain name you chose for your load balancer, normally www.yourdomain.com or similar.
If you didn’t already, edit your wp-config.php file on Node 1 and just below where you disabled WP_CRON, add the following lines:
if (strpos($_SERVER['HTTP_X_FORWARDED_PROTO'], 'https') !== false) {
  $_SERVER['HTTPS']='on';
}
The traffic is being served over https to your users, but because it’s plain http on each node (between your load balancer and your nodes), you need to make sure WordPress knows it’s HTTPS so any static files are correctly loaded over HTTPS.
Go forth and conquer!
That’s it, a mammoth task complete.
You can visit wp-admin from any server, but you can also force traffic to node 1 for your own admin purposes by visiting https://www.yourdomain.com:9443/wp-admin/. With the configuration above, node 1 is never serving traffic to front-end users, so you can run all kinds of admin jobs on there without impacting slowing down user traffic.
If anyone has any questions, fire away!


Hi!
First of all: thank you for this howto. Helped a lot, especially with the file sync between multiple servers. I had gotten to the same conclusion with glusterfs – it is too slow.
One question: currently I have one load balancer running nginx and 3 backend servers. I enabled fastcgi_cache on the backend with a tmpfs for each domain. Wouldn’t it make sense to use proxy_cache on the load balancer instead and make things “easier” on the backends? Any thoughts on that?
Thanks again!
Hi Dave, thanks for your great tutorial, please can you tell me where do i have to install varnish cache on load balancer or on nodes?
If you are determined to use varnish, you can actually use varnish AS your load balancer and it will also cache.
Great guide. Still relevant in 2021 IMHO. Other than the lack of multi-tier DB, it’s a great option. I love the option of using a separate server as the load balancer rather than a cloud solution (I am using Oracle). It’s cheaper this way and provides a faster load balancer to boot (pardon the pun).
I am currently using this guide, as well as your Rocket Stack, and searching through others to provide HA multi-tiered MySQL to WordPress. I never liked the idea of running the DB on the same machine as the webserver. I’d rather keep them in separate private subnets, for obvious reasons — security.
If you could point me in the right direction of the best option as applied to this guide, that would be great.
Thanks dave for a great article !
If you want to seperate the Database cluster from the Application cluster,
I suggest to install ProxySQL on each application server,
, and Percona PXC (xtraDB Cluster) on separate 3 machines for the database cluster.
Each ProxySQL you installed must have the same definitions, to contact the cluster.
CRITICAL – It is recommended to have just 1 node as writer in the Percona PXC cluster.
The way to make each ProxySQL pick the same Database machine for writing,
is by setting a DIFFERENT values in the column: weight in the mysql_servers table of ProxySQL.
For details – See these links regarding ProxySQL configuratoin.
It is recommended as a great tool to handle the Percona PXC cluster:
https://proxysql.com/documentation/getting-started/
https://proxysql.com/blog/effortlessly-scaling-out-galera-cluster-with-proxysql/
https://proxysql.com/blog/configure-read-write-split/
Hi There,
I have created the cluster using my own setup. And also I generally use ProxySQL and split read and write queries using ProxySQL. In this case, it is not working for me. All the pages in my woo-commerce are working except the checkout page. When I try to click on proceed to payment, it is not moving further.
I have used MariaDB Galera Cluster + ProxySQL ( 1 Write and 2 Reader )
Also in the article, they have not mentioned anything about Load Balancing DB queries.
Check your debug log, it should tell you what’s going wrong.
Hi there, is there an updated version of this guide for Ubuntu 20.04 and all of the updated software involved with this?
Thanks!
I’ll be releasing a 20.04 version in the summer. Focusing on plugin updates first.
Hi, I posted a few months ago and remembered about this one file sync solution I came across that would be really great for this stack. It’s called Syncthing and I successfully got it working on my Pis and it was fantastic. I thought that it would be great if everyone on this website knew about it as an alternative to unison as it is a bit easier to use at least for me. You can find out more about it at syncthing.net. Hope you can get it working.
Thank you for letting us all know.
Great article, guide.
Have You experienced changing the dbhost in wp_config to for example one of the other nodes in the cluster and the site requesting to be installed again? Can’t figure this one out. The DB’s are identical, table prefixes identical. Is there another place that WordPress writes something that requests the install that needs changing along with the DB_HOST?
Are you sure DB replication is running properly? You can test by modifying data manually in wp_options on one server and checking on the other.
The other potential issue is maybe your web server cannot actually connect to the database on the other server – you can test that using the MySQL command with the IP of the other node.
Also – you should make sure you use the INTERNAL IP addresses for the database host.
Hi Dave,
Thanks a lot for this nice tutorial!
I was wondering about the Percona version you are installing (0.1-4). Today (July 15 2020) the latest release is 1.0-10. Should I install this latest one?
Furthermore, in the “apt install percona-xtradb-cluster-57” command, what stands “57” for? (latest release of XtraDB is 8.0.19)
Thanks.
Regards
Yeah, you should install the latest of all components. I’ll get an updated article out before the end of the year.
I’m about to give a go at a similar setup in AWS. Thought it might be worth mentioning that AWS Application Load Balancers have mechanisms built right in to handle this sort of routing with the wp-admin.
https://i.imgur.com/v5KIkYP.png
That looks pretty cool. I’m still finishing off plugin updates for Faster Woo Widgets, but once that is done and live I’ll be taking a fresh look at stack options and hosting options for people.
Jelastic might be worth checking out:
https://github.com/jelastic-jps/wordpress-cluster
https://github.com/jelastic-jps/wordpress/tree/master/wordpress
https://jelastic.cloud/
or
https://marketplace.digitalocean.com/apps/jelastic-paas
Hello, How to fix I can’t access my domain.com:9443
I have successfully install let’s encrypt and now I’m using cloudflare. The ssl work well on my domain but if I add port 9443 the site is unreachable
If you’re using cloudflare, they won’t proxy traffic through that port. I checked for you and it seems they allow you to use 8443, so either you can change your config everywhere to forward traffic for 8443 to node 1, or you can access node 1 using the IP address directly with the port number 8443 on it, or alternatively you could configure a different sub domain admin.yourdomain.com in cloudflare and alter your nginx config so that requests for admin.yourdomain.com get directed to node 1.
https://blog.cloudflare.com/cloudflare-now-supporting-more-ports/#:~:text=CloudFlare%20protects%20and%20accelerates%20web,)%20and%20443%20(HTTPS).
Thank you, one more question sir…
Example, I have 2 domain name on my node1, node2 and node 3
1. domain.com
2. api.domain.com
Then, how i setup it at load balancer server 4?
Well your load balancer should have your public domain name, then on that node you use the “upstream clusternodes” block and then “proxypass http://clusternodes“.
upstream clusternodes {
ip_hash;
server 10.130.47.4 max_fails=3;
server 10.130.47.11 max_fails=3;
}
I am setting up my cluster a bit different than in the article, using Raspberry Pis and hopefully the Apache server. I would like to know whether I can use
the apache2 package for this project because I have more experience with that server. Nginx config seems complicated and the Nginx docs are a bit bland so I don’t want to spend a ton of time reading them, although I do think that Nginx would be good for the LB. Is there a way to use Apache for the server nodes and Nginx as the load balancer? Also, is this even a good project for the Raspberry Pi, considering I have lots of storage and caching plugins?
I couldn’t install Percona xxtradb cluster on the pi. I first did the instructions in the tutorial, but the package wasn’t found by wget or apt. I went to the Percona website and it said to configure the repository before installing. I did their instructions but the package wasn’t found and the percona-release script I ran said armhf wasn’t supported, so it skipped some packages. I am going to try doing a different database solution and I will use nginx because, like you said, apache is a memory hog.
You can use Apache, it’s just that Apache is a memory hog so you’ll get a lower total number of simultaneous visitors possible.
re: Raspberry Pi – that’s an interesting use case, let me know how it goes.
Really interesting stuff and I’m gobsmacked that you both have the time and energy to keep up with all the comments on all these various articles so congrats. I’ve only recently started reading through your articles and will surely now buy your performance plugin based solely on my understanding of how converting any table scans to seeks can rocket performance.
Its really only been the last two days I’ve given your rocketstack a go and now having read this article will surely look at building a cluster to offload admin tasks. We’ve been paying way too much for a 4XL AWS server with Cloudways to mask some performance issues on a site with a few 1,000 products and 100k+ orders and users. Using the base rocketstack I’ve been able to replicate the performance of that on a much more cost effective VPS measured using K6.
So thanks for all the help and knowledge your articles have provided ! I’m just now discovering some of your videos.
Thank you – there are other videos coming out soon and a fresh article for ubuntu 20 and other options for clustering as well as hosting reviews and comparisons.
If you’re happy administering your own site with SSH, then my stack guides are great but if you’re looking for a control panel I can recommend Gridpane.
If you need further help, I’m running a deal right now where plugin pack purchases until the 12th June get a 50% off coupon for 2 of my performance analysis and optimisation options.
how can i add high availability to wordpress for free in oracle virtual box. doing it or school and cant seem to find a way
Follow the guide and set up a cluster. Clusters provide high availability since you only need 1 out of 3 (or however many nodes you have) to be online in order for your service to be available.
I have tried to make use of a 7 pi cluster recently. After trying to do different things with it I have decided I want to make use of it as my personal web server (all 7 of them) using WordPress.
I was thinking of the following setup:
1. Load balancer
2. Website (Apache or NginX)
3. Website (Apache or NginX)
4. Database (MySQL)
5. Database (MySQL)
6. Cache
7. Storage for cluster
Is this a good use for the 7 Pis? could i do better? What is the best way to have a setup like this? What would i need?
The purpose of it; simply a “distributed computing” style wordpress site.
In the near future once i have this running satisfactorily i would like to duplicate the whole setup and have redundancy.
Cheers,
Andre
There are lots of ways you can set up clusters. In the guide I’ve listed I have web + db on each node. But yeah, you could do it your way too.
Thanks for this great tutorial.
I would like to know how can we do this if i use a mutliole domains in my wordpress multisite that let users choose their preferred domain.
There’s no difference to setting up multisite in a cluster vs a standalone server. Just follow the normal multisite multidomain config. This will include altering your nginx config files: https://www.digitalocean.com/community/tutorials/how-to-set-up-wordpress-multisite-with-nginx-on-ubuntu-14-04
Thanks so much for this tutorial.
Ihave a problem with nignx at the loadbalancer configration file.
i done every thing with your description but the web server dos not start.
when i save and restart the nignx it showed me an erorr.
Nov 23 18:14:39 loudbalancer nginx[1405]: nginx: [emerg] no “ssl_certificate” is defined for the “listen … ssl” directive in /etc/nginx/conf.d/loadbalancer.conf:38
Nov 23 18:14:39 loudbalancer nginx[1405]: nginx: configuration file /etc/nginx/nginx.conf test failed
Nov 23 18:14:39 loudbalancer systemd[1]: nginx.service: Control process exited, code=exited status=1
Nov 23 18:14:39 loudbalancer systemd[1]: Failed to start A high performance web server and a reverse proxy server.
— Subject: Unit nginx.service has failed
Sounds like you have uncommented the SSL cert line prior to actually running letsencrypt. You should comment out those SSL lines, then get nginx started, then run letsencrypt again.
Hey Dave
Thank you for the tutorial, I will most likey give this a try in the near future.
However, I’m new to a lot of this stuff, and therefore have a few questions.
1. Might be a rookie question, but if you expect having a product database taking up for instance 100gb, is 100gb disk a must on all four nodes or is it enough to have a 100gb disk on 1 node?
2. I have also been wanting to setup a staging site for some time now. Is it possible to integrate that into this cluster or should that be done separately?
Thanks.
1. These nodes are effectively independent nodes and can run on their own if they have to, so yes 100GB would be required on each disk. If you want to avoid this, you’d need to use a SAN or something.
2. You could have one extra node that is your staging server and then disconnect that from the cluster. But better practice would be to have a separate cluster.
Thanks so much for this tutorial. I love that the central node in the star is private. I’m wondering if you or anyone is aware of a way to only activate specific plugins on that node, so that they don’t cause a performance hit on the public nodes?
Sam
Not that I know of unfortunately – even if you somehow got the plugin files only onto 1 node the other nodes would then notice missing plugin files and deactivate the plugin(s) in the database which would repl back to the first node.
If someone else has a solution, maybe they can offer one.
Maybe multisite is what you are looking for?
Hey, Thanks for the tutorial. I see that you had terrible performance results with GlusterFS. Now you turned to Unison which syncs files. However, have you tried with NFS mount instead in place of Unison or GlusterFS?
Yes, I tried it. The problem with NFS is that the file system from each node will try to write or read the file directly. This often results in race conditions. When it reads the file, it grabs a ‘read lease’. This read lease doesn’t prevent other nodes from reading the file, but when the file is then written to that node will have to wait until all read leases are released. That causes sudden halts.
Worse than that is possible – if some PHP script grabs a read lease at first, then the same script on a different node grabs a read lease, and then node 1 attempts to write to the file it will fail indefinitely – this is the race condition.
There are a couple of workarounds – avoid writing to files – seriously, that’s an option, since files in WordPress should really only be written once and everything else should be in the database. We’re talking plugin files, images, css, js etc. But, some plugins will write to files and some custom code does too.
Using Unison, everything is written locally and then queued to be written to the other nodes avoiding any possibility of the local node not being able to quickly read or write to its own files.
hi there,
Thanks for posting this guide and sharing your knowledge, it is greatly appreciated.
I’m curious if you or anyone has tried this on Cloudways hosting service. Cloudways’ servers have Apache as part of their tech stack and im not sure how that will affect the whole cluster. I think we can disable Apache, but im not sure if the server will work as intended. Let me know if you know anything. Thanks.
Not possible. Cloudways is too locked down. They use a combo of Apache, Varnish and Nginx.
In my experience supporting people, I’ve found their stack to be a bit overcomplicated and not as fast as the raw stack in this guide.
I pulled my recommendation for Cloudways as a result about a month ago.
Me again. With the load balancer server you have configured here. Are you aware of any UI we can use to visually view what the LB is doing and how it is routing traffic to each server? Perhaps, also a way to view health on each of the web server as well?
I know DO has their own LB solution that may do this, but the last time i tried to play around with it, the whole solution was not very intuitive to get up and running
Thanks for confirmation. Yes, i agree Cloudways is pretty locked down. But it definitely has its purpose to simplify most sites i’ve managed. I’m willing to sacrifice a bit of speed (and gain it back elsewhere) to gain ease of provision and maintain–it’s not always possible to sit at a computer and SSH to a raw server all the time.
Hi, have you tested GridPane? Do you recommend it?
I haven’t run the performance tests yet. I’ll be comparing WP Engine, Grid Pane, Kinsta and Siteground in a new article soon.
Thanks for the great article, Dave. I’m currently hosting my website on a single server and I’m looking at this kind of setup in case I might need it. Your incredible article helped me understand important points. Hoping to implement it soon.
I did a little research and found interesting solutions:
https://convesio.com/features/
https://closte.com/features
https://console.cloud.google.com/marketplace/details/click-to-deploy-images/wordpress-ha
Maybe you can create your own pre-configured one-click install solution or join the project like: https://github.com/WordOps/WordOps ?
I know about Kinsta or Cloudways, but they cost more.
Have you actually setup a cluster with WordOps? Really want to know that’s possible.
Looking at SlickStack documentation they said its not tested, and purpose is single WP servers:
https://github.com/littlebizzy/slickstack
Hi – that’s a great idea and something I’ll likely approach in the future. I have considered in the past doing similar one-click installs on Digital Ocean and AWS, so no reason to not include these other platforms at the same time.
Dear Dave, thank you for the detailed guide on WP clustering. Indeed all these steps look like a mammoth task, and can be a nightmare for non-experienced folks. To solve this problem Jelastic team has built “WordPress PaaS Engine” with integrated high availability and load balancing. For example, one of the possible cluster topologies that our solution supports – 2 x Load Balancer + 2 x App Server (NGINX or LiteSpeed) + 3 x MariaDB Galera + 2 x Storage Container + 2 x Redis (per request). A cluster can automatically scale on each layer (lb, app, server, db) based on predefined triggers.
Two or more clusters can be installed across different regions and covered by Geo-DNS for providing advanced DC failover solution. Multi-region deployment is in closed beta at the moment, but can be provided per request.
A quick video overview of the dashboard and how to get started with Jelastic WordPress Cluster https://www.youtube.com/watch?time_continue=43&v=GalbkKxC79Y.
It will be great to get your feedback as an expert in this area and make sure that we did not miss anything important. Please let me know if you would like to get a sandbox for playing around.
Thank you in advance
Hi – it’s great to hear that others are building clustering solutions to make this simpler. I’ll gladly make your comment visible for others, and yes I’d be keen to get access to a sandbox to play with and run performance tests.
Jelastic is indeed a better solution. They also offer great clusters by just one click deployments. Their pricing model is also pay for what you use type.
Hm, I am stuck on private networking. I am not using digitalOCEAN and default Ubuntu 16.04 is completely different from this manual.
Also installing php 7/nginx is throwing error…
So I guess i am going back to centminmod…
Sorry I can’t help you further. Setting up a cluster is definitely not for everyone – you really should have sysadmin skills.
Hey David,
I’m pretty late to this article, but wondering if you can help clarify how you setup the FastCGI cache, especially the purging aspect of it.
How are you clearing the cache from all the servers? Is it a manual operation or did you create a manual plugin to handle it or?
Thanks in advance.
It’s up to you – there is an Nginx plugin which lets you purge. Here’s a good plugin by the same guy that makes the Redis plugin:
https://wordpress.org/plugins/nginx-cache/
Hello David i have tried these processes following every details but i still don’t see the database cluster working, mysql fails to connect on node 2 and 3 after configuring the wsrep.cnf file.
i also ran `clustercheck` on node 1 even if everything seems okay on it with mysql running but i get this message below
HTTP/1.1 503 Service Unavailable
Content-Type: text/plain
Connection: close
Content-Length: 57
Percona XtraDB Cluster Node is not synced or non-PRIM.
Please check our guide to maintaining your cluster. It should help you figure out what’s going wrong – it includes methods for diagnosing failing db clusters etc.
https://www.superspeedyplugins.com/2018/04/26/how-to-maintain-and-manage-a-wordpress-cluster/
Hi David,
Request your inputs on this..
I’m trying to setup multisite install (subdirectory mode) of wordpress. I’m assuming to add nginx rules as per below mentioned link, i have to edit the /etc/nginx/sites-enabled/wpintense.cluster.conf on all the 3 nodes? (except the load balancer node)..
Is my assumption correct?
Also, please let me know if the nginx conf shown in below link looks OK?
https://www.itworld.com/article/2871918/how-to-configure-nginx-for-wordpress-multisite-with-subdirectories.html
Best Regards,
Gane
Get in touch through our on-site chat and I can help you out.
Hi David,
Can’t thank you enough for your good work.
My question is related to wp all import. How this above setup will help me achieving 1 Million product import every night.
Feels to me the whole above setup is mainly for serving the site faster?
Thanks.
Hi – one thing is by keeping imports off your realtime server which serves users. If you want fast imports, check out our article about this: https://www.superspeedyplugins.com/2017/05/31/speeding-wordpress-imports-datafeedr-wp-import/
Dear David,
I would like to sincerely thank you for this great yet simple to understand guide. It’s really difficult to write technical documentation like this and be crystal clear at the same time. So, thank you for taking your time to share your knowledge and ideas with the world for free!
I’m trying to create a same setup, but will try to replace mysql / percona with something else may be and try to add redis. Not sure how much time consuming that’ll be for me given that I’m not an expert in writing nginx configs.
I will update here once i’m successful in above.
Thanks & Cheers!
Your Fan from India!
Redis is easy to setup. The only config change you need to make is to make it a non-persistent storage, and set the max memory you’d like your redis cache to use. Then install the redis plugin and add object caching. Apart from the speed boost of object caching, you also get all wordpress transients moved to redis in-memory storage which eliminates a bunch of unnecessary writes to your disks.
It didn’t work for me, I followed step by step and I didn’t even change, just copy/paste. Everything works until the replication with Unison but after that when set DNS provider made them to point to the LB, but it didn’t load WordPress installation.
I check the logs and the LB is receiving the request from my website correctly but seems like something is wrong with loadbalancer.conf
I will appreciate if you can help me to clarify this.
Thanks!
You might want to try removing the /etc/nginx/sites-available/default config on the load balancer and/or restart nginx.
Well written article that helped me on a project I was working with. During setting this cluster up I faced an issue with the percona cluster and got in touch with Dave (the author) who clearly went out of his way, going back and forth with me through e-mail to help me out until the percona database issue was fixed. Working at this project was extremely important to me and I wouldnt have done without this article. Dave has no idea how much he helped me and how much I appreciate it! I am not encouraging people to use Dave as a tech support analyst but I just want to let everyone know that hes the real deal and helped a fellow sysadmin in need.
What about DDL? How WordPress manages that considering Galera requires to change RSU method in each node and work in a more isolated way?
I’m not a master in WOrdpress but this topic really worries me
Thanks and great post!
The way Galera is set up here, it confirms that all nodes have made the change before committing on all of them at the same time. It’s a little slower than less strict replication but it avoids these issues.
Note: It’s important you keep your Redis object cache on however, as the number of writes to the database from transients can cause issues with this replication.
Hi David,
thank you for this guide. It is very well written and easy to follow.
I have some questions:
1. How do i know which node is delivering my site? I added a header on nginx fastcgi on every node and it returns allways the same node.
2. Would be easy to switch from ip_hash; to least connections?
3. If i switch node-1 off, then i am getting an error. Should not the site be served from one of the other nodes?
edi
Hey Dave,
I am having problems with Issuing the SSL certificate on the Load Balancer.
When I try to issue the SSL, certbot gives me the following error:
////
Failed authorization procedure. http://www.yet-another-domain.com (http-01): urn:acme:error:unauthorized :: The client lacks sufficient authorization :: Invalid response from http://www.yet-another-domain.com/.well-known/acme-challenge/9KuNEVFp7MWWUcl4D_iqvyod7a3waFKA8VpNDsD8HH0: ”
<html xmlns="http:", yet-another-domain.com (http-01): urn:acme:error:unauthorized :: The client lacks sufficient authorization :: Invalid response from http://yet-another-domain.com/.well-known/acme-challenge/4QZAR_4OJ-c9gSB8Fxo-eMq0Uj8N5V_JsV9cl2Re3Xo: "
<html xmlns="http:"
IMPORTANT NOTES:
– The following errors were reported by the server:
Domain: http://www.yet-another-domain.com
Type: unauthorized
Detail: Invalid response from
http://www.yet-another-domain.com/.well-known/acme-challenge/9KuNEVFp7MWWUcl4D_iqvyod7a3waFKA8VpNDsD8HH0:
"
<html xmlns="http:"
Domain: yet-another-domain.com
Type: unauthorized
Detail: Invalid response from
http://yet-another-domain.com/.well-known/acme-challenge/4QZAR_4OJ-c9gSB8Fxo-eMq0Uj8N5V_JsV9cl2Re3Xo:
"
<html xmlns="http:"
To fix these errors, please make sure that your domain name was
entered correctly and the DNS A/AAAA record(s) for that domain
contain(s) the right IP address.
////
My A record is set, and CNAME for www, but the host doesn't provide an ipv6 address. But I've used certbot at other times no problem issuing certs for sites.
Difference is the im trying to issue it on the loadbalancer, never done with certonly to webroot path before. Are there any special permissions, or is that the full configuration needed for the Load balancer above? Or does it require extra settings on the nodes? I used a stripped down regular nginx configuration for the nodes, since I am not using fastcgi_caching, but I did include the ACME stuff in the server block.
Thanks for any help or pointers you can give.
Jeff
Did you install the full file from the page above onto your loadbalancer? Importantly, you need the rule to allow the .well-known files.
Config above works and is full config for load balancer – i’ve set up a bunch of them. It’ll be the ACME stuff that’s failing – the ACME stuff needs to be on your LOAD BALANCER, not on the nodes.
Hey David, thanks for the help. Yeah i am absolutely sure it is working, I am trying to adapt it for my workflow, so stripped it back and will re-add your fastcgi_caching and security stuff as I go.
It’s all good stuff.
One thing I did note, on the load balancer, I needed to delete the default symlink from the etc/nginx/sites-enabled folder.
I also had to delete the inverted commas from:
wsrep_sst_auth=”sstuser:password”
to:
wsrep_sst_auth=sstuser:password
The full file for the load balancer ‘/etc/nginx/conf.d/loadbalancer.conf’ above was up on the load balancer.
So in the tutorial, all the files from your github ‘https://github.com/dhilditch/wordpress-cluster /root/wordpress-cluster/’ nginx file should be on the load balancer aswell, crucially, the acme stuff?
I will get to that.
Nice one!
I didn’t actually get it working using the webroot/ACME method – I will do later though I am sure.
Instead, for now, I just created a virtual host on the loadbalancer for my domain, and then used certbot –nginx plugin.
There is a bit of an issue at the moment with certbot –nginx plugin:
https://community.letsencrypt.org/t/solution-client-with-the-currently-selected-authenticator-does-not-support-any-combination-of-challenges-that-will-satisfy-the-ca/49983
So need to use:
sudo certbot –authenticator standalone –installer nginx -d -d –pre-hook “service nginx stop” –post-hook “service nginx start”
But this all worked.
Also with the clusterwpadmin and clusternodes, redirecting admin access to 9443:
This:
define( ‘FORCE_SSL_ADMIN’, true );
if (strpos($_SERVER[‘HTTP_X_FORWARDED_PROTO’], ‘https’) !== false) {
$_SERVER[‘HTTPS’]=’on’;
}
needed to be above this:
/** Sets up WordPress vars and included files. */
require_once( ABSPATH . ‘wp-settings.php’ );
That had me for a while.
This is all really great. Like I say, I am going through your Nginx configuration, lots to learn from there regarding optimizing an Nginx stack, this is all very much appreciated Dave.
I’d definitely like to buy you a beer if you have any such a button?
Jeff
Tipped, thanks again mate.
Thanks Jeff – I’ve added a tip button to the sidebar for you 🙂
Maybe it’s because you deleted the default symlink – not sure why you needed to delete that on the loadbalancer?
No I didn’t mean you needed to install the file from github on the loadbalancer. Maybe it’d be easier if I put a copy of the file for the loadbalancer on github, but I just mean the loadbalancer.conf text above.
There’s a comment in the text above that says: # this block is for letsencrypt.
Hello Dave,
thanks for the heads up. I am also working with GlusterFS so we are on the same boat here 🙂
I know the rebuild of the LB isn’t that difficult and takes aprox 5 minutes. But in my case I am running a very big website which I can’t afford downtime on. Although it’s a simple process, but If my website goes offline overnights (okay I also can ad some monitoring software with SMS or whatever alarms we can think of) I’ve got a problem I don’t want to. Then it’s better to go with en failover loadbalancer. Once again money shouldn’t be the issue with this kind of setup.
Regards,
Michel
Btw, perhaps for everyone here following this interesting blog it’s good know which servers and configuration you need.
My setup is:
LOADBALANCER 1 (2GB Droplet): LB + Keepalived daemon (NGINX)
LOADBALANCER 2 (2GB Droplet): LB + Keepalived daemon (NGINX) (Failover)
NODE 1 (8GB Droplet): Webserver 01 + DB (NGINX + PERCONADB + PHP-FPM 7.1)
NODE 2 (8GB Droplet): Webserver 02 + DB (NGINX + PERCONADB + PHP-FPM 7.1)
NODE 3 (8GB Droplet): Webserver 03 + DB (NGINX + PERCONADB + PHP-FPM 7.1)
Regards,
Michel
PS.
Perhaps it’s even fancier to setup separate caching servers with Memcached or Redis. One server could be used to offload PHP session and the second server could be handled by WordPress.
Hi Michel, David,
I really appreciate you sharing the DO server hardware configurations. I would like to request you to let us know for what kind of traffic was this setup made? I’m just curious to understand the numbers.. Example: X million users per month and X number of concurrent users / connections / requests in average to load balancer..
Thanks and looking forward for your reply.
Best Regards,
Raghav
There’s a video being released in September using a variety of load testing tools to simulate user traffic and huge numbers of products, posts, comments etc. I’m sure your question is more: What’s the maximum per hardware/per node? That video will answer those questions.
There’s no real requirement for servers, other than what I specified. Ubuntu 16.04, although Debian will probably work with the above commands. Other than that, make sure it has some decent amount of RAM, 2GB minimum, the more the merrier, and SSD disks, but these are not really requirements, just nice-to-haves.
I’ve built these with with as low spec as 3x2GB RAM + 1x1GB RAM (loadbalancer), and as high as 4x8GB RAM + 1x2GB RAM (load balancer) + some other variations of these sizes. There’s no limit to the number of nodes you can have – e.g. you could go 10x32GB RAM if you so wish, and you can also use any load balancer you like, e.g. you could use the digital ocean load balancer.
And yes, you can set up separate elements in your cluster, like a cluster of redis or memcached servers. The way the Nginx config for the load balancer is set up above, each user will stick to the same node (stickied by IP address) unless that node goes down. Each nginx server in the above config is running its own page cache using fastcgi_cache which is as fast as varnish. That works for logged out users only and switches off when key wordpress things happen, e.g. comments, or add to basket or similar.
Hello Dave,
Nice blog to read, but you are missing some essential things to get the whole tutorial working (please follow you own tutorial from beginning to end). You also write about 3 nodes in the beginning but you’ll need 4 nodes (loadbalancer) later on. The loadbalancer is your biggest bottleneck here……what if your loadbalancer goes down for any reason? If money ain’t a problem then I would prefer a backup load balancer. then 5 nodes in total is the way to go! Do you also thought about a clustercheck?
Regards,
Michel
Hi Michel – the guide has been updated to note that 4 nodes are used, although if you’re worried about this you can use the Digital Ocean load balancer feature they provide.
I’ve also updated the guide to replace Unison with GlusterFS which gives instant file replication and eliminates the need to activate plugins at node 1. Now you can do whatever you like on any node and it will replicate properly.
If your load balancer goes down, firstly it’s an incredibly simple server, so I don’t agree it’s your bottleneck here – all it’s doing is decrypting SSL and proxying traffic through to the other nodes. Secondly, it’s easy to rebuild – takes about 5 minutes.
hi
This is prabhu. i’m a web developer and i work with wordpress. this article about setting up a wordpress cluster for huge sites is really a useful information for everyone. Thanku so much
What do you think about this?
https://github.com/carlalexander/debops-wordpress
http://rancher.com/setting-up-a-scalable-and-highly-available-wordpress-environment-with-rancher-and-docker/
https://www.digitalocean.com/community/tutorials/automating-the-deployment-of-a-scalable-wordpress-site
I used to use the debops stuff quite a bit – it’s good, but there were bugs around the letsencrypt ssl and the varnish config, and I never made use of updating configs remotely using that system. There was sooo much custom config in their playbooks for me to go through (a lot of it good, but some it was causing problems and was difficult to trace) that I prefer to do it all from scratch so I have the latest code and no extra bumf, and I know exactly what is on there.
The digital ocean scalable wordpress link you sent – they only have 1 database. I do like their use of glusterfs though, and this could be implemented in the cluster I’ve described above if you wish – it would replace the need for unison to replicate the files. Note that glusterfs would mean you’d need more servers – e.g. 1 load balancer, 3 nodes with db+web, then 3 nodes for your glusterfs. You could theoretically install it on these 3 nodes themselves. BUT, the thing I like about my cluster is that any individual node has all the info it needs to run your entire site. Here’s a guide to installing glusterfs – https://www.cyberciti.biz/faq/howto-glusterfs-replicated-high-availability-storage-volume-on-ubuntu-linux/ I’ll get a site with glusterfs up and running and get some measurements done soon.
The Rancher/Docker link looks interesting, but the thing I don’t like about playbooks is that it gives you something else that you need to keep up to date. For example, that Rancher link is using playbooks that install PHP 5. The Nginx config is not great either. I do like docker though, and thanks for the links – it’s given me more stuff to investigate!
Great article, I will try to set up, I am also interested how to make it on Google Cloud
This kind of balancing can be easily done with Google Cloud. Very easy to orchestrate.
Thanks for the post – and i am interested in the google as well.
Do you have a link to an article covering the setup on Google Cloud? I’m always interested in any performance solutions for WordPress.