SSH keys are an alternative to username + password combos. They are often used to access servers and help speed your life up because you no longer need to remember a password to access your server.
They can also be used to give multiple people access to a single account – e.g. the root account – whilst still having the ability to remove access for that user without removing access for other users. If you shared access to your root account with username + passwords, to remove access to one person you would have to change the password, meaning everyone with legitimate access to that account would have to be told the new password.
Table of Contents
What is SSH?
SSH stands for Secure Shell, better know as Putty on Windows. A secure shell gives you command-line access to your server. So, SSH is a cryptographic networking protocol that allows you to operate secure network services over an unsecured network. They are much more secure than a password alone and are impossible to decipher with brute force.
All that stuff aside, the key thing you need to know is that SSH keys exist in pairs, a public and a private key. The public key you can share with anyone – for example, you can place it in the right place on a server and you will be granted access (without any passwords). The private key you guard with your LIFE. Or a password protected folder will do.
They are really easy to generate as this guide will show you.
Create your SSH key-pairs on a Mac
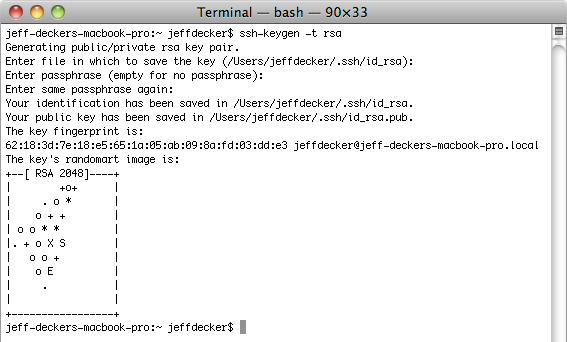
Open Terminal and create the your SSH keys by running this command:
$ ssh-keygen -t rsa
You’ll get something that looks like this:
Storing and securing your keys on a Mac
On a Mac, you will be asked where you would want to store your keys. It will display the default location, (i.e. home/user/xyz/.ssh/id_rsa.pub) you can put it where you want, but I’d just press enter and get on with it.
You will then be offered the chance to add a password, this is up to you, I prefer securing SSH keys folder within another encrypted password protected folder (how to on mac and windows). If you press enter again the keys with begin to generate and will be save in the location previously specified. This is preferred because then you don’t have to enter your password every time you connect. Also, some applications do not allow password-protected SSH keys.
The private key will be located in: home/user/xyz/.ssh/id_rsa
The public key will be here: home/user/xyz/.ssh/id_rsa.pub
Create your SSH keys on Windows
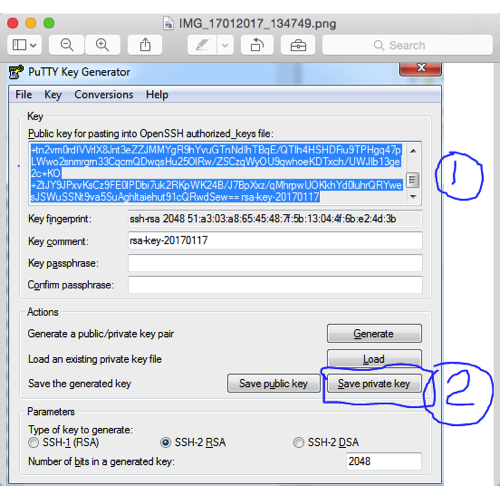
- Launch the PuttyGen program, and then click the Generate button. The program generates the keys for you.
- Enter a unique key passphrase in the Key passphrase and Confirm passphrase fields. (like a password or a phrase you use all the time eg. ‘Help I am a technophobe that should have used WP Engine’)
- Copy the public key ready for adding to your server (marked 1 below) then click save on both the public and private keys and pick somewhere secure to store them.
Storing and securing your keys on Windows
I’d recommend using the same method as described on Mac by storing them password-less within an encrypted folder. You can find a guide to do that here:
https://support.microsoft.com/en-us/help/4026312/windows-10-how-to-encrypt-a-file
Adding SSH keys to your server
If you’re using Digital Ocean, you can add your SSH key when you create a new droplet. Just paste your public key into the box they provide.

If you already have a server with username+password combo, you need to log onto it with putty, terminal or Filezilla and modify the following file:
/root/.ssh/authorized_keys
In that file, there is one public key per row. If it’s empty, just paste your public key in there. If there are already other keys, add a new line and paste your public key. Now you will be able to access your server using SSH.
Access your server using SSH keys on a Mac
Open terminal and run the following command:
ssh root@yourserveripaddress
You’ll be confronted with a message along the lines of:
The authenticity of host 'an ip address here (same ip address here)' can't be established.

RSA key fingerprint is: public key will be here .

Are you sure you want to continue connecting (yes/no)? yes

Warning: Permanently added 'ip address' (RSA) to the list of known hosts.

user@ip address's password:
Nothing to worry about, just check and confirm the IP address is correct and press enter.
Access your server using SSH keys on Windows
When you open PUTTY the configuration window should appear:
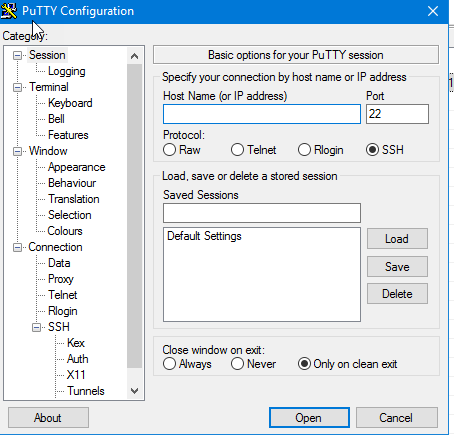
You simply enter the IP address into the field marked “Host Name (or IP address)” and click open or press enter.
A box like this should appear:
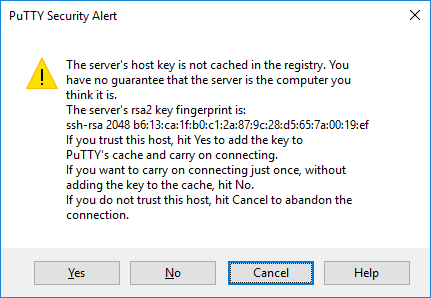
Click yes and you will be connected.
Removing SSH keys
That’s all there is to it. If you want to grant access to other people, you can just open up that /root/.ssh/authorized_keys file and add their public key. Remove the line when you need to remove their access.
Digital Ocean’s guides are also a lot of help:
https://www.digitalocean.com/community/tutorials/