

If you’ve been following my stack guides, you’ll have seen how popular my previous stack-build guides were. That’s because they were incredibly fast for the price of the server you’re using. My previous guides included installing Varnish and PerconaDB. In this guide, these have both been replaced with new and better alternatives.
Update: Since writing this article, I’ve added a stack configuration guide too.
The stack includes:
- Ubuntu 18.04 – the latest and greatest. Don’t go for 18.10 as it’s only supported for 9 months whereas 18.04 is supported until 2023.
- MySQL 8 – the fastest MySQL ever released
- Nginx – the fastest web server available
- PHP 7.3 – the fastest PHP available
- Redis – the fastest object and variant cache available
- Nginx FastCGI Cache – the fastest HTTP accelerator available and it’s easy to use
- Fail2ban
- Letsencrypt
Table of Contents
- First, a bit of background
- Hosting choices
- MySQL 8
- Benchmarks
- Starting set of commands for the stack installation
- Configuring Redis to be a non-persistent cache
- Configure DNS to point a domain name at your server
- Configuring Nginx to serve your website in the fastest possible way
- Install WordPress
- Troubleshooting WordPress database connection errors
- Adding SSL using Letsencrypt
- Changing your site to use SSL
- Search/Replace SSL
- Using SED to search/replace http with https in your WordPress theme files
- Configuring Cloudflare SSL
- Redirecting all traffic to https
- Optimising your MySQL configuration
- Optimising your MySQL configuration after you’ve run traffic for a while
- Optimising your PHP configuration for WordPress
- Configuring fail2ban to eliminate bot traffic before it ever hits WordPress
- Configuring Redis for object caching and transient caching
- What about page caching?
- Securing MySQL
- Optional nginx snippets
- Testing everything individually
- Summary
First, a bit of background
Before going into the stack build, I’d like to introduce myself. I’m Dave Hilditch, founder of Super Speedy Plugins. I’ve been developing WordPress plugins focused on improving WordPress performance for the past 4 years after leaving Skyscanner. You can see me talking about WordPress performance issues at my talk at WordCamp in Brighton, UK.
Here’s what some of our customers have to say about our plugins:
This plugin is brilliant!!! Would give it 10 stars if I could. Brought the site loading times down to less than 2 seconds – was sitting at about 10 seconds before.
Corey D, talking about our Scalability Pro plugin
Bought external images and scalability pro. 5 stars for both of them. Thank you for these superb plugins which really boosted my website speed and product imports.
Markus P, talking about our External Images and Scalability Pro plugins
This is the third plugin i bought! Faster isn’t close to how fast woo widgets load! Excellent plugin!!!
Savvas Z, talking about our Faster Woo Widgets plugin
If you’re thinking about rebuilding your WordPress hosting stack for performance, you may find with our plugin pack that you don’t need to! Now onto the guide!
Hosting choices
You can choose whichever host you like, but I prefer Digital Ocean and not because I have an affiliate deal with them – it’s because they have 50s builds, they have great uptime, they have SSD disks, they have great prices and I’ve pretty much never experienced any issues with their servers.
Given that I said it’s not because of the affiliate deal, they do provide an affiliate deal but it’s a nice one that gets YOU guys $50 credit towards your next server(s). That means you can build a great server with this stack and host it free for 2 or 3 months. To take advantage, click this Digital Ocean Affiliate Link.
If the guide below is too hardcore for you, we’ll soon be reviewing managed services. Our shortlist includes WP Engine, Kinsta, GridPane and Cloudways.
Otherwise, use whichever hosts you like, but this guide needs Ubuntu 18.04, so make sure you have that and SSH access and the guide will work.
MySQL 8
I used to recommend PerconaDB, partly because they had the fastest database (comparable to MariaDB but 3x faster than MySQL 5.6), but more because they have a really great performance analysis toolkit.
Now, there is another tool you can use to analyse performance, and MySQL 8 has caught up performance-wise, so we’re back to the core track.
You might notice in the install script below that the installation installs the packages for 8.0.10 when 8.0.12 is the latest version, but don’t worry about that – because we’re adding the packages, apt-get update and apt-get upgrade then update us to the latest version.

Benchmarks
I have benchmarks coming shortly including comparisons of various stack options, comparisons of theme performance and comparisons of various plugins. There’s a scalability black-list and scalability white-list coming too, and for anything on the blacklist, I’ll have identified the specific performance problems suffered by these plugins, themes or shortcodes and hopefully the developers can fix these issues so they can get onto the whitelist.
Starting set of commands for the stack installation
The following is based on Ubuntu 18.04. Once you are logged in, run these commands one at a time. You can copy the line (triple-click the line to select the line) then paste into your server by right-clicking.
Unless otherwise stated, accept all the defaults or ‘y’ whenever asked. NOTE: There is one exception – do not choose the default for the authentication mechanism when installing MySQL – use the LEGACY authentication mechanism to remain WordPress compatible.
wget -c https://dev.mysql.com/get/mysql-apt-config_0.8.13-1_all.deb
dpkg -i mysql-apt-config_0.8.13-1_all.deb
apt install software-properties-common
add-apt-repository ppa:ondrej/php
apt-get update
apt-get upgrade
apt-get install mysql-server -y # accept all defaults
apt-get -y install php7.3
apt-get purge apache2 -y
apt-get install nginx -y
apt-get install -y tmux curl wget php7.3-fpm php7.3-cli php7.3-curl php7.3-gd php7.3-intl
apt-get install -y php7.3-mysql php7.3-mbstring php7.3-zip php7.3-xml unzip php7.3-soap php7.3-redis
apt-get install -y redis
apt-get install -y fail2ban
Now that everything is installed, we need to configure each item to be more optimal.
Configuring Redis to be a non-persistent cache
You don’t want Redis writing to disk – we’re just using it as an object-cache and variant-cache, and anything using the object-cache of variant-cache will survive the cache being wiped (it’ll just start building the cache again) so you need to alter the config to avoid disk writes which would otherwise slow your server down.
Edit /etc/redis/redis.conf and add the following 2 lines at the end:
vi /etc/redis/redis.conf #you can use nano to edit the file instead if you like, but I prefer vi
Scroll to the bottom of the file (just hit G in vi to get there), then hit ‘i’ to insert and insert the following lines:
#You can adjust this value as you see fit - 200mb or 20000mb
#it depends on how much RAM you have. On a 1GB server, I use 100mb.
maxmemory 3000mb
maxmemory-policy allkeys-lru
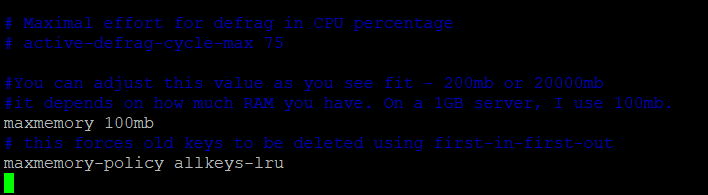
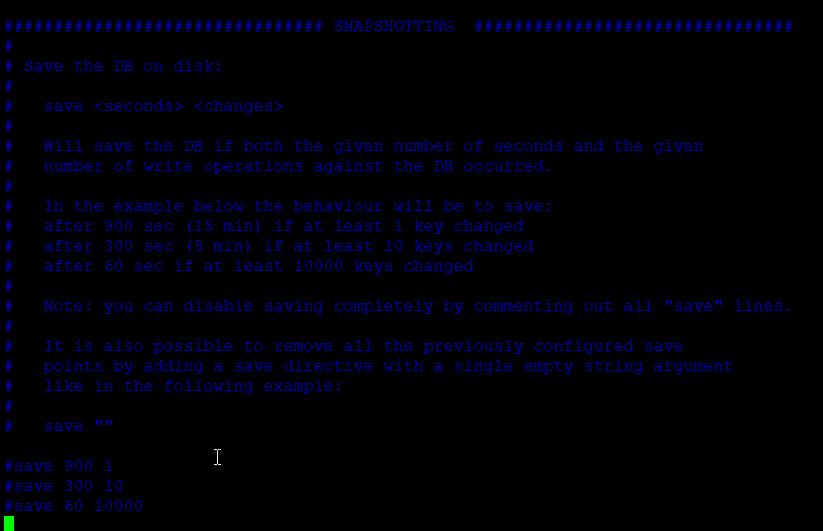
#save 900 1
#save 300 10
#save 60 10000
service redis-server restart
Configure DNS to point a domain name at your server

Configuring Nginx to serve your website in the fastest possible way
I have uploaded some configuration files to github to make this step a lot easier. The configuration files will allow your site to be served over port 80 (non-SSL) in order to complete the initial WordPress installation. After that, you can configure SSL using either the Cloudflare flexible SSL or by using LetsEncrypt to have full end-to-end encryption.
The config files I use are built to allow processes to run for ages – this helps if you’re running massive import or export jobs etc – but you can modify them using the comments included in the config files.
cd ~
git clone https://github.com/dhilditch/wpintense-rocket-stack-ubuntu18-wordpress
cp wpintense-rocket-stack-ubuntu18-wordpress/nginx/* /etc/nginx/ -R
ln -s /etc/nginx/sites-available/rocketstack.conf /etc/nginx/sites-enabled/
rm /etc/nginx/sites-enabled/default
The files you cloned above and copied to your nginx folder include a config file for your website as well as various snippets to make your site fast and secure. The files use the nginx_fastcgi_cache library, and for that to work you need to create a cache folder.
mkdir /var/www/cache
mkdir /var/www/cache/rocketstack
chown www-data:www-data /var/www/cache/ -R
Before restarting nginx, you should alter the rocketstack.conf file – specifically, you want to enter your own domain name to prevent botnets attacking your site via the IP address.
vi /etc/nginx/sites-available/rocketstack.conf
Then change the server_name _; line to read (there are 2 lines like this):
server_name www.yourdomain.com;
To get these files into your nginx installation, you’ll need to restart nginx using the following command:
service nginx restart
Now your web server is ready for traffic, so visit www.yourdomain.com in your browser and check that you see the following:

The above confirms nginx loaded but the files it needs don’t exist yet.
Install WordPress
Before you install the WordPress files, you need to create a database. I tend to just use the command line like this:
mysql -u root -p
You’ll be asked for your MySQL password which you can paste using right-click.
Then run the following SQL, one line at a time after editing the 2nd command to use a strong password.
CREATE DATABASE rocketstack;
CREATE USER 'rs'@'localhost' IDENTIFIED WITH mysql_native_password BY 'CHOOSEASTRONGPASSWORD';
GRANT ALL PRIVILEGES ON rocketstack.* TO'rs'@'localhost';
EXIT;
You can install WordPress using the following set of commands:
wget https://wordpress.org/latest.zip -P /var/www/
unzip /var/www/latest.zip -d /var/www/
mv /var/www/wordpress /var/www/rocketstack
chown www-data:www-data /var/www/rocketstack -R
rm /var/www/latest.zip
Once done, if you reload your domain name you should see the WordPress installation screen. In the installation screen, you’ll be asked for the database name, the database username and the database password, so enter those from when you created the database and user.
In the example above, the database name is ‘rocketstack’, the username is ‘rs’ and the password is ‘CHOOSEASTRONGPASSWORD’. You can change these, and you should definitely change ‘CHOOSEASTRONGPASSWORD’, although with this config, and because we ran the secure mysql scripts, remote login to your MySQL server will be disallowed.
Once your WordPress installation is complete, you can move onto adding SSL to your site.
Troubleshooting WordPress database connection errors
If you are experiencing a database connection error, it is likely related to the new MySQL 8 authentication methods.
You can check your default authentication method by reading this file:
cat /etc/mysql/mysql.conf.d/default-auth-override.cnf
It should contain the following:
[mysqld]
default-authentication-plugin = mysql_native_password
If it doesn’t, change it to mysql_native_password, restart mysql and then rerun your WordPress installation again by revisiting your home page. Edit the file using:
vi /etc/mysql/mysql.conf.d/default-auth-override.cnf
Restart mysql first using:
service mysql restart
Adding SSL using Letsencrypt
apt-get update
apt-get install software-properties-common
add-apt-repository universe
add-apt-repository ppa:certbot/certbot
apt-get update
apt-get install python-certbot-nginx
certbot --nginx
The last command above will scan your nginx configuration files and figure out any URLs you have set for this server based on the server_name variable. If you left them as _ you should change them to your domain name(s). If you have multiple domain names, you can separate them by spaces in the server_name variable.
The command will run and update your nginx config file to have the correct location of the SSL certificates.
Once complete, you need to set up SSL renewals, so run:
crontab -e
And add the following line:
0 0 1 * * certbot renew
Changing your site to use SSL
For some weird reason, the WordPress installer fails miserably if your site starts out HTTPS. So, you have to install over HTTP and then convert to HTTPS. Now that your site serves up SSL traffic, you still need to make some alterations to be fully SSL.
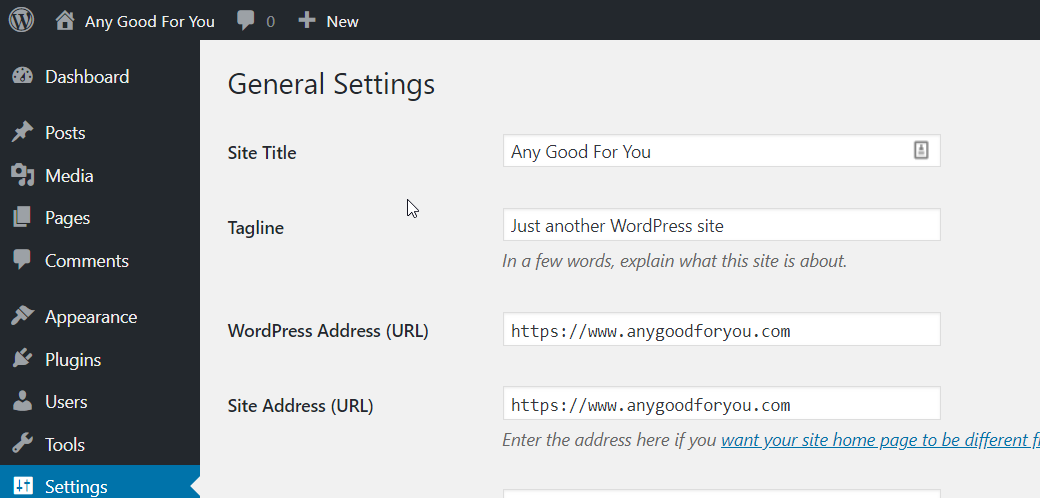
Firstly, visit wp-admin -> Settings and change your WordPress Address and Site Address making both of them https instead of http.
If this is a brand new website, there’s only SSL redirects remaining – to send all traffic from http to https. You can do that with an nginx rewrite, or you can do it using Cloudflare.
You can test your pages, after you’ve changed your site address, and look for the padlock being broken. If it’s broken, you have insecure content being loaded on these pages.
Search/Replace SSL
If, instead of seeing https links above, you see https links, you need to fix these. One easy way to fix this is using a plugin but that’s the slowest possible way to fix it since full WordPress code needs to be loaded before the redirect kicks in.
Instead, you should use a search/replace plugin like Better Search and Replace or similar to replace all http://www.yourdomain.com references with https://www.yourdomain.com references.
If you have a massive site, you should probably use the Interconnectit script instead to search/replace in your DB and use sed to search/replace in your theme files.
https://interconnectit.com/products/search-and-replace-for-wordpress-databases/
Using SED to search/replace http with https in your WordPress theme files
It depends on how your theme developers have coded things. You ideally want a theme that uses //www.yourdomain.com as these type URLs are protocol agnostic, meaning they will use whatever protocol your pages were loaded over. But, many theme developers will have hardcoded http background images into any of your PHP, JS or CSS files so you need to find them and fix them to be https.
Logged into your server, using SSH, navigate to your wp-content/themes/child-theme folder.
cd /home/826397.cloudwaysapps.com/vaxvhpbyme/public_html/wp-content/themes/your-child-theme/
Now run something like the following line below. This will search and replace inside .php, .css and .js files so be careful. Take a backup of the folder prior to running your sed.
find ./ -type f -readable -writable -exec sed -i "s/http://www.yourdomain.com/https://www.yourdomain.com/g" {} ;
The command may look a little odd because with sed you need to escape some special characters, in our example the forward slashes and the dots.
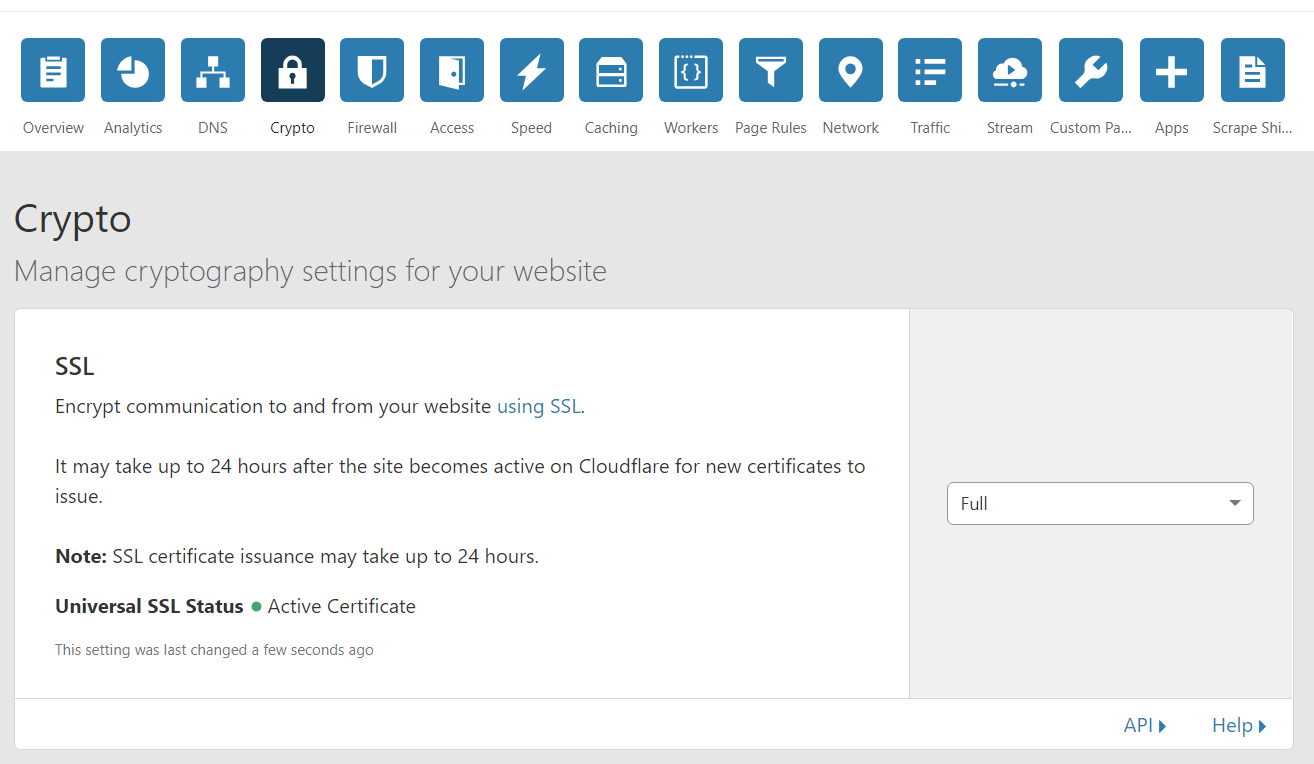
Configuring Cloudflare SSL
If you configured Letsencrypt SSL, you can now configure FULL SSL so that traffic to your site is full encrypted. You *don’t* have to do this – if you are determined to lower your CPU usage, you can use the FLEXIBLE SSL option in Cloudflare, and this will mean traffic from your users to the Cloudflare servers is encrypted, but traffic from Cloudflare to your server is NOT encrypted.
I personally prefer to have the traffic encrypted all the way through, and I think you have an obligation to do so – you do not know who is packet sniffing on routers between Cloudflare and your own servers.
Anyway – it’s easy to enable FULL SLL – just log in to Cloudflare, hit the Crypto menu button and choose the FULL dropdown option.
To test that SSL is enabled all the way through, you can run the command below. The nginx configuration files save access logs to two different locations, depending on whether it’s encrypted or not.
View the latest encrypted traffic access logs:
tail /var/log/nginx/rocketstack_ssl_access.log
View the latest unencrypted traffic access logs:
tail /var/log/nginx/rocketstack_access.log
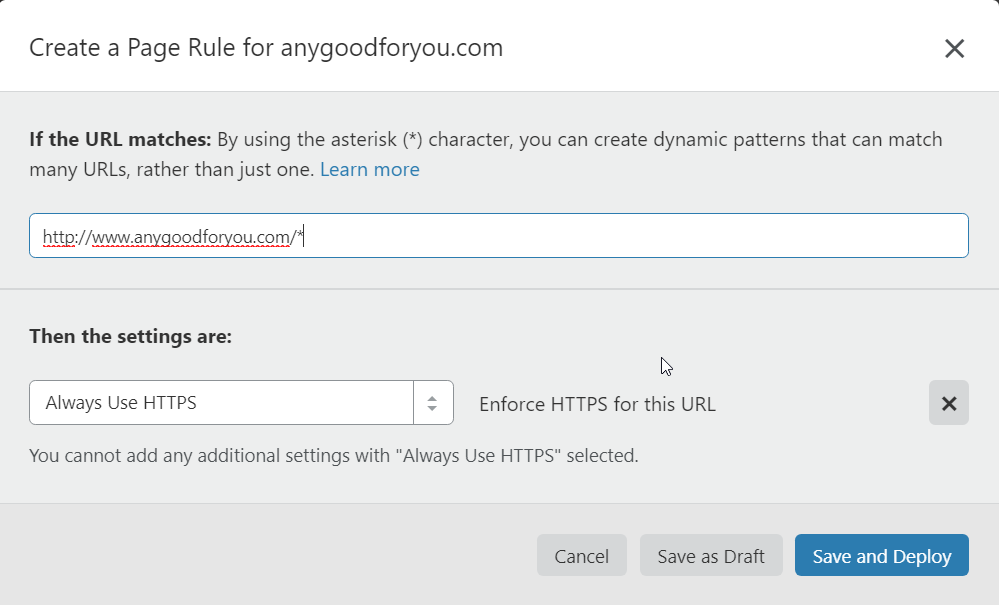
If you’d like to force all traffic through SSL, I recommend you create a page rule using Cloudflare. It’s the easiest way.
If you’re using Cloudflare, you should install and configure the Cloudflare plugin.
Redirecting all traffic to https
You can either use a Cloudflare page rule, or you can use an nginx rewrite rule. The cloudflare page rule eliminates some work from your server, in the cases where traffic is trying to visit old http links, so that’s the preferred option.
Log into Cloudflare and create a new page rule. Enter your http://www.yourdomain.com domain name and choose ‘Always HTTPS’. Save and deploy.
You should already have your WordPress site URL set to https://www.yourdomain.com/ so https://yourdomain.com traffic should already be getting redirected to the correct URL. Here’s an example page rule in Cloudflare for HTTPS.
Optimising your MySQL configuration
The mysql configuration files you need to edit are a little different to the previous PerconaDB installations I used to use.
In this stack guide, I’m recommending that you initially modify your mysqld (MySQL daemon) configuration file as follows, then run your site for a while and once you have typical traffic for a while, you should run the performance optimisation script further down this article. That performance script will help you configure your MySQL configuration for your particular server abilities and traffic behaviour.
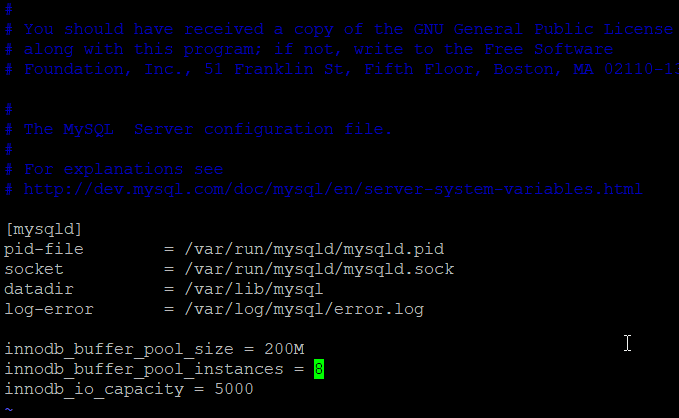
Firstly, edit your mysqld.cnf file:
vi /etc/mysql/mysql.conf.d/mysqld.cnf
To start with, just add these basic optimisations at the end of the file:
innodb_buffer_pool_size = 200M
innodb_log_file_size = 100M
innodb_buffer_pool_instances = 8
innodb_io_capacity = 5000
max_binlog_size = 100M
expire_logs_days = 3
Once you have run your new server for a while, with real traffic, follow these instructions to optimise further.
Optimising your MySQL configuration after you’ve run traffic for a while
Once you have traffic running for a day or two, you should download the tuning primer script. It’ll inform you of any modifications you should make to your mysqld.cnf file. Here’s how to install and run it:
cd ~
git clone https://github.com/BMDan/tuning-primer.sh
cd tuning-primer.sh
./tuning-primer.sh
It outputs information and colour codes red or green for ‘needs work’ or ‘fine’. Once you have some decent traffic, run the primer and follow the instructions to optimise your MySQL configuration further.
Optimising your PHP configuration for WordPress
By default, your PHP configuration will probably not be good enough for you. This section will tell you the areas you need to look at, but the configuration you choose depends on your traffic and the amount of RAM you have.
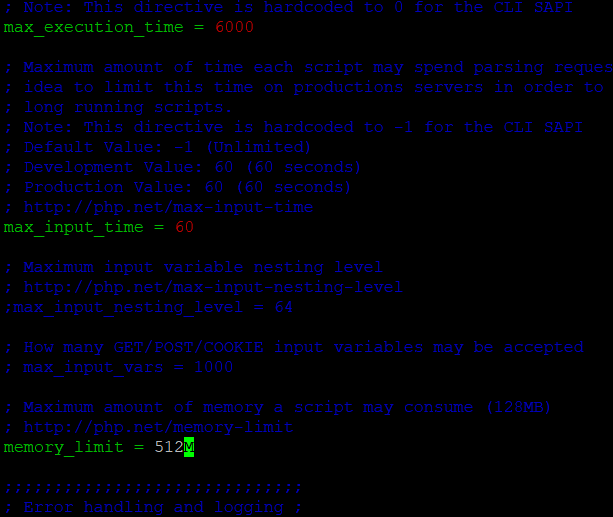
The first file to edit to optimise PHP is the php.ini file.
vi /etc/php/7.3/fpm/php.ini
You should take your time to scroll down through this file and figure out if there’s anything else you’d like to modify, but the key entries you should change are:
max_execution_time = 6000
memory_limit = 512M
upload_max_filesize = 50M
The defaults for the above are 30s, 128M and 2M which are not enough for modern websites. So, edit the php.ini file, find these lines, change whatever else you see needs altering and then restart PHP. Before you restart PHP, you should also edit your www.conf file.
You should also uncomment the line (uncomment by removing the leading semi-colon) which starts:
;max_input_vars = 1000
And then change the value to 5000 to accommodate some of the more badly written plugins (looking at you UberMenu!).
Finally, still inside your php.ini file you should enable opcache.
opcache.memory_consumption=128
opcache.interned_strings_buffer=8
opcache.max_accelerated_files=50000
opcache.revalidate_freq=60
opcache.fast_shutdown=1
opcache.enable=1
There are potentially some other optimisations that will help your specific scenario, so take the time to read through the comments in the php.ini file and decide for yourself it there’s anything else you need to tweak.
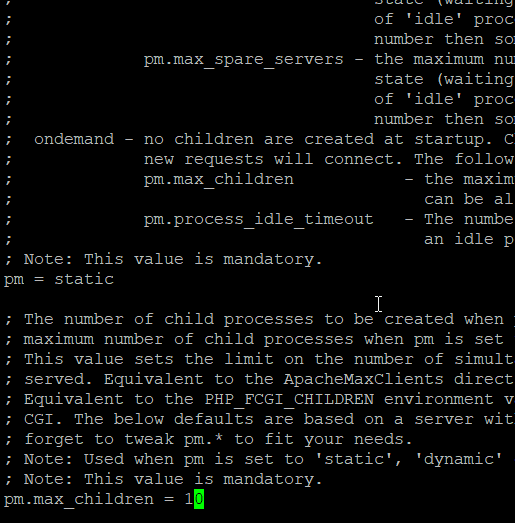
The other part of PHP configuration you need to alter is the www.conf file. This controls how many simultaneous PHP processes will be spawned. For best performance, you should configure this to have all the processes already spawned so that when traffic builds, the processes are already available to server traffic.
vi /etc/php/7.3/fpm/pool.d/www.conf
The choices you can see in the comments section, but what you want for best performance is:
pm = static
The default is pm = dynamic. If you set pm = static, you can then set pm.max_children to control how many simultaneous PHP processes will be running the entire time your server is running.
Once you have altered and saved this file, you can now restart the PHP service.
service php7.3-fpm restart
Configuring fail2ban to eliminate bot traffic before it ever hits WordPress
If you’ve ever thought about using WordFence or Sucuri, they’re not bad plugins. The problem is that loading WordFence or Sucuri involved a whole bunch of expensive elements of your WordPress stack including Cloudflare, Nginx, PHP and MySQL. If you can stop the traffic earlier, it will only involve Cloudflare or Nginx.
In order to stop traffic at the Cloudflare level costs some money – they provide a web firewall, but for performance reasons this would be your most performant option.
If you can’t afford that, or if you reject paying money for something you can sort out for time rather than money, you can configure fail2ban.
The basic install, if you’ve followed the installation above, automatically includes SSH/putty attacks and blocks those attacks based on IP addresses.
I will write a separate article about configuring fail2ban as it can be complicated, but if you wish to get this set up, you should install the WP fail2ban plugin and follow their guide for adding their ‘jails’ and ‘filters’. Basically, fail2ban uses filter config files to spot dodgy traffic and then uses the jail config files to decide how long to ban them.
Configuring Redis for object caching and transient caching
Many plugins will use transients to store information that helps speed up their plugin operations. If you do not have an object cache enabled, these variants will be stored in your MySQL database. That is not ideal, since that involves writing to disk. Even SSD disk operations are slow compared to RAM operations. At the top end of RAM speeds you’re talking 20GB per second versus SSD top-ends of 200MB per second. So, you want to make sure your transients are stored in RAM, as well as your objects stored in your cache.
You’ve already configured Redis to store in RAM, so all you need to do now is install the correct plugin.
The one you want to install is called the Redis Object Cache, by Till Kruss, and *not* the WP Redis plugin.
Installation is simple, install the plugin, activate it, then visit Settings->Redis and click ‘Enable Object Cache’. You’ll then see the Status: Connected.
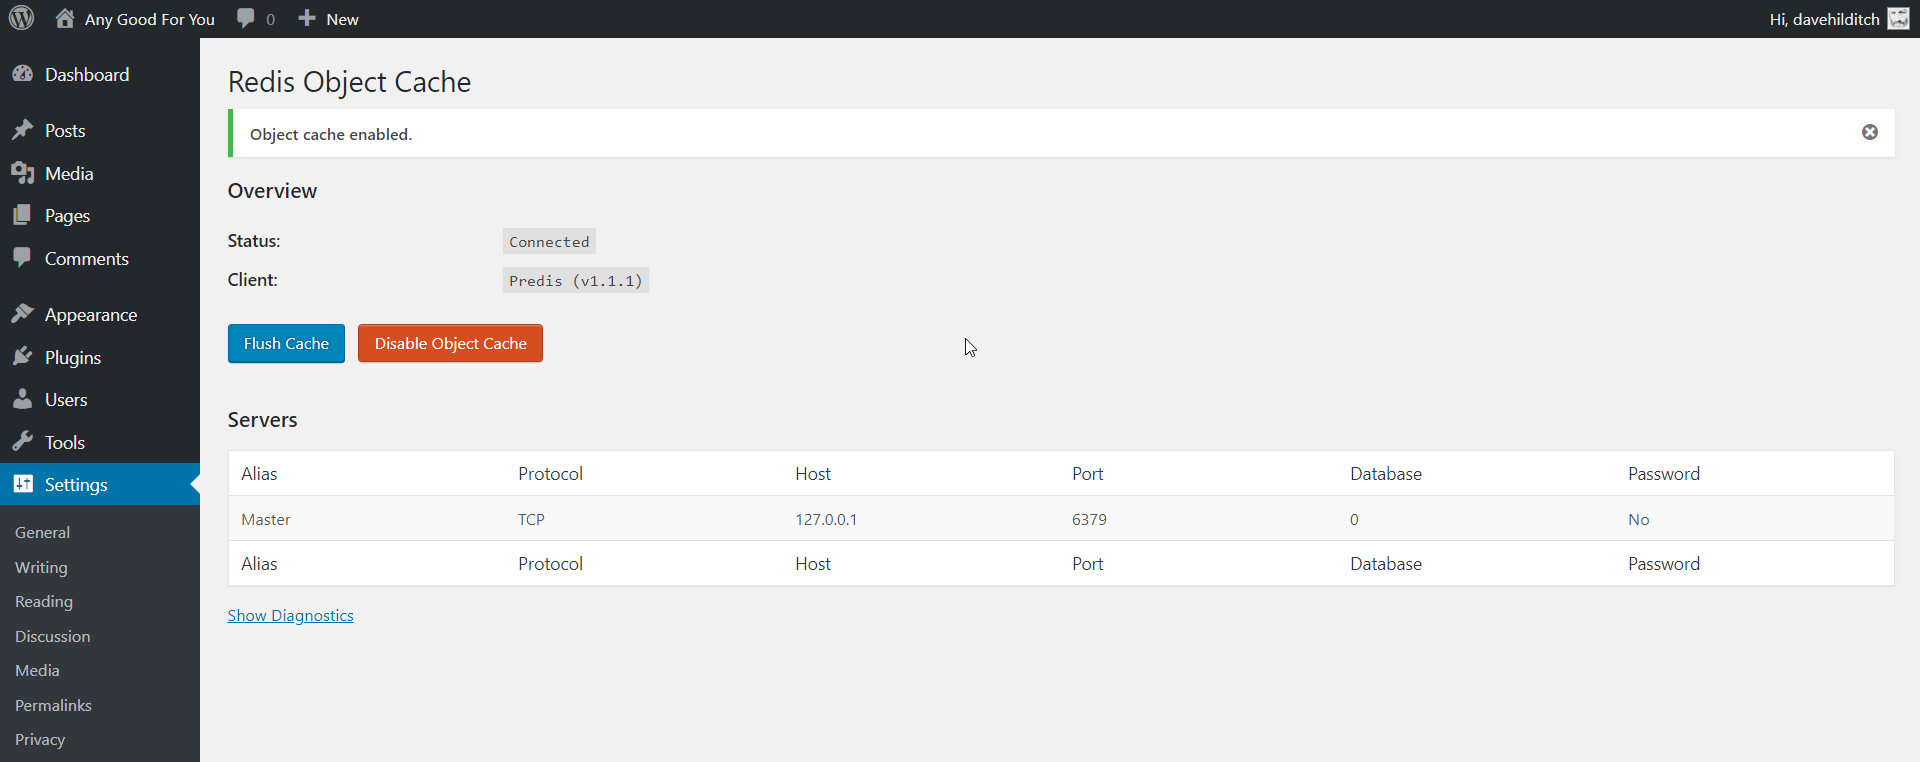
If you have Query Monitor installed, you’ll notice now that the number of queries running per page is massively reduced. The reason the object cache helps is two-fold – firstly, the MySQL queries do not need to run again, but also the PHP that runs and processes the results of the MySQL queries and creates an object doesn’t need to run again.
This is entirely safe – it speeds up your site massively, both through the object cache and through the storage of transients in the Redis memory cache.
What about page caching?
You do not need a page caching plugin with the above stack because the nginx fastcgi cache handles that and stores pages cached under your /var/www/cache folder. That is faster for your site, because the full HTML is cached up for users using nginx only, before PHP or MySQL is touched or invoked.
There is a plugin you can install if you need to flush your nginx cache on-demand, and/or when new articles are released. The plugin is also by Till Kruss and is called the Nginx Cache plugin.
Securing MySQL
MySQL by default will not be accessible from anywhere other than your localhost. So it’s already very secure. If you want to secure it further, you can run this command below but BE CAREFUL to choose the mysql_native_authentication rather than the new recommended cached authentication. If you make a mistake with this, check the database troubleshooting section above for how to fix.
mysql_secure_installation # choose y for everything EXCEPT recommended authentication plugin and enter a secure root password
Optional nginx snippets
There are other optional nginx snippets inside our github repo which you can include in your server blocks in /etc/nginx/sites-available/rocketstack.conf. You should take the time to take a look at these snippets and see which additional ones you might wish to include.
For example, you may wish to have nginx handle your gzip compression, so inside both your server blocks you would add the following line:
include snippets/gzip.conf
However – if you’re using Cloudflare or another CDN, you could instead have your CDN handle GZIP compression which will keep that CPU load away from your server.
You may also wish to use the Yoast SEO sitemaps config file. To do so, you’d include this line in both your server blocks:
include snippets/yoast-sitemaps.xml
You can view the various snippets we have on our rocket stack github repo, or if you’ve cloned the repo you can use your preferred file editor.
Testing everything individually
In addition to the specific debugging and troubleshooting sections above, I’ve been asked some times how to debug a failed install. Here’s how:
- Test you can connect to mysql
- Test nginx and DNS using a static HTML file
- Test PHP using a PHP file
- Test fastcgi_cache using any of your static files (css, js etc) – open developer console, and look in the network tab, look in the headers, look for NGINX: HIT rather than NGINX: BYPASS
- Test Redis using Redis plugin or the redis-cli command
Summary
Follow the guide above to get the most bang possible for your buck. I prefer to use Digital Ocean droplets with their fast SSD disks, cheap prices and 50 second setup speeds.
But getting fast disks is not enough – you need to make sure the software you install is the most performant available. Nginx uses less memory compared to Apache, and is faster, so both per-page performance and simultaneous user-capacity is improved.
I’ve made the guide above as simple as possible for anyone to follow, but please ask questions below because I can’t predict everything you might ask. I love questions, so ask away and I’ll flesh out this guide to cover anything I may have missed.
Update: Since writing this article, I’ve added a stack configuration guide too.


Thanks for you time, very useful. I want to ask, do you think is possible have this level of power using vesta-cp? I manage a some sites and could be fine to have some automation. Today I use it on DO.
Yeah I don’t see why not – it’s an open source control panel so I’m sure it could be modified to install and configure this stack. Would be very cool.
Hello Dave,
I’ve been using your stack for a few years now and it’s just freaking genius.
Recently I decided to integrate it with Bedrock and dockerize it.
If you find it interesting here’s the description.
https://armando-rivero.medium.com/building-a-fast-wordpress-development-stack-with-docker-and-bedrock-2944efd18f12
Thanks for your great work!
I’ve run the steps, and whilst doing the certbot (letsencrypt) part, it said that ppa was deprecated:
#add-apt-repository ppa:certbot/certbot
The PPA has been DEPRECATED.
To get up to date instructions on how to get certbot for your systems, please see https://certbot.eff.org/docs/install.html.
More info: https://launchpad.net/~certbot/+archive/ubuntu/certbot
It still worked, but I thought I’d mention it in case you need to update your guide.
Thanks – that’ll be very useful for others. I’ve got a fresh guide for Ubuntu 20.04 in the works, probably coming out in May.
Hi Dave,
I see that Digital Ocean has a WordPress droplet out of the box – is that worth running to save time on some of the steps in this guide?
Thanks,
Jon
Thank you for this wonderful guide, i implemented it on a couple of projects now and it’s working really well with wordpress and woocommerce. I also built your optimizations into my ansible playbooks, so deploying and maintaining my infrastructure is now a breeze. What I’m using also as an extra is Optimus Cache Prime https://patrickmn.com/projects/ocp/ which fills the cache via a cronjob, so the visitors get almost always the cached version of the page.
So again, nice job and thank you
Thank you – I’m sure some of my readers would appreciate it if you shared a github link to your ansible playbooks.
It’s been two years and this guide remains my bible for setting up new website/server instances.
However, when my website receives heavy traffic, say over 20K users per day, I keep getting this error:
502 Bad Gateway
There isn’t much going on the website. Just two gravity forms that users fill.
I can confirm that this is not a website software issue and I suspect that this is happening with NGINX/PHP-FPM.
What would you recommend in this situation?
Thanks!
You might want to check your RAM consumption on the server. If you run the
topcommand through SSH, you’ll see your PHP processes.If you see some of them consuming a lot of RAM then you probably have a memory leak. Quickest and easiest way to fix that (other than finding the leak) is to recycle your PHP processes.
You could switch your PHP config to this:
pm = ondemand

pm.max_children = 32

pm.process_idle_timeout = 3s
ondemand rather than static will ensure the PHP processes get recycled. You’ll probably see a slightly slower speed when your site hasn’t had visitors in a while, but you should see higher overall capacity.
https://serverfault.com/questions/939436/understand-correctly-pm-max-children-tuning
Hi Dave,
Thanks for the guide.
I had no major issues but now when I create a subdomain in nginx, it always redirects to the main domain?
Any reason why?
Been on the web for hours and following guides but it just does not work to create any subdomnain.
Thanks
To configure the 2nd domain:
Hi Dave,
Thanks for the guide.
I encountered a couple of issues:
1) At the step of installing and running tuning primer it says:
Using login values from ~/.my.cnf
– INITIAL LOGIN ATTEMPT FAILED –
Testing for stored webmin passwords:
None Found
Could not auto detect login info!
Found potential sockets: /var/run/mysqld/mysqlx.sock
/var/run/mysqld/mysqld.sock
Using: /var/run/mysqld/mysqld.sock
Would you like to provide a different socket?: [y/N] N
Do you have your login handy ? [y/N] : y
User: root
Password:
Would you like me to create a ~/.my.cnf file for you? If you answer ‘N’,
then I’ll create a secure, temporary one instead. [y/N] : y
– FINAL LOGIN ATTEMPT FAILED –
Unable to log into socket: /var/run/mysqld/mysqld.sock
2) When I installed mysql tuner instead, it has a lot of these errors:
[!!] FAIL Execute SQL / return code: 256
[!!] failed to execute: SELECT CONCAT(user, ‘@’, host) FROM mysql.user WHERE password = PASSWORD(‘root-password’) OR password = PASSWORD(UPPER(‘root-password’)) OR password = PASSWORD(CONCAT(UPPER(LEFT(‘root-password’, 1)), SUBSTRING(‘root-password’, 2, LENGTH(‘root-password’))))
[!!] FAIL Execute SQL / return code: 256
Any suggestions please?
Can you log into MySQL by justting running the mysql command from SSH?
If you have configured a root password, then you can create a credential file to avoid having to enter the username and password every time. See this guide:
https://serverfault.com/questions/358903/store-the-mysql-client-password-or-setup-password-less-authentication
Thanks for this amazing guide, this is by far the best wordpress setup I have ever tried !
Lost 2 days trying to figure out why a woocommerce setup wouldn’t go any lower than 2.5 sec TTFB and tried everything without success !! Multiple cache plugins, Database tuning, CDN, running new relic and query monitor to try identify the issue but everything seemed to point out a bottleneck at php level .
Then I came across this guide and decided to give it a try … I have to say I am very impressed with the results !
I have a fairly heavy woocommerce website and I’m getting a wooping 130-150ms TTFB average, that’s even better than a fresh wordpress install usually gets with just cache + CDN optimization .
Life saver ! 🙂
Thank you! I’m glad you’re happy – I’m aware it’s quite daunting at first to build your own stack and I probably will at some point make an automated build for all this, but there’s a big benefit to going through the steps yourself so you understand your own stack a lot more.
Remember to check out my plugins too once your store gets bigger as even with this stack WooCommerce will slow down once it gets bigger unless you use our plugins.
Hi Dave,
Looking forward to reading an Ubuntu 20.04 version of your rocketstack.
In the meanwhile I just built a fresh one with Ubuntu 20.04, keeping this guide for general direction.
I didn’t add mysql and ondrej repositories.
I went with the MySQL 8 default, then run mysql_secure_installation.
Changed root of mysql to native with
>ALTER USER ‘root’@’localhost’ IDENTIFIED WITH mysql_native_password BY ‘password’;
but I did add the file
/etc/mysql/mysql.conf.d/default-auth-override.cnf
It wasn’t there by default, but I guess it won’t hurt.
Went with the default php7.4
=================
When trying to start nginx there was an error, a very trivial one though:
The server block is missing ssl_certificate and ssl_certificate_key statements.
There are two commented lines with the future letsencrypt statements, which at that point of the procedure aren’t there yet.
Apparently the nginx server would have started untli very recent versions even without valid ssl_certificate and ssl_certificate_key statements, then you would letsencrypt-auto it, so the problem would never come out. Now it spits an error when you try to start the server the first time.
A temporary simple way out: comment out the whole ssl server block just to test the installation with http.
After this long preamble, my question/request: I have a single public IP address, my firewall NATs tcp 80 and 443 to an internal reverse proxy based on nginx with letsencrypt and all the customizations needed to work with wordpress.
This single reverse proxy points to several wordpress sites (something I couldn’t easily do with apache, which I am much more used to), each with its own dedicated stack on a dedicated server and sitting in my private LAN. I am content with running them all on http and let the single reverse proxy do all the SSL.
In a way I am “decoupling” the nginx role, SSL reverse proxy and web server.
Do you think it would be possible to let me know where your optimizations should be applied in this scenario? At the moment I will test them all in the internal wordpress stack and leave the reverse proxy alone, maybe just trying with caching enabled or caching disabled.
Please let me know your thoughts when you have time.
Keep up the good work, it’s really inspiring,
Cheers,
simon
If each site has its own dedicated server and stack then apply the optimisations there. Nginx is really fast out of the box as a reverse proxy.
Upvoted!
My main issue was with WP All Import, but your explanation on what to do on wp-config (define(‘WP_ALL_IMPORT_UPLOADS_BASE_DIRECTORY’, ‘../wpallimport’);) may be helping.
I will try this on Soundorabilia.com, which carries 150k products.
Once again Dave, this whole Stack post is plain Gold. We’re happy to promote your work to our Clients.
We would be interested to know also what’s your recommendation for the Media offload on S3. We are using Mediacloud.press, but it’s heavy.
You could use my plugin External Images which allows you to reference external images in your site.
If you need the actual images copied across to S3 on your behalf too, please upvote this feature request and add comments: https://www.superspeedyplugins.com/suggestions/add-option-to-migrate-all-existing-images-to-s3-or-other-external-storage-location/
Alternatively, I have an old article on my old website that might be useful to you – it lets you mount your S3 bucket on your server and then WordPress believes it’s uploading images when it’s actually sending them to S3. Let me know if you want an updated version of this article: https://www.affiliatewebdesigners.com/2015/06/02/using-amazon-s3-to-store-your-affiliate-product-images/
Upvoted!
My main issue was with WP All Import, but your explanation on what to do on wp-config (define(‘WP_ALL_IMPORT_UPLOADS_BASE_DIRECTORY’, ‘../wpallimport’);) may be helping.
I will try this on Soundorabilia.com, which carries 150k products.
I used your configuration for a long time but it was overcome by the openlightspeed stack.
I still believe in you and I wanted to see something new for 2020. Could you do that? It would be a great pleasure to implement your configuration. Thank you
I’ll be running new benchmarks in june or july, comparing hosts along with a brand new fastest stack build for 2020.
Litespeed will definitely be getting reviewed, primarily for the selective cache purge and the cached gzip of files.
Hey, I can’t wait to see something new.
I am disappointed with Litespeed, as it is consuming almost 100% of the CPU .. it is a faster option, but it requires a lot of resources.
If it’s consuming all your CPU, it may be ‘faster’ but it’s not more scalable. And technically, if nginx uses 5% CPU and litespeed uses 100%, then it’s not actually faster, it’s just better at using all the CPU.
I’ll check all this in my future guide – if you can provide any more info about what litespeed is doing to consume 100% CPU that would be very useful – maybe it’s pre-preparing gzips of static files?
looking for the new stack.
My current road map is: Faster Woo Widgets update, another Super Speedy Search update, then thorough docs and videos for everything, THEN I’m doing a new hosting stack alongside a hosting comparison of the best hosting options out there.
Hi Dave H.,
First of all, thank you so much for the guide.
Sometimes, when I deploy a server with several wordpress sites using this guide, I get a PR_END_OF_FILE_ERROR .
I don’t know exactly when I comes, neither how I solved. I try to disable some sites, and then enable one by one, and finally somehow it works.
Do you have any explanation for this?
That’s very odd. Never seen that before. Possibly your server is running out of RAM? From a Google search it seems this is related to Firefox addons – maybe try disabling them and trying again?
Which Php version should I use for my website https://www.digitrally.com? currently using 7.3? should I upgrade to 7.4?
There’s really not much perf improvement in my experience – maybe 2 or 3% speed improvement which is very difficult to observe in practice. But yes, my future guide will use PHP 7.4 so feel free to install that instead of PHP 7.3.
Probably the best wordpress tutorial! The virtual host conf and all the snippets in your github is really organized, really appreciate about your work!
Right now, I am trying to host mutiple wordpress sites into a vps, the redis server is caching the sites incorrectly, should be because I haven’t configured it properly, need some more time to study about how to set it up.
You can either change the wp_ database prefix in wp-config.php for each website but you’d have to change each table you already have in those databases.
Alternatively, you can use different redis databases for each site and just choose the relevant database in the Till Krus Redis plugin – the default redis database is database(0), and by default Redis has 16 ‘databases’ already for you. If you need more databases for more than 16 sites, check this guide: https://stackoverflow.com/questions/35621324/how-to-create-own-database-in-redis
To configure each website to use its own Redis database, you can add this to wp-config.php:
DEFINE('WP_REDIS_DATABASE', 1);
(the default is 0, and the default max is 15 giving a total of 16 Redis databases available by default)
https://github.com/tillkruss/redis-cache/blob/master/README.md
Hi Dave, I’m trying to interpret the options for securing PHP requests. Would it be redundant to set cgi.fix_pathinfo=0 in my php.ini? Your rocketstack exclusions snippet already denies access to .php files in */uploads?
https://www.nginx.com/resources/wiki/start/topics/tutorials/config_pitfalls/?highlight=pitfalls#passing-uncontrolled-requests-to-php
Thanks!
You should add it, I always advocate belt & braces but to be honest this should have been in the security part.
The particular vulnerability here is quite complicated to reach – you need to have a vulnerable plugin which allows someone malicious to alter wp-config.php or similar, upload an image, then execute the image – the image actually contains PHP code. But it is a vulnerability so yes you should add it.
I’ve added this info to the new DOC trello card for the next article: https://trello.com/c/EV2C3GOv/99-doc-write-new-rocket-stack-guide-for-ubuntu-20
Thanks, I like the belt & braces phrase haha. Cool, I’ll check out the trello card!
Hah – I didn’t realise this was a British-specific phrase.
Hi there, fantastic stack and tutorial thank you!
With the above all up and running (with gzip enabled, and proxied via Cloudflare), is there any point in having:
1. Autoptimize to minify and aggregate CSS + JS (either/or?)
2. WP-Optimize which has an option to preload the whole site and serve a cache version.
Chrome’s lighthouse and webpagetest.org seem to think the results are better… with the above, but these aren’t based on real user experience…
1. Either Autoptimize or alternatively you can minify using Cloudflare – it works pretty well and has some good stuff for moving javascript further down the page to improve page speed.
2. Sure – a cache primer is good, but having an extra page-caching system is mostly redundant as nginx will serve up the cached page before it hits WP-Optimize’s version.
Hi Dave – responding to your comment here because our nested convo didn’t have a reply option.
20.04 is running smoothly so far with just the certbot fix, and I’m now getting into hardening for wordpress. I’m very much a novice dev (no formal education, only made 3 sites so far) so I don’t have much to comment on about speed, reliability, etc as I don’t know what to look for or test for.
Something I just came across in the ssl.conf snippet:
ssl_protocols TLSv1 TLSv1.1 TLSv1.2;
This appears to be out of date, will you be updating the snippets as well when you make the next guide?
https://blog.qualys.com/ssllabs/2018/11/19/grade-change-for-tls-1-0-and-tls-1-1-protocols?_ga=2.86743963.281913640.1588821630-1238874318.1588547854
Yes, I’ve also added this note to the trello card: https://trello.com/c/EV2C3GOv/99-doc-write-new-rocket-stack-guide-for-ubuntu-20
fwiw Certbot now runs smoothly via snap for ubuntu 20.04. Best practice can be found on the certbot website tool. I like the concept of sprints, it’s my first time coming across that concept today.
How to hide .user.ini on this stack. I’ve tried some methods. But nothing work all.
I’m not sure where you’re .user.ini file is coming from, but you can add a rule to nginx server {} blocks like this:
location ~ \.user\.ini$ {deny all;
}
Does this work in 2020 with the latest ubuntu version and updates .Kindly let me know if there is an updated version of the post for 2020 ?
Not tested it yet. I’ll build a fresh guide soon. Main difference is PHP 7.4 is the default version.
I’m just starting this process, so far I’ve needed to grab the latest mysql for compatibility: mysql-apt-config_0.8.15-1_all.deb
Ubuntu 20.04: certbot is currently broken. Adding SSL Using LetsEncrypt is as far as I got. Nameservers are still moving so I’ll get back to it tomorrow.
#apt-get install python-certbot-nginx
Looks like there is a sketchy workaround, but that it should be fixed soon?
Here’s some relevant reading…
https://github.com/certbot/certbot/issues/7951
https://bugs.launchpad.net/ubuntu/+source/python-certbot-nginx/+bug/1875471
Yeah Ubuntu 20 only got released a week ago, so it’ll probably be another few weeks before all the other software items are available.
I went with the sketchy workaround, and have the site up and running now after some SSL troubleshooting. Looking forward to a fresh guide!
Great! How is it so far?
With this caching setup, will it be automatically cleared when it needs to be?
New Page/Post (or edit)
New Comment
…
For users logged in, or commenters, they will see the uncached page (i.e. they will see fresh comments) but for users logged out it will take until the nginx page cache expires before they see the new comments (if the page was in the cache before this extra user commented)
For new pages, these have never been cached before, so the main issue here is that your archive will not show the new page in the archive for 60 minutes (if your archive page has been cached inside the last 60 minutes). You can decrease this if you wish in the nginx config file for your site. You can also flush the nginx cache manually using the WordPress Nginx plugin.
You can also use ajax comments if you wish since ajax is never cached, so then users would see that being up to date.
My next stack build will include a selective page caching system so that rather than flushing the entire cache, it will be possible to automatically flush your archive pages but leave everything else cached.
Awesome post this improved by site server speed a lot for my wp site.
Thanks.
I’ve been keeping the local php.ini version when upgrading packages. Should I be periodically checking version differences in the php.ini-production.cli and merging them manually? What is the best practice? Sorry for the noob question.
You should keep the local php.ini version when upgrading so you retain all your changes from the default settings.
Hi Dave,
What’s your take on Nginx vs OpenLiteSpeed for WordPress?
I’ve yet to run the benchmarks. I have a task created here which I’ll get to once all my plugins have had their upgrades released: https://trello.com/c/qLWH6oj9/75-doc-create-comparison-of-hosting-providers-including-ssdnodes-aws-digital-ocean-would-be-easiest-to-compare-through-gridpane-to
Hi Dave, is it possible to use both the CDN KeyCDN and Cloudflare at the same time? I mean is it worth it or the Cloudflare is enough?
You should just use the one CDN really. If you like KeyCDN then use them, some people report issues sometimes with Cloudflare but to be honest given the size of them there will be issues for some users.
Thank you!
Another question, do I need a cache plugin with server-side cache (FastCGI)?
I’m talking about caching by WP-Rocket only and trick Nginx to serve those cache without hitting PHP?
If I were you, I’d disable the page caching in WP Rocket as it’s wasteful when you have Nginx handling it for you. The Nginx helper plugin can be useful to clear the page cache.
Bear in mind, WP Rocket doesn’t include an object cache which is really the most critical cache in WordPress.
Hi,
What re your thoughts using this stack but swapping out certain areas with OpenLiteSpeed + LSCache? I have been benchmarking 20+ sites with different configurations and so far running LS+FastCGI, MariaDB, Redis, CDN with QUIC Cloud for most of the site, and CDN with Cloudinary (site pulls in countless images that need quick optimizing, then using s3 Offload into a bucket after x amount of weeks) with A.I meta needed. I’m getting close to as perfect as I can make it, and then want to rollout the stack with LXD containers for each client site, thoughts? I also been doing a lot of DNS testing and I know cloudflare has great DNS, however, I see many cases when im using Route 53 thats increasing speed (I know its not a major difference, but overall every little tweak adds up in the long run) just wanted your thoughts about this and LS and how things are different in 2020? Cheers mate.
I’ve yet to test with Litespeed – I’ve heard good things. I’ll be running my own comparisons once I get a bunch of plugin updates out the door.
thanks let me know when you do, so interested
Hi, thanks for the tutorial. I have one question, and one comment.
I’ve had my server running for awhile now (vultr 1vcore, 1gb ram) with a very low traffic site, and just revisited this tutorial for memory cleanup because apt-get was failing. I ended up setting php processes to ondemand, to try and fix the issue, because I’m a newb. 10 children were running @30mb ea, so my line of thinking was this would free up ~300mb of ram. Am I on the right track?
Secondly, I noticed that /etc/nginx/sites-available/rocketstack.conf includes the snippet security.conf by default.
When I checked out security.conf, these two lines jumped out at me:
# uncomment out if you are ussing https/SSL
# add_header Content-Security-Policy “default-src ‘self’ https: data: ‘unsafe-inline’ ‘unsafe-eval’ ;” always;
I was wondering if I should uncomment this, and if so, if you wanted to mention it in the tutorial because you go over https/SSL in the tutorial?
Yeah ondemand is useful – particularly because it fixes any memory leaks you may have. Basically the worker threads are constantly getting killed and restarted fresh, as needed, so it will definitely save you memory.
re: the security policy, I didn’t enable it by default because it could theoretically break some plugins. It will make your site more secure and less vulnerable to any malware that may try to install itself – more specifically, it’ll make your site more secure against the impacts of an infected. You’ll need to test adding it with your site.
Understood. Thanks for the reply!
Hey i followed this tutorial, but i installed php7.4 instead of php 7.3 version. Now i see my website page loading time increased by 20-40% in the new server? is the php version causing any issues? shall i downgrade to php 7.3?
That sounds odd. I guess it’s possible that something got full deprecated in 7.4 and this has broken a speed plugin you have?
Which speed/caching plugins are you using?
I wasted a lot of time trying to use MariaDB and php7.4 with the rest of your tutorial. I couldn’t figure it out. I gave up and used your recommended stack with 7.3. Not figuring it out is not sitting well with me and I think I will use a different droplet and ( try to ) figure it out a little later.
Wondering if maybe your failure to use MariaDB is related to the authentication method used by default?
For PHP 7.4, it should be a matter of altering the nginx config file. If you take a look at the last commit on my github repo you’ll see the change going from 7.2 to 7.3:
https://github.com/dhilditch/wpintense-rocket-stack-ubuntu18-wordpress/commit/4504c3e6113fac61ed4f26ddf134e368d4d91839
Very odd – was there nothing tell you anything useful in any of the error logs for nginx, php, mysql?
Great guide thanks.
I have one issue so far. I moved some image files to new locations and redirected the old links. The redirect goes to an NGINX 404 instead of being redirected in WordPress. I feel like NGINX should hand these 404’s over to WordPress, like it does for all of our other redirects. I am using an SEO redirect plugin which works for page redirects, but isn’t for images.
What am I missing, is it something in NGINX that I can add?
Thanks
Redirects from all the redirect plugins I’ve tried work perfectly for me, but to be honest I’ve never tried redirecting an image. Can you give an example so I can inspect it in Chrome? I’ll need an example of the page containing the image, the original image URL, the new image URL.
Original link (now redirected to): https://dev.fastway.zone/wp-content/uploads/2020/01/PMB-01-3014-Kickstand-1.jpg
File Moved to: https://dev.fastway.zone/wp-content/uploads/PMB-01-3014-Kickstand-1.jpg
Image Product Page: https://dev.fastway.zone/product/pmb-01-3014/
I tested it with a different (free) redirect plugin “301 Redirects by WebFactory” and it produced the same NGINX 404.
Thanks
Hi. followed these steps to create my website https://www.syscodes.io, also created a subfolder https://syscodes.io/blog by creating a separate mysql db. Last night, everything was working fine. Today I see if I open a blog suppose syscodes.io/blog/xyx-artcile it redirects to the primary domain and shows post does not exist. While I can log in to the subfolder website, but only posts are being redirected to the primary domain. Can you help me out?
You’ll need a separate nginx entry for your 2nd website.
Hi Dave, I hope you’re doing well. I’ve followed this guide and it’s working a treat. I want to explore this 1 million products in Woocommerce concept that you are championing. I also want to provide some advice to you, and have reached out to you through intercom and through skype. I read your dev-diary about wanting to move away from intercom, so please let me know if there is a better way to reach you. Thanks and looking forward to connecting with you.
Thanks for getting in touch. There will be an update out shortly with better means of communication. If you’re an existing customer, you can raise a ticket here: https://www.superspeedyplugins.com/submit-ticket/ If you’re a new customer, you can email [email protected]. I’ll be migrating away from intercom today probably, so these emails will be arriving directly at my gmail inbox instead.
i have installed the above stack all is fine but when working with post like update ,draft publish it takes too much time . help me out please . i am sending you screenshot of htop as well.
https://imgur.com/a/0X1NC9J
This will be caused by one of your plugins. I recommend you install query monitor and view queries by time and by component on the page after you update the post.
Hello,
It would be great if you can make a tutorial about how to install googlepage speed module with this wordpress stack,
Thanks
I’ve created a doc request for you – upvote here and you’ll be notified when it’s written
https://www.superspeedyplugins.com/idea/create-guide-to-installing-googlepage-speed-module/
Would love this guide, also failed in getting pagespeed module up and running well
Dave, i success followed your tutorial installing the fastest wordpress stack. But unfortunately i found problem since my blog is dinamyc/news. It won’t show latest post in homepage, i think is because Nginx FastCGI Cache. I can’t purge cache. Please help!
You can change how long the the nginx fastcgi cache lasts for. Also, new posts *should* automatically wipe the nginx cache but alternatively you can install the nginx plugin to allow you to manually flush the cache.
Hi Dave, thank you so much for the guide.. Question though, on Firefox, when I opened the homepage of the site, the header says Fastcgi-Cache: BYPASS. While on Chrome, it says Fastcgi-Cache: HIT. Does this mean on Firefox, Fastcgi is not working? I tried on the homepage, because when I try to open a static asset like CSS, the Fastcgi-Cache header is not showing, not sure why.
Thanks again.
Probably when you opened in firefox the first time it wasn’t cached yet – try refreshing in firefox and you should see the cache hit.
Sorry Dave, my previous comment is inaccurate. Turned out it’s not because I’m using Firefox, but it’s because I’m “logged in” when using Firefox (doh!). I found this snippets in fastcgi-cache.conf:
# Don’t use the cache for cookied logged in users or recent commenters
if ($http_cookie ~* “comment_author|wordpress_[a-f0-9]+|wp-postpass|wordpress_no_cache|wordpress_logged_in|woocommerce_cart_hash|woocommerce_items_in_cart”)$
set $skip_cache 1;
}
I think this is the one causing Firefox to BYPASS cache. My question is, can this snippet modified to allow cache for “logged in” customers, except when they’re adding items to cart, checking out, or doing other woocommerce related functions? For admins, no problem, we’re good without cache.
If you remove wordpress_logged_in| from the line, it will not skip the cache for logged in users, unless one of the other cookies exists (comments, cart etc).
If you want to disable the cache for admins only, you will need to add a function to the login hook. This function would check if the user is admin, then set one of the other cookies which would bypass the page cache – e.g. you could set wordpress_no_cache (doesn’t matter the value you give it, only that it exists)
You should also delete the cookie on logout. There’s a stackoverflow with the two functions you’d need here – just change the cookie name:
https://stackoverflow.com/questions/33256109/set-cookie-before-log-out-and-after-admin-login
Thanks Dave, all working fine now! Really appreciate the help.
I’ve refreshed the page several times, but it still says BYPASS. I noticed this line:
Cache-Control: no-transform, no-cache, no-store, must-revalidate
but I’m not sure where this is coming from. On Chrome, this line doesn’t exist. I didn’t modify anything from your guide, so I think this must be some kind of default settings that comes from somewhere.
Thanks! Are there any steps in this guide that I should leave out or change, if I am using Virtualmin? Also, I am only going to be hosting one website on the server. Do you recommend I use Virtualmin or just Webmin
Thank you.
No keep everything in the guide. I don’t have recommendations though for virtualmin vs webmin because I don’t use either. Maybe one of my readers can help you.
Hi,
First of all, thank you very much for this guide! Awesome work!
I want to give a small contribution, on how to change nginx and php-fpm users. My website runs some git repos, and I need to manage them with my own user.
I changed the following configurations:
1) /etc/nginx/nginx.conf
changed the line:
user www-data;
2) /etc/php/7.3/fpm/pool.d/www.conf
changed the lines:
user = www-data
group = www-data
listen.owner = www-data
listen.group = www-data
3) Change the permissions of the following folders:
sudo chown myuser:mygroup -R /var/lib/nginx/fastcgi/*
sudo chown myuser:mygroup -R /var/www/cache/mycache
4) Restart nginx and php-fpm
sudo service php7.3-fpm restart
sudo service nginx restart
thats it!
best,
This is great! Thanks for helping out.
Hi, I just stumbled across this guide, and was wondering if I can use it in conjunction with virtualmin? I want to host multiple WordPress sites on one server. Is this possible? I am a newb at this so not sure where to start…
Yes it will work – you would still benefit from having MySQL 8, PHP 7.3, Redis and Nginx. Virtualmin would be used just to create databases & configure the website info in nginx.
It looks like it’s compatible with Ubuntu 18 so just install it and try it out.
Wouldn’t it be better to have a separate managed database engine from Digital Ocean? Or would the performance be the same? I’m thinking I need it for remote access. The db processes can be run on my local machine and I just update the remote db.
I haven’t tested using a separate managed db engine yet from digital ocean but it’s on my list of things to test.
Hi Dave! I’ve this setup working on a WP Multisite for the past month, but I’m running into a problem when adding a custom domain to a subsite. I cant log in after changing the domain. To be totally precise: I am being logged in (have debugged to be sure of this), but i’m being served a cached version of the website and cant access the wp-admin area.
I’ve tried to empty cloudflare cache, tried to empty nginx cache, but with no luck. What can it be the problem? Thanks!
I’m not sure with multisite – maybe try disabled the nginx cache completely and test that? In the https://github.com/dhilditch/wpintense-rocket-stack-ubuntu18-wordpress/blob/master/nginx/snippets/fastcgi-cache.conf file you can change this:
# Don't skip by defaultset $skip_cache 0;
to:
# Don't skip by default

set $skip_cache 1;
Then check if it’s letting you log in. If it does, that’ll confirm it’s the nginx cache that’s the problem for multisite and probably then you’ll need to add a better cache key – currently:
fastcgi_cache_key “$scheme$request_method$host$request_uri”;
If you have a domain variable, you could add that to the key.
Hi Dave!
In the end it was a WordPress cookie issue. But thanks anyway!
Hi, Thanks Dave for this great stack,
i followed the steps but i am stuck at “Now your web server is ready for traffic, so visit http://www.yourdomain.com in your browser and check that you see the following:”
I don’t see 404 not found, i see “This site can’t be reached”
what i am doing wrong
Make sure you have DNS pointing to the server and try restarting nginx.
Hi, Dave, Great to see you are back!
Just curious, is this stack really secure by itself, or is there anything else like firewalls etc that I should be implementing? This is my first linux stack build.. Thanks!
Hello Dave,
Great WordPress stack!
I was woundering if you any one else here have any experince with Litespeed? And if so whats your thoughts on it?
It seams very interesting as it has a native cache plugin (LS cache) with many other wordpress optimisation options, for free. Their enterprise vertion (server with under 2gb ram is free) has a Quic (http/3) option. All the tests i have seen on the web show it to be faster than Nginx.
So if you or any one else here have any experinse with Litespeed, please let mr know? What r your thoughts on it?
P.S. Stay fast!
Best regards,
Pavel
If you’re looking for a managed service, Gridpane have the fastest managed service out there. You can deploy to loads of places – Digital Ocean, AWS etc.
Hi Dave, Thank you;
I need to create a site in a subdirectory ( exmaple.com/site2 ). example.com is a WordPress and site2 is a WordPress; how can I do that? we have one FastCGI cache path for 2 different sites, is it bad for my site? please help me at this situation;
I love you. That’s all I have to say.
Thank you! I love you too 🙂
Hello! I’m using Centos 7, instead of Ubuntu, since it’s more stable.
Also, there is some troubles with MySQL8 and WP, so MariaDB is more stable too.
Please look for this stack and maybe you can make another guide for Centos?
Hi – I find CentOS a pain to be honest, and the argument about it being more stable doesn’t apply to this stack. Having said that, I have helped someone else install it all on CentOS and basically you’re swapping out apt-get for yum to install each component.
Also – CentOS puts config files in different places, but if you use the find command then that will help, e.g. find . -name redis.conf
Hi Dave, I keep getting: ERR_CONNECTION_CLOSED after running certbot, cloudflare it’s deactivated acting only as a dns service.
I also tried reissuing the certificate.
Any idea why this might happen ?
Try switching to FULL (not STRICT) SSL with Cloudflare. Presumably you enabled the option to redirect non-HTTP to HTTPS with certbot.
Hi Dave, I have the same issue as some others above, the website worked, until I ran certbot –nginx
I got the “Congratulations! etc\” message but the website wasn\’t able to be connected.
DNS is correct, cloud icon on Cloudflare is grey, I used \”flexible ssl\” on Cloudflare.
Anything else I can troubleshoot?
Thanks
If you use the ‘flexible SSL’ it will access your site through HTTP not HTTPS. You should use FULL but not FULL STRICT. Full will mean you use the Cloudflare SSL on front-end and then communication between Cloudflare and your server will be over your Letsencrypt SSL cert.
Hi Dave,
I try to optimize Mysql
but when I try to use tuning-primer.sh
I got this message “authentication message”
root@nova-deals:~/tuning-primer.sh# ./tuning-primer.sh
Using login values from ~/.my.cnf
– INITIAL LOGIN ATTEMPT FAILED –
Testing for stored webmin passwords:
None Found
Could not auto detect login info!
Found potential sockets: /var/run/mysqld/mysqld.sock
/var/run/mysqld/mysqlx.sock
Using: /var/run/mysqld/mysqld.sock
Would you like to provide a different socket?: [y/N]
Can you help me?
Thank You
If you choose N then it should ask you next if it should create a ~/.my.cnf file for you. Once it does, edit this file and enter your username and password creds then re-run the script.
What’s happening with WP Intense?
Are you planning to:
1. hire new developers
2. fix the bugs
3. add feature requests
?
Yes to all of these. There are many changes coming, but the investment I need to hire devs has stalled. It should be here this month.
Right as of this minute I’m working on some bug fixes for FWW, a paid feature request for external images and also I have an updated http://www.superspeedyplugins.com website coming soon which includes buddypress with the idea being that site-wide activity will be far more visible including bug fixes, additions to changelog, feature requests, forum posts etc.
It’s hard to reach you. If you don’t mind, may I ask when are you coming back to work? I’m waiting for the FWW update. When finally comes the long-awaited update? I wait and wait and nothing comes.
https://www.superspeedyplugins.com/idea/unlimited-number-of-duplicated-pages/
https://www.superspeedyplugins.com/idea/parameterized-urls-still-available/
Good to see you back! I think this is the most urgent FWW feature request:
https://www.superspeedyplugins.com/forums/topic/add-support-for-plugins-that-remove-the-category-base-when-using-the-filters/
I’m aware of it but it’s hard to reach you. Please delete this comment after reading it.
I know this is highly desired. I’ve implemented the basics of this but it comes with many bugs so I’ve removed it for now so I can release other FWW bug fixes and improvements, coming out this week hopefully.
Come on, this is ridiculous. Little or nothing has been done in the last months. Small CSS changes and there is still a bug: http://prntscr.com/peipjn
That’s fair, but onboarding the new dev is taking longer than anticipated. In any case, I am now freed up to develop again too this week, so you’ll see movement finally.
It’d help me if you keep these comments to specific feature requests or in the forum rather than on this unrelated article.
I don’t see any progress toward fixing bugs or adding new features.
There was a minor upgrade to FWW last week and our new developer is continuing with bug fixes on that plugin as he familiarises himself.
I highly recommend this developer: https://maciejbis.net/
Maybe you can work together.
I’ve messaged him. Thanks. Got a few other interested parties. Hopefully have someone on board next week.
Hi, I’ve been using your stack for a long time. I always liked it. It works excellently well. But only today did I realize that price filtering and other elements don’t work.
There are no issues with woocommerce, the theme and plugins .. because I tested raw wordpress. And I have the same problem.
Could you help me adjust this?
wp-admin / edit.php? post_type = product & orderby = price & order = desc
I have no issues with price filtering or anything else and this is the first report I’ve had about this.
Can you provide access and a URL where I can see what you’re meaning? Then I’ll be able to debug. Contact me through [email protected].
Thank you, it worked!
But after I install the ssl using certbot –nginx, nginx started giving the error:
conflicting server name “domain.com” on 0.0.0.0:80, ignored
I checked all .conf files under sites-available and there are no duplicating files or “listen 80”
Any thoughts?
Thanks
Maybe you have two default servers in your nginx files? Or maybe you have two sections in a single file for the same domain listening on port 80?
Redis will be a droptemt server ? Or on same webserver can need to install radix?
Cant config , how much you charge for stack config,?
I don’t do custom stack builds for customers any more. Pretty much all of them expected me to then manage the site maintenance for them which I have no interest in doing.
I can recommend Gridpane. It’s a little more technical minded than most managed services, but if you can handle that you get superb performance.
You can install redis wherever you like, but typically you’ll install it on your web server.
Hi Dave,
After installing wordpress, I still get the 404 nginx page when trying to visit my domain. The wordpress files are all in var/www/domain.com. DNS pointed service ip to domain.com. Any thoughts on why is the case?
Thanks
Sounds like you need to change /home/826397.cloudwaysapps.com/vaxvhpbyme/public_html/ in the nginx sites-available file to point to /var/www/domain.com
Also, is there a reason to install php-fpm or cgifast?
(Sorry, I’m still learning a bunch about server configs)
I don’t think I understand the question – you need php-fpm to actually process PHP code.
Hi Dave,
Thanks for sharing the great work! I had a few questions.
— I’m hoping to spin mysql and redis up on their own servers. Do you have any tips or scripts for this?
— Any thoughts on pros- v cons of supplementing this config with Nginx acting as reverse-proxy for Apache?
Best.
I avoid Apache just because it’s normally a memory hog, but yea you can put mysql and redis on their own servers easily enough and change the IP addresses instead of ‘localhost’. Make sure you use local network IP addresses for better performance. If using digital ocean, you can tick the box for ‘private networks’ when creating droplets and then your servers have two IP addresses – one public, one private and local.
Hi, does this stack cover setting up a firewall, or is that not needed because it is using fail2ban? If I need to set up a firewall too, is there anything I should keep in mind in regards to open ports, etc?
Thank you
The firewall is included and fail2ban automatically adds rules to your firewall.
Check out my stack maintenance guide for administering fail2ban etc, but you can also look up iptables. For example, the following command will list all firewall rules that have been created (e.g. by fail2ban or anything else):
iptables -L
Also, I won’t be using Cloudflare as I plan to use AWS Cloudfront. I noticed the following lines in the conf file setting a proxy header? As these still needed do you know?
#these lines should be the ones to allow Cloudflare Flexible SSL to be used, so the server does not need to decrypt SSL
proxy_set_header X-Forwarded-Host $host;
proxy_set_header X-Forwarded-Server $host;
proxy_set_header X-Forwarded-For $proxy_add_x_forwarded_for;
proxy_set_header X-Forwarded-Proto https;
proxy_set_header X-Real-IP $remote_addr;
proxy_set_header X-NginX-Proxy true;
There are 2 key purposes here:
https://docs.aws.amazon.com/AmazonCloudFront/latest/DeveloperGuide/RequestAndResponseBehaviorCustomOrigin.html#request-custom-headers-behavior
The only snippet I couldn’t figure out it’s purpose or where/whether to include was: fastcgi-php.conf
If you can shed any more light it would be appreciated.
This script determines if the fastcgi_cache should be hit or bypassed. Based on things like cookie for items added to basket or user logged in etc.
Hi Dave, great setup! Couple of quick questions…
you mention when debugging a failed install you look for NGINX: HIT rather than NGINX: BYPASS. I might be mistaken, but these headers don’t appear to be added anywhere in this setup?
Did you mean one of the below?
Including the ‘fastcgi-cache’ snippet returns a ‘fastcgi-cache’ header (HIT OR MISS) but only for html assets?
Including the ‘static assets’ snippet means files such as css, js, etc. return a ‘Cache-Control’ header as “public” .
I think I have mine setup OK, but might be helpful to others if you wouldn’t mind clarifying?
You’ll find the cache headers line 13 in this file which is included in the main script:
https://github.com/dhilditch/wpintense-rocket-stack-ubuntu18-wordpress/blob/master/nginx/snippets/fastcgi-cache.conf
Thank you so much for your tutorial, Dave.
I have been done and my website is working. I use with woocommerce, i test with about 200 products. But my store is still slow, especially admin page, when I delete products. Can you give me some suggestions?
Thank you so much.
Best regards.
Can you describe your products? Do they have lots of variations? If so, I’m working on a solution:
https://www.superspeedyplugins.com/2019/07/06/my-journey-fixing-woocommerce-slow-speed-with-many-variations-part-1/
Thank you so much for your reply.
My products is T-shirt and yes, they have a lot of variants.
Hi there!
Any update ? 🙂
Sorry, what’s this regarding?
Thank you for this wonderful tutorial. It would be awesome to create an ansible playbook from this.
I had created an ansible playbook in the past but I disliked it because really ansible is focused on deploying multiple droplets and then updating all of them across the board.
I prefer the individual server-level granularity, but if you are up for creating an ansible playbook I would definitely link it here.
You should maybe look at one of the other comments in here from someone who has created a docker deployment script – similar but probably better than ansible.
Yes MySQL is best because supported by Ubuntu, same that SlickStack did. No reason to change to Percona or MariaDB cuz they have small team and less money. But PHP 7.3 I don’t think its faster much than 7.2 if using Fastcgi Cache already, and not supported by Ubuntu. Can you please tell me what you think about my opinion? And do you try SlickStack with Force HTTPS MU plugin?
I’m not sure what support you rely on from Ubuntu, I’ve certainly never thought to contact them for anything. I have multiple sites using PHP 7.3 – the reason it’s in here is because it’s 10% faster than PHP 7.2.
https://kinsta.com/blog/php-benchmarks/
I have not tried SlickStack or HTTPS MU plugins – let us know here if you do.
Hi, do you have a guide on getting this stack to work with multiple websites on one server?
Thanks!
There are some comments in this article from others covering how they did it but generally you need:
That’s it really, it’s fairly simple, but droplets are so cheap these days I just do 1 site per server.
Hi Dave,
Thanks for the great tutorial.
I have one issue – http is not redirected to https. I installed Lets Encrypt and selected option 2 Redirect http to htpps and also forced redirect in wp-config. But when I go to http://mydomain.com it gives me ERR_EMPTY_RESPONSE.
Any ideas how to fix this?
Hmm – this sounds like you’ve somehow switched off port 80 completely. You should keep your site listening on port 80 and have that rule redirect to 443. Letsencrypt should automatically add this rule for you.
Hi Dave,
I got error 524 on Cloudflare
when I try to install a database on my server
Can you help to fix this issue?
Thank You
Keep cloudflare off – use the little cloud bypass icon – until you’ve completed full installation.
I did, it didnt work.
I had to edit this file: /etc/nginx/snippets/limits.conf
When I did that it worked!
Extremely good instructions, thank you. The site is extremely fast!
Trying to upload a media file (WAV) that is around 65MB, getting this error in /var/log/nginx/rocketstack_error.log (A 12MB MP3 file worked fine.)
2019/06/23 11:22:57 [error] 2623#2623: *91 client intended to send too large body: 71886902 bytes, client: 192.168.1.148, server: bjokib.com, request: “POST /wp-admin/async-upload.php HTTP/1.1”, host: “192.168.1.4”, referrer: “http://192.168.1.4/wp-admin/media-new.php”
client_max_body_size 250M; in /etc/nginx/nginx.conf
upload_max_filesize = 250M in /etc/php/7.3/fpm/php.ini
post_max_size = 12M in /etc/php/7.3/fpm/php.ini
WordPress media upload page also says, Maximum upload file size: 250 MB.
All services are restarted, php-fpm, Nginx.
But when I upload something, it throws a HTTP error. And the log file logs that error above.
I believe I have increased the limits in all config files. What am I missing?
In addition to PHP, Nginx has its own max upload configuration setting. That’s what the client_max_body_size refers to and what this error refers to.
Did you add client_max_body_size 250M; inside the http {…} area?
There was an error in posting the above comment.
post_max_size = 250M in /etc/php/7.3/fpm/php.ini
Not 12M!
Hi, I am going through your tutorial and got stuck at the step “Adding SSL using Letsencrypt”
I succesfully installed Lets Encrypt, however Let’s Encrypt asked to select to add a redirect (option 2) to what I said yes, and now I can’t go on to the next step to change the site url in wordpress to https however I now can’t access wordpress anymore. I suspect it’s because I selected #2.
I looked online to see how to revert this, but all I could find was that option 2 adds a few lines to a file called 000-default.conf, and that I have to comment out them out. I couldn’t find this file though (Is it an apache file?):
RewriteEngine on
RewriteCond %{SERVER_NAME} =example.com 25 [OR]
RewriteCond %{SERVER_NAME} =www.example.com 3
RewriteRule ^ https://%{SERVER_NAME}%{REQUEST_URI} [END,NE,R=permanent]
Is there a way to reinstall Lets Encrypt or fix this?
Thank you!
The file will be inside /etc/nginx/sites-available for the redirect.
Hi, I want to thank you for your great stack! Together with your scalability plugin I bought, my website is super fast! However, I am still stuck with these issues:
1. Securing MySQL: I get this error while trying to secure MySQL, even though I am logged in as root:“The user provided does not have enough permissions to continue. mysql_secure_installation is exiting.”
2. I modified the “/etc/php/7.2/fpm/php.ini” file and changed these entries:
max_execution_time = 6000 memory_limit = 512M upload_max_filesize = 50M
but I still get a message on the wp media upload page stating: Maximum upload file size: 8 MB. I also Restarted MySQL after making these changes.
Any Ideas where I could of gone wrong? Is there any way I can give you access to my install to check it out?
Thank you
service php7.2-fpm restart
*edit I meant I restarted PHP (not MySQL)
Dave,
After following this guide everything is working great, however I’m trying to setup a cron to curl a URL and I’m getting:
curl: (35) OpenSSL SSL_connect: SSL_ERROR_SYSCALL in connection to mydomain.com:443
Is there a specific setting or update to resolve in this config?
Thanks.
I use wget for cron. Not sure why your cURL is not working. Maybe you don’t have letsencrypt set up and are using cloudflare instead? This may cause this I guess.
Hi Dave,
Do you recommend using PHP opcache in addition to the above?
Thanks!
Yes – sorry for not including it originally – I’ve added it to the article now. I’m running benchmarks on the key problems my customers have – mostly around huge stores and large numbers of woocommerce product variations – and I’ll link to that benchmark article once it’s released.
Could you please fix this bug: https://www.superspeedyplugins.com/idea/fww-category-widget-duplicated-base-slugs-in-urls/ ? It’s over a month old.
PS. Please delete this comment, just answer in the thread.
???
Howdy!
First: thx for this awesome tut! I set up an Ubuntu 18.04 LTS VM (2 CPUs, 4GB RAM, 120GB SSD VHDX) on a local domain. I followed every necessary step including the MySQL and PHP fine-tuning. I skipped SSL because I only need this site for local testing.
WP 5.2.1 (DE Edition) worked fine. I can log in and make my desired settings. But when I log out and try to open the page WP throws an error (translated from German):
“The file wp-config.php already exists. If you need to do the configuration again, please delete this file first and try a new one.”
I already tried to insert
define(‘WP_HOME’,’http://myhost.mylocal.domain’);
define(‘WP_SITEURL’,’http://myhost.mylocal.domain’);
in the wp-config.php but had no luck. Tried to reboot the VM, deleted browser cache, etc. No matter what I try I’m always redirected to http://myhost.mylocal.domain/wp-admin/setup-config.php
Never encountered this before (on managed webservers, vms, vhosts, xampp, lamp, etc.).
Any tips?
Thx 😀
It sounds like you maybe migrated a site over the top of the fresh rocketstack installation. If so, you’ll need to update your wp-config.php file to reference the correct database and db name and db user.
Hi Dave.
No, I didn’t migrate a site or installed a second one. I just followed your tutorial. Only difference is that I selected the German version of WP 5.2.1 but kept everything as described.
Opened the URL, provided WP installation with all necessary credentials, clicked on install and logged in. No matter what I edit in the backend (permalinks, website title, theme or simply nothing) – after I log out I get this error message. Started over with a fresh install from my VM snapshot with no luck 🙁
That’s odd. So if it installed, you definitely had the DB creds correct. Maybe you didn’t set up the www-data:www-data permissions for the /var/www/rocketstack folder?
I definitely set
chown www-data:www-data /var/www/rocketstack -R
during the installation. I followed the tut again on a fresh and clean Ubuntu install from top to bottom and the error remains. If I execute the chown command a second time after everything is installed it works… really strange…
🙂
Cheers
Is it possible you migrated an existing site? If so, the file permissions would have been copied across when you copied over the previous files.
I’ve written a full guide to migrating reliably here:
https://www.superspeedyplugins.com/2017/05/18/migrating-huge-wordpress-sites-reliably/
Thank You So Much
Dave H.
Finally, I have WordPress with PHP7.3 with MYSQL 8
I was looking for this type of script to make the fastest wp website.
I wanna say to all visitors who are trying to install this.
Please read carefully the whole script
There isn’t any mistake.
Hi Dave,
Thank you for the share. Followed and worked perfectly.
Would just have one question: How would you enable Brotli compression with this set up?
Thank you.
Hi, great work. It’s a really amazing setup and I’m actually using it under Vagrant for local development/content updates, as it makes everything faster than my old XAMPP.
However, to my understanding, you’re missing the nginx configuration for WordPress.
.htaccess files don’t work with nginx, so all WordPress rewriting requires some special configs.
https://codex.wordpress.org/Nginx
Hi – it really depends on what you’re using. If you’re using Yoast sitemaps for example, then yes you need to add some extra rewrites covered here:
https://www.superspeedyplugins.com/2019/04/12/how-to-configure-nginx-for-yoast-seo-sitemaps/
No, sorry, my bad, your original setup works out of the box. My problem was that I was trying to make it work with several wordpress installations. Through trial and error I figured out that, in that case, you need to add some configurations for ngninx in /etc/nginx/sites-available/rocketstack.conf.
I put all my sites in subdirectories mounted on /var/www/rocketstack. So, lets say I have a site I wanna see on rocketstack.local/site, then I’ll need to add these two location blocks within the server block (notice I haven’t tried with ssl yet because it’s still just for local development)
# These 2 blocks go inside the first server block in rocketstack.conf
location /site/ {
root /home/826397.cloudwaysapps.com/vaxvhpbyme/public_html/site;
try_files $uri $uri/ /site/index.php$is_args$args;
}
location /site/wp-admin/ {
root /home/826397.cloudwaysapps.com/vaxvhpbyme/public_html/site;
try_files $uri $uri/ /site/wp-admin/index.php$is_args$args;
}
After adding this, you might need to restart nginx a couple of times, perhaps after trying to open a page and getting a 404 (not so sure how all of this works, but after a few restarts it does).
Thanks again and keep on the good work. Looking forward for your next awesome setup
Sorry for a stupid question, but why is apache2 being installed if nginx is going to be the webserver? Thanks
It’s on there by default. Removing it clears things up.
My apologies Dave, but I did the whole glance look at the install list and misread the apache 2 was an apt purge not an apt install. Sorry to waste your time!
After installing SSL, site completely crashed, same problem like an above user. He mentioned this “Right after I changed the WordPress address and Site address to https, the website would not load anymore. All I get is “This site can’t be reached”. Me too!! Same problem, tested 5 times, everything works like a charm, once I get to the “install SSL” point, everything dies…. This is stupid.
He was able to fix it by using Cloudflare and flexible SSL. In my case I’ll wait for Dave to fix this SSL problem. I hate cloudflare, don’t wanna use it, therefore skipping this tutorial for now.
If you use Cloudflare, you need to pay these days to use a strict SSL, otherwise use the Flexible SSL certificate option.
If you don’t use Cloudflare, you shouldn’t see issues.
Did you restart nginx? The certbot should restart it for you, but if not, try restarting nginx and take a look at your rocketstack.conf file and confirm the certbot added the SSL certificate lines.
Something is wrong with WP 5.2 ??
DigitalOcean > Ubuntu Droplet > WP 4.9.8 > OK
DigitalOcean > Ubuntu Droplet > Latest WP > After installing let’s encrypt > I can’t access website anymore Frontend Backend don’t work. I’ve tested 2x times. Once I get to the “install SSL” section of your tutorial, website is crashing. Weird.
Nothing I’m aware of should break with WP 5.2.
Did you use certbot to run letsencrypt and did it complete without errors?
One key note: If you are using Cloudflare, when you are running the certbot you should have the Cloudflare bypass option on. (arrow going around the cloud rather than through the cloud in DNS settings)
Do you suggest installing the Google Pagespeed module with this configuration?
It’s up to you. Google Pagespeed or new relic are both decent, but I like using xDebug when there are any tricky issues. Less overall load on the server.
How can I further boost my page load speeds? Is it possible to install opcode caching and varnish caching additionally?
Also, I do have WP Rocket plugin for wordpress, which they say works with NGinx out of the box. Should I install it (since I already have a subscription), or should I install W3 Total cache? Or should I just not consider any caching plugin (like you had suggested above)?
I don’t use WP Rocket. I just rely on: fastcgi_cache, autoptimize plugin and sometimes some cloudflare features.
Hi, when I got up to the “Securing MySQL” part, I got this error:
“The user provided does not have enough permissions to continue. mysql_secure_installation is exiting.”
I was logged into console with the main root account. How do I fix this?
Thanks!
Use your root db user rather than the wordpress db user.
Thanks for your response. Where should I use my root db user? In wp-config?
Also, I am facing another problem and I am not sure if it is related. I tried updating a theme and I get this permissions related error:
“An error occurred while updating Porto: The update cannot be installed because we will be unable to copy some files. This is usually due to inconsistent file permissions.”
Also, I modified the “/etc/php/7.2/fpm/php.ini” file and changed these entries:
max_execution_time = 6000
memory_limit = 512M
upload_max_filesize = 50M
but I still get a message on the wp media upload page stating: Maximum upload file size: 8 MB.
I tried finding my .htaccess file to add the values, but it seems it doesn’t exist. Any clues?
Thanks!
You’ll need to restart the php service after changing these values using:
server php7.2-fpm restart
Thanks. I tried “service php7.2-fpm restart” but it still shows max upload 8mb on the wordpress media upload page.
I fixed this by changing this line in php.ini: post_max_size = 50m
Thank you – I’ll update the article to reflect this.
Hi, New query about the nginx cache plugin.
We use Pools for php. which means one wordpress site will have a pool named after its user.
So example user fred has a fred.conf in /etc/php/7.2/fpm/pool.d/
; pool name (‘www’ here)
[fred]
; Unix user/group of processes
; Note: The user is mandatory. If the group is not set, the default user’s group
; will be used.
user = tattoo
group = tattoo
my nginx config then specifies
fastcgi_pass unix:/run/php/php7.2-fpm-fred.sock;
And we can have different amounts of pm.servers etc and control the site usage properly while being able to have multiple sites on the one server.
Except for the issue that the nginx cache at /var/www/cache/fred is owned by www-data and therefore cant be accessed by the Till Kruss Nginx plugin.
I can add the user fred to the www-data group
usermod -a -G www-data fred
and then modify the folder
chgrp www-data /var/www/cache/fred
chmod g+rwxs /var/www/cache/fred
and this allows my pool user to delete the cache correctly.
My query is….
is that an acceptable way to do things?
does adding a user to the www-data group give them access to files they should not have access to.
Can I have Nginx proxy cache have a different user for each cache? so do the above the other way round and add www-data to the Fred group and save the proxy data as owned by Fred:Fred .
Or is there any better way to manage the cache on a per-user basis using pools so that the Nginx plugin will work and be able to purge the cache but the security and separation of the different sites and users is maintained.
i realise thats a long post. Sorry.
Your feedback is appreciated.
Ok i figured it out. I wrote it up so i wouldnt forget it.
https://www.siparker.net/web/nginx-proxy-caching-with-multiple-php-pools-and-wordpress/
Hi Dave, thank you so much for such a great article. It helps me a lot!
I wanted to ask you something.. Do you happen to have this dockerized? or, could you point me to a good docker file that might be pretty close to this?
THanks so much,
I do not have it dockerized yet, but this is definitely something for the future.
I am in talks with someone about recommending a great managed service that includes clustering options however. More to follow soon.
Oh, I forgot to say.. The Readme is not updated. This project is a fork of this one:
https://github.com/mjstealey/wordpress-nginx-docker
Took me weeks, but I got it.
I wanted to share with everybody. Please, feel free to fork, PR, or just throw any comments about this setup. I just learned Docker so there could be some mistakes, however, it is working great for me and I’m already using it to easily create new domains or testing ones.
https://github.com/sadesarrollo/sa-wp-nginx-docker
Alright, thanks a lot!
Hi Dave,
I’d previously successfully implemented your guide above on two separate DigitalOcean Droplets (i.e. VPS) for two separate domains and saw a good performance improvement.
However, I’m now in the process of migrating on to a single (larger) server but am finding that the second site doesn’t work as expected when I enable redis (in wp-config.php) and am seeing content from the first redis enabled site and/or content missing.
I’ve found a number of articles via google (e.g. https://community.pivotal.io/s/article/How-to-setup-and-run-multiple-Redis-server-instances-on-a-Linux-host) but this has a number of differently named config files and am not confident that it’d work on my latest patched 18.04 LTS Ubuntu server.
Would you be able to provide any pointers?
Thanks,
Derrick
After much trial & error, I managed to get multiple Redis servers running for my multiple WordPress instances on the same server, aided by this guide: https://medium.com/@MauroMorales/running-multiple-redis-on-a-server-472518f3b603
Whilst not 100% fitting my exact use case, I managed to work out the differences and errors along the way. This also specifically helped: https://stackoverflow.com/questions/40317106/failed-to-start-redis-service-unit-redis-server-service-is-masked
Finally, setting up my 2nd wp-config.php to suit for the 2nd Redis server, adding:
/** Redis config parameters */
define(‘WP_REDIS_CLIENT’, ‘predis’);
define(‘WP_REDIS_HOST’, ‘127.0.0.1:6380’);
define(‘WP_REDIS_PORT’, ‘6380’);
define(‘WP_REDIS_DATABASE’, ‘1’);
define(‘WP_REDIS_PASSWORD’, ‘veryLongSecretPasswordGoesHere!’);
Just posting all the above, in the hope someone else finds it useful.
Cheers, Derrick
Very cool – thank you for the info – others will definitely find it useful. I pretty much always only run one website per server, given how cheap droplets are these days.
Hi, thanks for the great guide! It was my first time configuring a stack myself and it wasn’t that hard.
Everything seemed to work fine until I set up SSL. Right after I changed the WordPress address and Site address to https, the website would not load anymore. All I get is “This site can’t be reached”.
I tried adding the https url to the wp-config file but that didn’t help.
After this happened, I continued and configured cloudflare, because I thought it would help, but it did not.
Any idea of what I should check next?
Use Flexible SSL or upload your certificate to Cloudflare.
I realized when I change Cloudflare to Flexible SSL, my website is back. Only when it I set it to Full or Full Strict does it break the website. Any ideas on how to fix this or what went wrong?
Thank you!
Yes – if you want to use FULL on Cloudflare, you need to upload your own SSL certificate to Cloudflare. I believe they moved this feature into the premium plans however, so Flexible is what you should use unless you want to pay them.
Given that you have an SSL on your site, you still have fully encrypted traffic, except with 2 different SSL certs – one by Cloudflare, and one by Letsencrypt.
Thank Leon, Sitemap it’s good for me too with
# Rewrites for 301 include /home/826397.cloudwaysapps.com/vaxvhpbyme/public_html/wp-content/uploads/wpseo-redirects/.redirects;
# Rewrites for Yoast SEO XML Sitemap rewrite ^/sitemap_index.xml$ /index.php?sitemap=1 last; rewrite ^/([^/]+?)-sitemap([0-9]+)?.xml$ /index.php?sitemap=$1&sitemap_n=$2 last;
I’ve added a sitemap configuration article which gives full info.
https://www.superspeedyplugins.com/2019/04/12/how-to-configure-nginx-for-yoast-seo-sitemaps/
Thank for this article
Hello,
If you have a problem to install Mysql 8
you can use this repository
$ wget https://repo.mysql.com//mysql-apt-config_0.8.12-1_all.deb
$ sudo dpkg -i mysql-apt-config_0.8.12-1_all.deb
Regards,
Thank you for this and for helping our readers. I’ll get the article updated once I’ve built a new stack. Should be today.
I love your blog! Just curious when the updated stack is going to be released? Should I bother installing the one on this page or wait for the new stack?
Thanks!
This is currently the newest one. You can follow some additional tips you’ll find in the comments to get the latest version of MySQL and PHP. Other than that, you can use these two commands to get everything to update:
apt-get update

apt-get upgrade
These work for me regarding yoast:
# Rewrites for 301
include /home/826397.cloudwaysapps.com/vaxvhpbyme/public_html/wp-content/uploads/wpseo-redirects/.redirects;
# Rewrites for Yoast SEO XML Sitemap
rewrite ^/sitemap_index.xml$ /index.php?sitemap=1 last;
rewrite ^/([^/]+?)-sitemap([0-9]+)?.xml$ /index.php?sitemap=$1&sitemap_n=$2 last;
Great, thanks! I’m working through this on another site right now.
Hi Dave, awesome tutorial! I am new to this so forgive me if this is stupid question… How can I get gzip to work?
-Added the snippet include to config
-Restarted nginx
-Didn’t work so restarted my droplet
-still showing that its not gzipping.
How can I check if gzip is even installed? Should I just skip this and use cloudflare?
There are a few possibilities here:
You can check for compression using a variety of online tools, e.g. https://www.whatsmyip.org/http-compression-test/
You can also see more background info here: https://serverfault.com/questions/818549/nginx-gzip-not-working
Ok great, I got it all worked out. Tested the site on a server pilot/digital ocean droplet vs this setup on DO, and this version loads almost twice as fast… in just over 1s. Phenomenal! And that’s without the CDN setup yet. Thank you!!!
Hello,
I saw in the discussion, many people like me have an issue with Yoast Sitemap
Can you help us to added rewrite rule on nginx conf?
Regards,
Hi – yes – working on this guide for you now.
Hello,
Your tutorial is great
but I facing an issue with Yoast sitemap
I try to refresh my permalink on wp-admin Settings -> Permalinks but nothing change
Can you help me?
Thanks
Hi – I am working on a guide to show you how to do this just now.
https://www.superspeedyplugins.com/2019/04/12/how-to-configure-nginx-for-yoast-seo-sitemaps/
Hi Dave, Thanks for this updated guide very good as always.
Is there an accepted / particularly good way to control caches for things like woocommerce etc where the cart of sessions need to be maintained per user.
Have you considered writing a deply script similar to https://github.com/Mins/TuxLite that would manage this whole deployment. its particularly useful in its capability to setup pools for multile sites on the one server. and a command to include phpmyadmin via a symlink and then turn ot off again also.
Finally when installing i had a long issue trying to figure out why i couldnt install the version of mysql you mention above. this was because the gpg key for that version expired in feb and apparently is still expired and cant be used without a big workaround. It worked fine when i did subversion 12 instead from command line
thanks again for all your effort writing this up.
Hi – thank you – I will get the mysql thing updated ASAP.
re: WooCommerce, the nginx config comes with configuration for WooCommerce. This detects the WooCommerce add-to-cart cookie and then prevents caching for that user from that point onwards.
With this configuration, is it possible to use Cloudflare cache everything rule?
Yes it is
Dave
Any advice on upgrading php to 7.3?
Thanks
Dear everyone who writes about technical stuff about development in technology, web, mobile dev, should take this article as an example, cause it tells you about what you gonna install, what that stuff gonna do/affected to you.
btw, thank you for the article dave, I know what I’m gonna do now.
Thank you for your kind words.
Hi, can you help me to make rewrite rules on rocketstack.conf for Yoast?
I added this code below but my /sitemap_index.xml still not created or appear. Just 404 not found.
What should I do?
# Rewrites for Yoast SEO XML Sitemap
rewrite ^/sitemap_index.xml$ /index.php?sitemap=1 last;
rewrite ^/([^/]+?)-sitemap([0-9]+)?.xml$ /index.php?sitemap=$1&sitemap_n=$2 last;
Hi – sometimes permalinks get stuck – you’ll probably find that if you visit Settings -> Permalinks in wp-admin then click ‘Save’ (yes without changing anything) that it will start working
Hey buddy, I have followed all step. but I’m facing an issue in sitemap. using Yoast plugin for seo. I able to access sitemap with this https://abc.com/?sitemap=1. but while we call https://abc.com/post-sitemap.xml then throw 404 . I have update rule in /etc/nginx/sites-available/rocketstack.conf still facing issue . please help me
Please try visiting wp admin -> Settings -> Permalinks then hit ‘Save’.
Please update first two commands they are not working
mysql-apt-config_0.8.12-1_all.deb
wget -c https://dev.mysql.com/get/mysql-apt-config_0.8.12-1_all.deb
dpkg -i mysql-apt-config_0.8.12-1_all.deb
Which version of Ubuntu are you using and which hosting company?
Hey @Dave H,
Unfortunately, I’d already those articles and had no luck. Think I’ll therefore give phpmyadmin a miss until compatibility issues are resolved.
Many thanks for a great article!
Hi, I updated the config files to use PHP 7.3, here is the link to the git repo.
https://github.com/floatbeta/wp-rocket-stack-updated-2019
Thank you for your help with this.
First off, I’d like to say thank you for an excellent well explained article.
FYI, I found a gotcha whilst installing mysql, using the above commands:
wget -c https://dev.mysql.com/get/mysql-apt-config_0.8.10-1_all.deb
dpkg -i mysql-apt-config_0.8.10-1_all.deb
apt-get update
Which gave an error:
Err:4 http://repo.mysql.com/apt/ubuntu bionic InRelease
The following signatures were invalid: EXPKEYSIG 8C718D3B5072E1F5 MySQL Release Engineering
This meant I couldn’t proceed, at the time, but managed to resolve by adding the key:
apt-key adv –keyserver keys.gnupg.net –recv-keys 8C718D3B5072E1F5
Which then allowed me to successfully:
apt-get update
apt-get upgrade
So, I then had a working version of MySQL 8 on the machine.
However, the thing I’m struggling with now is that I’m trying to install phpmyadmin, but keep getting the following error:
mysql said: ERROR 1064 (42000) at line 1: You have an error in your SQL syntax; check the manual that corresponds to your MySQL server version for the right syntax to use near ‘IDENTIFIED BY ‘examplePassword’
Do you have any ideas as to how I could resolve this?
Hi – it sounds like phpmyadmin is not yet MySQL 8 compatible. Maybe it’ll be as simple as getting the very latest phpmyadmin. The part that has been deprecated has been deprecated for a while, specifically performing a GRANT PRIVILEGES and creating the user at the same time.
See this stack overflow for more info:
https://stackoverflow.com/questions/50409788/mysql-8-create-new-user-with-password-not-working
You could find the code inside the phpmyadmin that is performing this GRANTandCREATE and alter it to the new format, but presumably someone else has done this already.
You may also run into issues relating to the new default authentication method in MySQL 8 – see this stackoverflow about that:
https://stackoverflow.com/questions/49948350/phpmyadmin-on-mysql-8-0
Finally I got it running how do I enable ion cube loader I have a plugin which needs ion cube loader to work thank you
There’s a guide here for Ubuntu 16 which should work – https://www.digitalocean.com/community/tutorials/how-to-install-ioncube-on-ubuntu-16-04
Hello Dave
Can I use Debian9 instead ?
Yes, should be fine, providing the update packages are available. Debian is normally slower at releasing stable updates than Ubuntu.
In the same line of thinking of mysql php package not seeming to be installed …
mysql_connect() or mysql_query(). Those functions have been deprecated for a while now… using mysql now, will that not break everything ?
Plugins have all been using $wpdb->get_results for a while now, rather than constructing their own db connection. If you are integrating third-party php, rather than plugins, then you may have to rewrite older mysql_* functions to use the newer functions.
Hi there !
Your PHP installation appears to be missing the MySQL extension which is required by WordPress.
I don’t understand… I re-ran everything twice, MySql is well installed and the extensions for PHP as well ! Tried a few different guides, always comes back the same.
php7.2-mysql is already the newest version (7.2.15-0ubuntu0.18.04.1).
0 upgraded, 0 newly installed, 0 to remove and 0 not upgraded.
Any ideas ?
Hi – please check the database connection errors troubleshooting section on this page. It is highly likely that’s what you are experiencing and you need to change the mysql authentication type for the wordpress db user.
Hi there !
Your PHP installation appears to be missing the MySQL extension which is required by WordPress.
I don’t understand… I re-ran everything twice, MySql is well installed and the extensions for PHP as well ! Tried a few different guides, always comes back the same.
php7.2-mysql is already the newest version (7.2.15-0ubuntu0.18.04.1).
0 upgraded, 0 newly installed, 0 to remove and 0 not upgraded.
Any ideas ?
I’m not sure how you’re getting this error. Please check the database troubleshooting section. Is it possible you have a different default authentication method for MySQL users than the one listed in this article?
I would like to Enable HTTP/2 Support. For that I need to tell Nginx to use HTTP/2 with supported browsers. Don’t really know where to add HTTP2. Based on what I learned from this article:
https://www.digitalocean.com/community/tutorials/how-to-set-up-nginx-with-http-2-support-on-ubuntu-18-04
I need to find this:
…
listen [::]:443 ssl ipv6only=on;
listen 443 ssl;
…
and replace it with this:
…
listen [::]:443 ssl http2 ipv6only=on;
listen 443 ssl http2;
…
I went ahead and nano etc/nginx/sites-available/rocketstack.conf I found only this. Should I just add http2 at the end or there are far more tweaks I have to do than just adding 2 words.
server {
listen 80;
listen [::]:80;
Your changes look good. That’s if you haven’t enabled HTTPS. If you have enabled HTTPS and letsencrypt on your server, there should be a second block inside rocketstack.conf for 443 SSL traffic, but yes, those edits look good to me.
Thank you so so very much splendid the installation was flawless. Awesome.
Mysqld is taking up 40% of the memory from my 1gb digitaloceaan droplet. I’ve run tuning-primer.sh but haven’t found any settings to tune this memory usage. Or is 40% by mysqld normal?
Check out my article on configuring your stack to see how to control mysql memory usage. 40% is about right though. You need to leave RAM for the operating system, nginx, redis, the php processes.
https://www.superspeedyplugins.com/2019/02/14/stack-configuration-customisation-and-optimisation-guide/
Hi, what about FWW update? I’m writing here, because there is no contact on Intercom.
https://www.superspeedyplugins.com/suggestions/not-fixed-announced-fww-bugs/
https://www.superspeedyplugins.com/suggestions/seo-text-based-on-filters/
Hi – sorry – sometimes I get lost in code. I’ve added two new robot paths to intercom last week to help keep people updated and I’ve started a dev diary to keep you notified about what’s being worked on.
Faster Woo Widgets is almost there including both the things in those links.
Still the most awesome guide I have seen so far. Do you have any suggestions on installing phpmyadmin with this setup? Have a couple of sites where DDOS attacks are corrupting WP database and would like to be able to “hopefully” repair and optimize with phpmyadmin.
I have the same problem. After I created my sites, and set everything up. I was hacked and my database was corrupted. I did the whole procedure to recover but it did not work. I’ll start from scratch. Unfortunately it will be a great job. But that’s what has to be done. If anyone knows of ways to protect the site, let me know. It’s a major inconvenience to get through this.
In the modules folder I found a http image filter module. Is this one already enabled and if not would you recommend it to do?
You won’t need it for normal WordPress stuff, but if you want to enable it for other reasons you could do so. If you’re thinking to resize images on-the-fly, you may be better off using the service provided by Cloudflare to handle this as it’ll alleviate load from your server.
My access logs are flooded with 408 codes in my site_access.log : “POST /api HTTP/1.1” 408 0 “-” “Mozilla/5.0”. Almost every second. I haven’t done much different then following this guide. Do other also expierence
Hi – please change your server_name _; inside your rocketstack.conf file in sites-available.
Change it to reflect the domain name of your site.
Then run:
service nginx restart
yes I already did 🙂 I copied rocketstack.conf and renamed it to mywebsite.conf. In the config file I changed every line with rocketstack to mywebsite and also changed the server_ name to mywebsite.com
moved to an other hostingcompany. Same installation and no log spamming
Great tutorial and I am interested to try it on my VPS.
However, I have just two questions, Could you also add how can I add multiple WordPress installations via this process?
Also, could you add a file manager portion in the tutorial so that I can access the files via a GUI file manager from the web?
Thanks in advance.
Hi – for a file manager, you can use FileZilla. There are other web-based file managers you can use. I’ll cover these in my upcoming article.
I’m also adding info about multiple websites on one install to this upcoming article.
When trying to add a ssl certificate I get an error:
[domain]/.well-known/acme-challenge/LGgb3bl6BTvcOgZgsQNcs6YGgIgtwH-Tr687Ym4EtrA:
“\n404 Not Found\n<body
To fix these errors, please make sure that your domain name was
entered correctly and the DNS A/AAAA record(s) for that domain
contain(s) the right IP address.
Should I use cloudflare before setting up the ssl certificate or afterwards?
If you have cloudflare on your site, ensure you have clicked the cloud icon in the DNS tab to bypass cloudflare until you have your SSL configured.
If the SSL still doesn’t register, follow the troubleshooting section for the SSL – there’s an alternative way now to generate the SSL certs that seems to be a bit more reliable across different platforms.
Thanks for the great article. Do you think redis will help each and every type of WordPress site?
Absolutely. 1) It moves transients into RAM only which is a major speed boost and 2) It gives you a lightning-fast object cache which is another major speed boost.
There is no downside.
Keep having uploads blocked. The only solution I have found is to run this command: sudo chown -R www-data /home/826397.cloudwaysapps.com/vaxvhpbyme/public_html/wp-content/uploads
Any ideas?
Not sure why your uploads folder is changed from being owned by www-data:www-data. Is it possible you are uploading plugins or files using filezilla directly?
Is it possible your uploads are blocked for another reason? e.g. max size?
Not a max size issue, nor direct uploads. I’m stumped on what is changing. Running several configurations and have had to run the command on each.
If you’re interested, ping me a message through our on-site chat, I’ll give you my public key, you can give me access, and I’ll figure it out and report back here with the solution.
Right now it seems to be working fine. I will ping you if it reoccurs. Thanks
Can you confirm that your /var/www/rocketstack folder is ownder by user and group (separate things) called www-data?
mmh, I can’t install WordPress. Get an error: Error establishing a database connection
Don’t know how to resolve this. Followd every step in the guide
When you ran the command to secure mysql, did you choose the defaults, or did you choose the new encryption algorithm for mysql user passwords?
If you chose the new method, then you should edit /etc/mysql/mysql.conf.d/mysqld.cnf and add the following line at the end:
default-authentication-plugin = mysql_native_password
Im not very known with manually installing this software on a vps. But I would really like to have phpmyadmin on the stack. Is that easy to achieve with mysql8?
did you figure out how to install phpmyadmin with this setup? I am having trouble. Always get 502 errors when trying to connect to phpmyadmin GUI. Thanks in advance.
The easiest to add is to add PHP MyAdmin using a subfolder. You can also add it as a subdomain if you wish, but a subfolder will not require any alterations to your nginx config.
Or you can use PHP Miniadmin – http://phpminiadmin.sourceforge.net/
Yes – you can install it afterwards, or you can use phpminiadmin.
On a different topic, what are using for the “Trending” and “Popular” Articles widget in the sidebar? I really like how simple and clean that is. Thanks
It’s WordPress Popular Posts shortcodes inside Tabs Responsive with my own CSS to get it to stick once you scroll a little and my own CSS for the styling.
We connect to an outside inventory system using webhooks. They don’t appear to fire with this configuration. Thought maybe it was a plugin but after disabling them all it still won’t fire. Set up a test site with same db on apache and they work. Would there be something stopping web hooks from working in this configuration?
If they are inbound webhooks where the endpoints are on your server, then you’ll need to configure nginx to call the correct PHP scripts. If they are outbound webhooks then I see no reason for them not to work.
Hi. Great set up! Have a question. With this config, should the define(‘WP_CACHE’, true); option be used in the wp config file or not? thanks
Whatever caching plugin you use should change this setting for you, so no need to manually alter it.
ok gotcha. i am not using anything beside the config you posted. still, i saw some other articles online that suggested enabling the line in wp config file when using Redis. guess I will just leave it out.
Seems like FastCGI does some kind of redirect loop after a few days of running..
When clearing /var/www/cache the problem seems to disapear, any idea?
Hi did you ever find a solution to this, as I am facing the same issue. I can’t seem to figure it out. Thanks!
Hi – it might be caching a redirect related to cloudflare? This is the most common reason for this. If it’s still happening to you, ping me in the chat so I can look at your config and figure this out.
So MariaDB is no longer recommended? I’ve shifted my installation to MariaDB, should I shift back to MySQL 8, or is MariaDB still a good choice?
MariaDB is still a good choice, but MySQL 8 is as fast as MariaDB and there’ll be a lot more support around the internet for MySQL 8. Performance-wise, they’re very similar.
Hi. This is an awesome setup. Really fast, I can seem to get sitemaps to work. It looks like I am having some rewrite issues with NGINX. Any suggestions on how I should enter these and in which particular file? Thanks again.
Did you get this sorted out? Also having the problem on two sites. Both sitemaps for the plugins yoast and google sitemaps don’t work. Added the recommended fix from plugin developer to conf file but still not writing.
Guide for sitemaps here: https://www.superspeedyplugins.com/2019/04/12/how-to-configure-nginx-for-yoast-seo-sitemaps/
for some reason, all the other plugins and/or code suggested insertions. did not work. but the one i mentioned above did. works with Jetpack sitemap and SEO Framework sitemaps as well.
finally got it sorted by adding a sitemap plugin and adding the suggested code to the rocketstack.conf file. I used XML Sitemap Generator for WordPress 4.1.0. Had to paste the code in both the http and https sections.
Hi – what error are you experiencing? Perhaps the plugin you are using needs some configuration? Typically this would involve copying a line into your nginx.conf file or to your sites-available/rocketstack.conf file.
Hi Dave,
I want to try this on my live droplet. My current setup is as below. Can you recommend which parts should i do and which should ignore.
Image
Ubuntu 16.04.4 x64
Size
1 vCPUs
2GB / 25GB Disk
I wouldn’t recommend upgrading an existing droplet unless you’re ok with downtime. You’d be better off creating a new droplet then migrating your site. I have a guide to migration here: https://www.superspeedyplugins.com/2017/05/18/migrating-huge-wordpress-sites-reliably/
Nice job guys! There are a few minor changes if you need to run virtual host with different ips but other then that this was great!
Dave (sorry the format on my earlier message got messed up)
This system is rocking for me.
A couple things I found:
The gzip settings are in the snippets, but are not called in the rocketstack.conf (was easy for me to include). See you added instructions in comments line.
The crontab -e addition should be corrected to fix the two dashes versus one (–webroot-path and –renew-, both should have two dashes in front.
I find that Cloudflare May or may not be reducing total load time, but always increases TTFB. I have not used Cloudflare for this reason. What has been your experience?
You have suggested max_execution_time of 6000. Do you mean 600s?
Finally, the current configuration does not have TLSv1.3 (which requires the more recent OpenSSL, not yet standard with 18.0.4). Any thoughts on upgrading? I know there’s at least one repository with the updated 18.0.4 and OpenSSL, but worry about security risks of pulling from another source. What are you planning to do?
Thank you so much for this write up. It’s a fantastic foundation.
I dot one site to work but i’m trying to setup two sites using this process. I have two directories in var/www/site1 site2 and setup two directories for /etc/nginx/sites-available and enabled them. Updated host files to point to each IP that is assigned to me server but both sites direct to the default IP. What am I doing wrong?
Enter the server_name variable to match the domain you are matching.
Also, you should delete the /sites-available/default file.
Could you write an example ? Cuz i had problem with cache folder. I received a nginx error about /var/www/cache, that was in use for two sites. Im little bit lost.
Create a separate folder for caching the second site – e.g. /var/www/cache/site2 and change the config file
I made several configuration attempts and the one that worked perfectly, was to create a new server block, inside the rocketstack.conf. Everything is ok now
I ran into the same issue. Can you share the code please.
This will also work – I prefer to use separate config files per website, but you can have multiple inside the same file if you wish.
Actually – I really prefer completely separate droplets per website.
Dave
This system is rocking for me. A couple things I found:
The gzip settings are in the snippets, but are not called in the rocketstack.conf (was easy for me to include)
The corn tab line added should be corrected to fix thetwo dashes versus one (wbroot-path and renew-, both should have two dashes in front
I find that Cloudflare May or may not be reducing total load time, but always increases TTFB. I have not used Cloudflare for this reason. What has been your experience?
You have suggested max_execution_time of 6000. Do you mean 600s?
Finally, the current configuration does not have TLSv1.3 (which requires the more recent OpenSSL, not yet standard with 18.0.4 any thoughts on upgrading? I know there’s at least one repository with the updated 18.0.4 and OpenSSL, but worry about security risks of pulling from another source. What are you planning to do?
Thank you so much for this write up. It’s A fantastic foundation.
Hello my friend, I really enjoyed the tutorial. I did the same thing as you said and it worked out fine. But I have some doubts:
1) My site can be accessed by IP and domain. But I want it to be only for domination, is it?
2) I want to use this setting for Woocommerce, should I add rules to checkout page or something?
3) I want to use the same VPS for more than one site, how should I proceed?
Thank you
1) Add your domain to the server_variable instead of just _ there.
2) It includes rules for WooCommerce to bypass the nginx fastcgi_cache. You can test this by opening the network tab in chrome developer tools (F12) then reload the page and look at the ‘headers’ sub-tab and view if it was a cache HIT or BYPASS. You’ll notice a BYPASS as soon as products added to basket.
3) Create additional files for each site in /sites-available/ and separate folders under /var/www/. Ensure you specify the server_name variable.
Thanks, I did just that and had problems only with the cache. Nginx has an error saying: “the same path name” / var / www / cache ”
I do not know how to adjust it, could you help me?
Repeat the steps in the guide to create a new cache folder for the 2nd site and adjust the config accordingly.
Amazing guide. I’m working on enabling WP Multisite to an install I did using this guide. I’m working through it, and I’ll probably figure it out eventually… but would you happen to have an nginx configuration you could share that enables Multisite (sub-directory option)?
Right now, when I add an additional WP site, nginx does into redirect loop when I try to browse to it.
Thanks in any case.
Hey Casey,
Experienced the same issue. To fix, add the multisite rewrite rule in the server block of your wordpress.rocketstack.conf file:
# Rewrite multisite ‘…/wp-.*’ and ‘…/*.php’.
if (!-e $request_filename) {
rewrite /wp-admin$ $scheme://$host$uri/ permanent;
rewrite ^/[_0-9a-zA-Z-]+(/wp-.*) $1 last;
rewrite ^/[_0-9a-zA-Z-]+(/.*\.php)$ $1 last;
}
You may also need to specify the server_name with your domain too.
Regards!
Yes – change the ‘server_name’ variable to reflect your site. That should stop these redirects. It may also be your cloudflare SSL flexible certificate (if you’re using one). If so, you should switch to FULL.
When running the tuning script it comes back with “No InnoDB Support Enabled!”
Is that a tuning script bug or did I miss something?
Sorry – I linked the wrong tuning-primer.sh script.
Use this instead:
cd ~rm tuning-primer.sh
git clone https://github.com/BMDan/tuning-primer.sh
cd tuning-primer.sh
./tuning-primer.sh
This still doesnt seem to work.
I always get
– FINAL LOGIN ATTEMPT FAILED –
Unable to log into socket: /var/run/mysqld/mysqld.sock
thats the correct sock file in my.cnf but it never seems to be able to login.
There is a issue open on the tuningprimer github to support mysql 8 but i assume as its in the tutorial that you can do thsi without any issues?
Hi – please check the database connection errors troubleshooting section on this page. It’s highly likely that you ran the command to secure mysql but then you chose the new authentication plugin. There’s a guide above to changing that back for your WordPress db user.
Really simple to follow guide. And blazing fast result!
Being a total newbie I wonder if it’s possible to add a second WP site to the same VPS? Since I don’t yet use the full potential of a single page..
Yes it is – the easiest way is to create a copy of the nginx/sites-available/rocketstack.conf file for your 2nd domain. You will need to create a separate folder, separate database, separate SSL certificate etc but yes – just repeat the config steps but change rocketstack.conf to point to your other domain. You’ll need to change the server variable to refer to the domain you are adding.
I don’t know what it is but for some reason trying to create a 2nd site always causes an error with nginx and the service won’t restart. Running the validation tool on the .conf file says that the fastcgi_cache_path directive is not allowed. Of course, running the tool on the original rocketstack.conf file produces the same error but the service will start. I have tried everything except giving each site it’s own cache folder.
Sorry – you need to create a separate cache folder for each site and change the config to reflect that too.
I’m also trying to have multiple (small) sites on one server. So far I’ve made seperate cache folders
/cache/site1
/cache/site2
Made different configs.
nginx/sites-available/site1.conf
nginx/sites-available/site2.conf
in the config file I replaced everything which contained ‘rocketstack’ to for excample ‘site1’
But I run into an error. Removing default config doesn’t solve the problem
nginx: [emerg] a duplicate default server for 0.0.0.0:443 in /etc/nginx/sites-enabled/rocketstack.conf:75
Am I missing something?
thank you! but if i try to access php files eg. installer.php (duplicator plugin) i get a 404, how can i fix that?
Check permissions on the file – they should be owned by www-data:www-data.
I used
checkgzipcompression.com > to check if GZIP is enabled, it is.
tools.keycdn.com/http2-test > to check if HTTP 2 is enabled, it is.
I don’t understand in the comments above, you said
“… this link looks useful for what you need: https://www.digitalocean.com/community/tutorials/how-to-set-up-nginx-with-http-2-support-on-ubuntu-18-04”
But it is enabled, or am I missing something?
Add this to rocketstack.conf:
include snippets/gzip.conf;
Or use Cloudflare for compressing files to save CPU on your server.
Nice! I got 84 on pingdom 🙂 🙂
In case someone is curious, here are my details:
Hosting: Digital Ocean
Droplet: 4 GB Memory / 80 GB Disk / NYC3 – Ubuntu 18.04 x64
Pingdom: https://pasteboard.co/HN89vBT.png
P.S. I got F for “Compress components with gzip”. Above in the comments you mentioned “It’s in the /snippets/ directory, and is included in the config.” Got confused then why I got F (12points) for Gzip? It has to be tweaked or configured somehow?
Hi – see my other responses here – you can either use Cloudflare to compress your files and set browser caching or you can add this line to rocketstack.conf:
include snippets/gzip.conf;
Another suggestion if I may: https://developers.google.com/speed/pagespeed/module/
A more native approach to even more speed optimizations allowing us to use less plugins in the CMS. It has a LOT of nice filters: https://www.modpagespeed.com/doc/
This guide is next in the list. Please upvote this idea here to be notified when it’s released:
https://www.superspeedyplugins.com/idea/create-guide-to-installing-googlepage-speed-module/
This is quite difficult to install I noticed 🙂
If you don’t follow the ‘defaults’ when securing mysql, then you’ll have to follow the troubleshooting.
Yes it’s difficult, but you’ll learn a lot about managing and running your own server, which is ultimately the best way to have total control over your wordpress environment in the most cost-effective way.
Oh sorry, my reply was for Chris in order to install pagespeed.
But I did succesfully followed your guide 🙂 thanks for that. Websites running well
Oops – my bad – my fault for replying from back-end where you can’t see threads. Glad to hear it.
Any idea how to fix product page not loading when enabling redis object cache?
This sounds like something specific to your install. Some plugin has some broken code when trying to use the object cache.
Enabled your debug.log file by editing wp-config.php and then load your product pages and check the log file to find out the culprit.
Unable to log into socket: /var/run/mysqld/mysqld.sock with primer ./tuning-primer.sh
does a different socket have to be used?
Hi Dave, just stumbled on your webpage. Great content.
Which kind of Digital Ocean droplet would you recommend for a Datafeedr site with around 80,000 products? Would the 2 GB, 2 vCPUs droplet be sufficient? Thanks in advance.
Hi – if you use our External Images plugin then the 2GB droplet will be big enough. It takes a while to import images and it also takes a lot of storage space.
Any plan to use this stack in a high performance cluster set-up like the one you have created using percona cluster ?
Not soon – I’m focusing on plugin upgrades over the coming months including Price Comparison Pro, Scalability Pro, External Images, Faster Woo Widgets and bug fixes for the others.
I think no Gzip on this config.
” Enable gzip compression F (0) “
You are correct. In the guide, I presume you will use Cloudflare to compress files but if you wish to add gzip using nginx, simply add this line to your rocketstack.conf file in the nginx/sites-enabled folder.
include snippets/gzip.conf;
You can put that after this line:
include snippets/nginx-cloudflare.conf;
There are other snippets in that folder that can be useful under various scenarios which I will cover in future guides.
btw, does the nginx config force https redirection ? I was expecting to see something like “return 301 https://example.com$request_uri;” somewhere in the conf or snippets.
What about Gzip ?
Either use Cloudflare to compress files or add this line to your rocketstack.conf file:
include snippets/gzip.conf;
i think you forget add gzip to nginx config
No, It’s in the /snippets/ directory, and is included in the config.
This is absolutely awesome! Have you considered adding http2 protocol implementation? That speeds up the server quite a lot.
And with the asynchronous resource fetching we won’t even need to combine CSS/js files with plugins anymore.
Nice idea – it’ll include it in my stack-tests when I have my benchmarks ready which will be done after I’m finished two plugin upgrades.
But this link looks useful for what you need: https://www.digitalocean.com/community/tutorials/how-to-set-up-nginx-with-http-2-support-on-ubuntu-18-04
Thanks for the guide. Great stuff!
Thanks for the awesome guide! Works great!
Are there any updates on http2 with this stack? I am farely new to this topic, therefore guidance would be highly appreciated.
See the answer someone else provided in a comment on this thread for adding http2
Dave
A few corrections I found for this excellent tutorial as i followed along:
1. You did not show the command to actually create the database:
CREATE DATABASE rocketstack;
2. For the SSL creation there are several occasions where — was converted to a single dash on your code above
I am working through it diligently and loving your work so far. Thanks
Oops – thanks for this – I’ve updated the guide to fix these issues.
root@server:~# dpkg -i mysql-apt-config_0.8.10-1_all.deb
dpkg: regarding mysql-apt-config_0.8.10-1_all.deb containing mysql-apt-config, pre-dependency problem:
mysql-apt-config pre-depends on gnupg
gnupg is not installed.
dpkg: error processing archive mysql-apt-config_0.8.10-1_all.deb (–install):
pre-dependency problem – not installing mysql-apt-config
Errors were encountered while processing:
mysql-apt-config_0.8.10-1_all.deb
It sounds like you might not be running Ubuntu 18.04? What OS are you running?
Excellent article as always!!!
I have tried the above setup on a digital ocean 1 gb ram. Every step works perfectly!
The only issue i encountered is the ssl command: /opt/letsencrypt/letsencrypt-auto certonly -a webroot –webroot-path=/var/www/acme/ -d yourdomain.com -d http://www.yourdomain.com
I get an error: certbot: error: unrecognized arguments: –webroot-path=/var/www/acme/
Any workaround?
Thanks
Hi – I’ve updated the article – you may find now the command stretches across on top of the sidebar, but now the — (double dash) will be properly represented instead of being turned into a single longdash.
Thank you so much, what about varnish ?!
No need for varnish when you’re using the Nginx fastcgi cache – it’s being used in this config instead of varnish, is AS fast, but most importantly is easier to configure and debug.
I can’t install MySQL 8
What happens?
You are being helpful as always. I was out of my patience to be honest. Can’t wait to test this in a working environment.
Thanks Dave!
root@server:~# ./tuning-primer.sh
-bash: ./tuning-primer.sh: Permission denied
Thank you so much…