

In the article below, I cover various tips and tricks to help you run your WordPress stack smoothly and easily. It’s focused around my Rocket Stack build, but can be tailored to any stack really. If you’re experiencing performance issues, you will probably also find my performance analysis guide useful.
Table of Contents
- Securing your website
- Use SSH keys rather than passwords
- Adding extra websites to your stack
- Balance your RAM allocation for each stack service properly
- Change Redis RAM allocation
- Other PHP configurations
- MySQL administration, optimisation and monitoring
- Nginx configuration and optimisation tips
- (optional) Add country to your nginx_fastcgi_cache configuration
- Allowing cross-server origin scripts
- Other snippets
- Add SFTP users in the www-data group
- Cloning your stack
- Summary
Securing your website
Securing your website is important for multiple reasons. Obviously, the primary reason is because you don’t want to be hacked, but securing your website is also important for speed and scalability.
The fact is that most hack attacks against WordPress websites are performed by robots and they are relentless! In their efforts to hack your site and guess passwords they will end up hitting your site so hard they effectively perform a denial of service attack. So, if you want your site to remain fast, you need to secure it.
Don’t use Wordfence for security
WordPress security does not mean installing WordFence – a plugin I have very little respect for. Why? Because I’ve had two clients who were hacked, who were informed they were hacked by Norton Safe Web, and who both had WordFence installed. Even running the WordFence full scan did not detect these two infections that I knew were present.
On top of that, WordFence slows your website to a crawl. Solving security at the WordPress plugin level is simply far too late in the overall stack. It needs to be solved at the nginx level, or – when possible – before that.
Lock down your server from IP address visits
Ensure you have a server_name set inside your nginx configuration script. If you don’t, you’ll end up attacked by one of the bots that is just probing IP addresses.
If you followed my guide, this is the line you need to edit:
server_name _;
Change it to properly reflect the domain name of your site, e.g:
server_name www.superspeedyplugins.com;
Protect yourself properly using fail2ban
You need to use fail2ban. It’s awesome. It’s free. It protects your site through the firewall which means that traffic doesn’t even manage to hit nginx. To recap the difference this makes, compared to banning IPs using Wordfence, here’s how your stack probably looks to outside traffic:
Cloudflare -> firewall -> nginx -> nginx_fastcgi_cache -> (PHP + MySQL + Redis + WordPress core code -> Theme -> Plugins)
So, with fail2ban, you’re stopping traffic at the firewall step. It doesn’t even touch nginx once the IP address has been banned. That’s a whole lot less CPU, disk and RAM usage per hack-attempt.
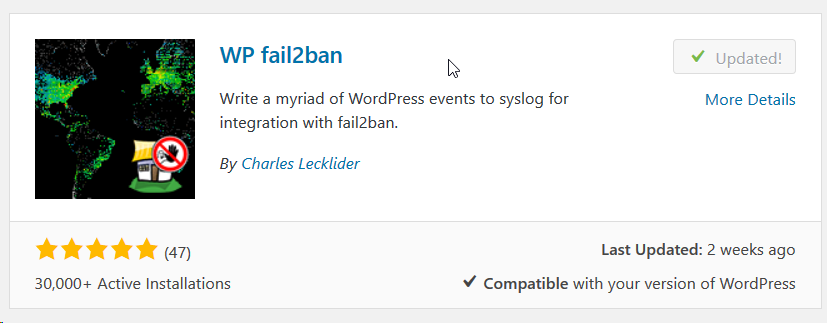
Install the WP fail2ban WordPress plugin by Charles Lecklider. This plugin stops the vast majority of hack attacks including the xmlrpc attack. Even although I said earlier that plugins are not a good solution for security, this plugin actually writes log files out to disk that are then used by fail2ban to update your firewall. It includes 2 fail2ban filters – one which stops clear hack attacks very quickly, and the other which stops manual password guessing.
After you have installed and activated the WP Fail2ban plugin, there’s a bit of config required to get it working properly. You can find a full guide from the plugin page, but here are the most critical parts. Firstly, if you are using Cloudflare, you need to tell Fail2Ban about those IP addresses. Fail2ban will then use the ‘forwarded for IP’. If you don’t do this, depending on how your stack is configured, you could end up banning swathes of legitimate users because they are all appearing to originate from the Cloudflare IP addresses.
Note: If you’re using my Rocket Stack, you don’t need this really – because in our nginx configuration files we alter the IP addresses to be the passed through IP addresses – specifically to aid fail2ban, but also because plenty other tools also want/need access to the IP address of the visitors. Anyway, add this to your wp-config file:
define('WP_FAIL2BAN_PROXIES','103.21.244.0/22,103.22.200.0/22,103.31.4.0/22,104.16.0.0/12,108.162.192.0/18,131.0.72.0/22,141.101.64.0/18,162.158.0.0/15,172.64.0.0/13,173.245.48.0/20,188.114.96.0/20,190.93.240.0/20,197.234.240.0/22,198.41.128.0/17,199.27.128.0/21,2400:cb00::/32,2405:8100::/32,2405:b500::/32,2606:4700::/32,2803:f800::/32,2c0f:f248::/32,2a06:98c0::/29');
You also want to stop user-enumeration. You can block this with the fail2ban plugin by adding this to your wp-config.php:
define('WP_FAIL2BAN_BLOCK_USER_ENUMERATION', true);
Now you need to change some things manually on your server to actually link the knowledge from the WP Fail2ban plugin directly to the fail2ban service installed on your server. Firstly, if you don’t already have fail2ban, install it using:
apt-get install fail2ban
Now what’s remaining is to copy the filters from the WP Fail2ban plugin to the correct location for fail2ban to be able to use them, and then configure your ‘jails’ including how many retries you will allow before banning and how long you will ban for. If you are using my Rocket Stack, you can copy the fail2ban filters using this:
cp /home/826397.cloudwaysapps.com/vaxvhpbyme/public_html/wp-content/plugins/wp-fail2ban/filters.d/* /etc/fail2ban/filter.d/
Adjust the above statement as required for your own stack. Once you have the filters in place, you need to edit your jail configuration as follows:
vi /etc/fail2ban/jail.local
If you have a fresh install of the fail2ban service, the above file will be empty and will be created by the command above. Add the following lines – no need to adjust really:
[wordpress-hard]
 enabled = true
 filter = wordpress-hard
 logpath = /var/log/auth.log
 maxretry = 1
 port = http,https
 bantime = 31536000
[wordpress-soft]
 enabled = true
 filter = wordpress-soft
 logpath = /var/log/auth.log
 maxretry = 3
 port = http,https
If you wish, you can alter the filters slightly – for example, the wordpress-hard filter above is set to ban offenders for a year (331536000 seconds). The wordpress-hard filter really shouldn’t give any false positives however, so it’s best you leave it. You can view current bans using:
fail2ban-client status wordpress-hard

fail2ban-client status wordpress-soft

If you need to unban IP addresses, there are a few ways. Here’s the first way:
fail2ban-client get wordpress-hard unbanip 92.53.65.22
Or, if you want all IP addresses to be unbanned, the easiest way is to edit your jail.local file and set or change the bantime=1 – this will ban the users for 1 second only which is effectively no ban at all. Then, restart fail2ban using service fail2ban restart.
Use SSH keys rather than passwords
You can find guides online for generating your own SSH keys. The reason they are valued over username + passwords is twofold. One – the keys are massive and non-guessable. Two – each person has their own key, so if you wish to revoke access, you simply remove their key. That means, multiple people can access the same root account, and then if you need to remove access for one person there’s no password to change – just remove their key.
You can add keys through the Digital Ocean interface, or you can edit the following file:
vi /root/.ssh/authorized_keys
All you need to do to grant access is paste the new key onto a new line inside that file.
Adding extra websites to your stack
Firstly – I don’t like doing this. I like separation of concerns and I hate when I’m chasing a performance issue having doubt in my mind that the performance issue is even coming from this website. On top of that, the way that caching works – it tailors itself to traffic. So, if you have two websites on one server, they could have very different traffic patterns which ruin each others performance.
Having said that, some of you will want to add more websites anyway, and the easiest way to add extra websites to your server stack is to clone the configuration file inside /etc/nginx/sites-available/ and alter it for the new server. Alter the command below to give your 2nd configuration file a suitable name.
cp /etc/nginx/sites-available/rocketstack.conf /etc/nginx/sites-available/secondsite.conf
Now that the file is created, we need to edit some key parts of it:
vi /etc/nginx/sites-available/secondsite.conf
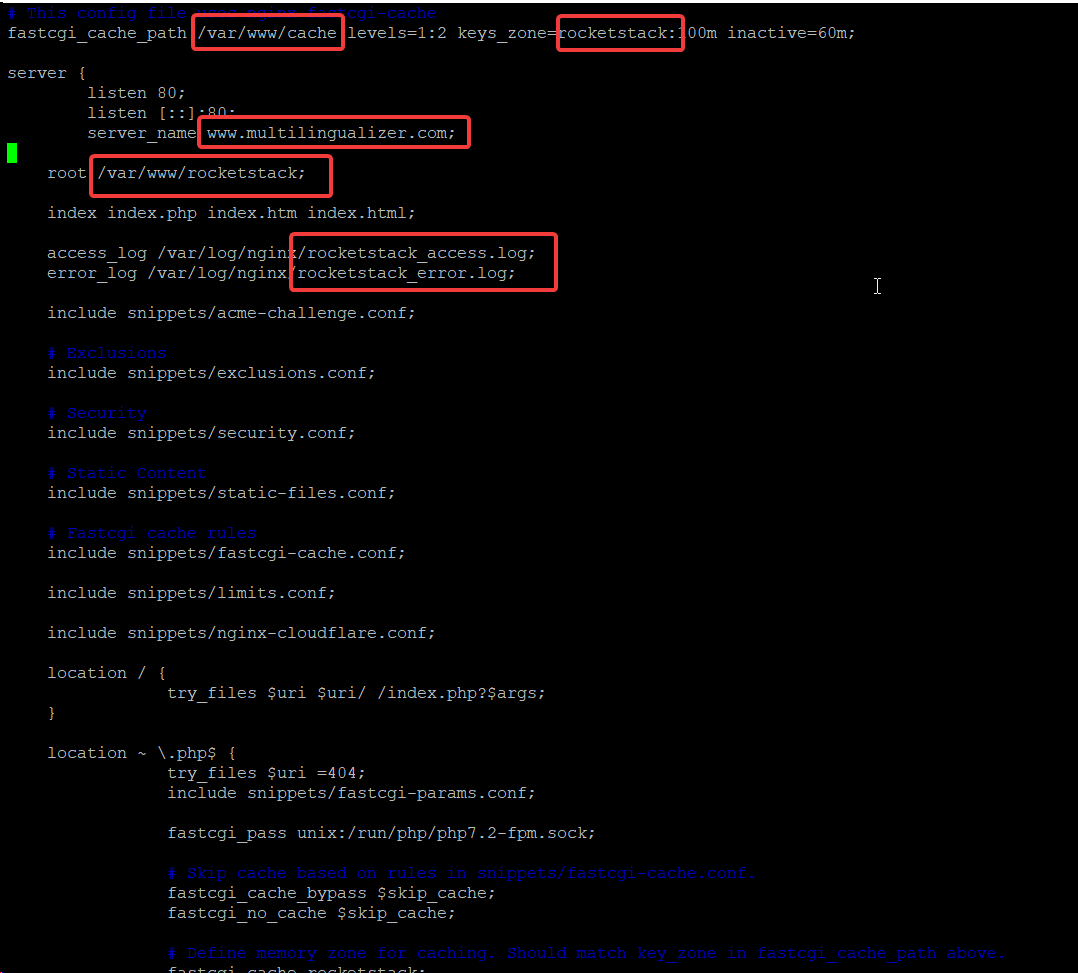
So – the lines you need to edit for your extra sites are:
- fastcgi_cache_path – change the folder and change the keyzone
- server_name – change this to the domain of your extra site
- root – change this to the folder for the files for your extra site
- access_log & error_log – change these to have a name that helps you identify the log files for your extra site
- You’ll also need to repeat this in your https/443/SSL server block if you have one
- If you have an SSL block, you should comment out the ssl_certificate and ssl_certificate_key lines
That’s just nginx configuration. You’ll also need to create some new folders:
- Create cache folder, e.g., /var/www/cache/secondsite
- Change ownership of the new cache folder to www-data:www-data
- Create web files folder, e.g. /var/www/secondsite
mkdir /var/www/cache/secondsite
chown www-data:www-data /var/www/cache/secondsite
mkdir /var/www/secondsite
If you used an older version of my Rocket Stack build, you should also move your fastcgi_cache for your first site to a subfolder of your cache folder.
mkdir /var/www/cache/rocketstack
chown www-data:www-data /var/www/cache/rocketstack
Then, once you have the new folder set up, alter your original /etc/nginx/sites-available/rocketstack.conf file and change /var/www/cache on the very first line to read /var/www/cache/rocketstack.
Once all of this is done, you should test your nginx configuration changes before you restart the nginx service. Test using:
nginx -t
And once you have confirmed there are no errors, you can restart nginx using:
service nginx restart
If you’ve done everything correctly, your server will now respond to queries for your secondsite domain by sending traffic to /var/www/secondsite – so, go ahead and install whatever website you wish into that second folder. You can follow my original stack guide for installing WordPress if you wish – by this stage it’s effectively:
- Download the wordpress files and extract them to your /var/www/secondsite folder
- Change owner on all files in that folder to www-data:www-data
- Create a database for the second site, create a user, grant all privileges for that user to the database
- Open your second site URL and follow the WordPress installation instructions
Balance your RAM allocation for each stack service properly
The most critical element when it comes to RAM is that you don’t ever want your server to run out of RAM and end up using the swap file. Using the swap file means your server is flushing things from RAM to disk. This will massively slow down everything on your server, so you need to avoid it happening.
If you have 4GB RAM on your server, a typical RAM allocation might look like this:
- Redis – 500MB
- MySQL – 1.5GB
- PHP-FPM – 1GB
- Other services and operating system – 1GB
Here is how to configure your stack to obey the rules above.
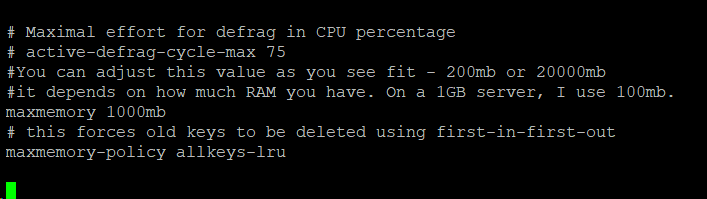
Change Redis RAM allocation
With Redis, it’s straightforward.
vi /etc/redis/redis.conf
Find the maxmemory line (in vi you can hit / then type maxmemory). Change it to whatever mb value you wish:
Change MySQL RAM allocation
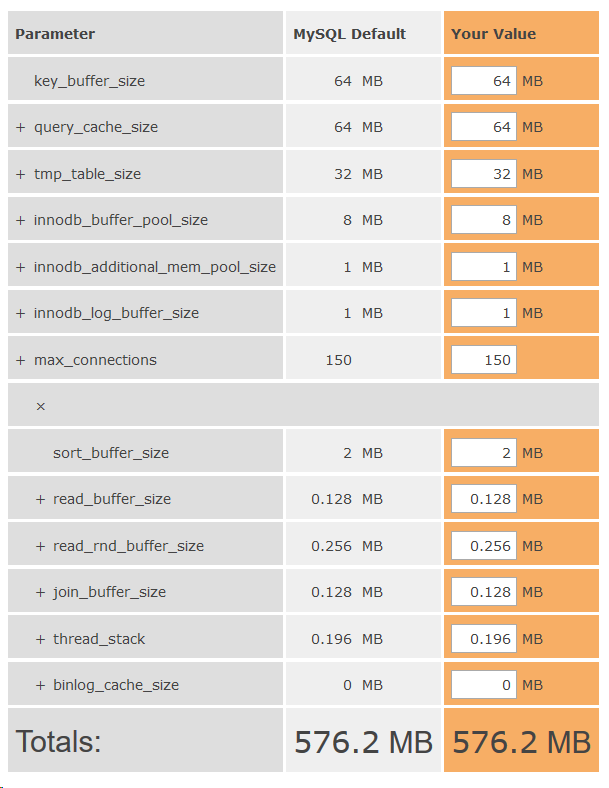
Configuring a maximum RAM allocation for MySQL is not simple. It’s effectively the total of all of your memory limits in your configuration files. However, the 2 most important, and normally largest are:
- innodb_buffer_pool_size
- innodb_log_file_size
- max_connections
So – edit /etc/mysql/mysql.d/mysqld.cnf and edit/add these values as in the image below:
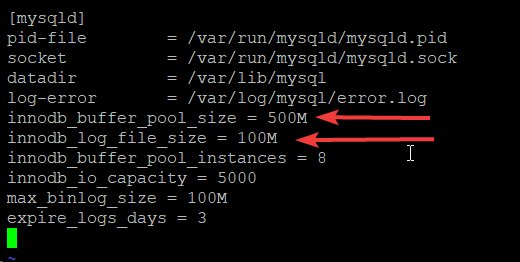
Those values above are fairly healthy for 4GB RAM, but ultimately the correct values depend on your own particular scenarios and user traffic. This is actually one of the biggest benefits of running your own stack – you can tailor it to your own traffic. To do so, run your server for a few days and then run the following commands:
cd ~
git clone https://github.com/BMDan/tuning-primer.sh
cd tuning-primer.sh
./tuning-primer.sh
When you run the command above, it will provide more info regarding your memory usage. See the image below to see the things to look for.
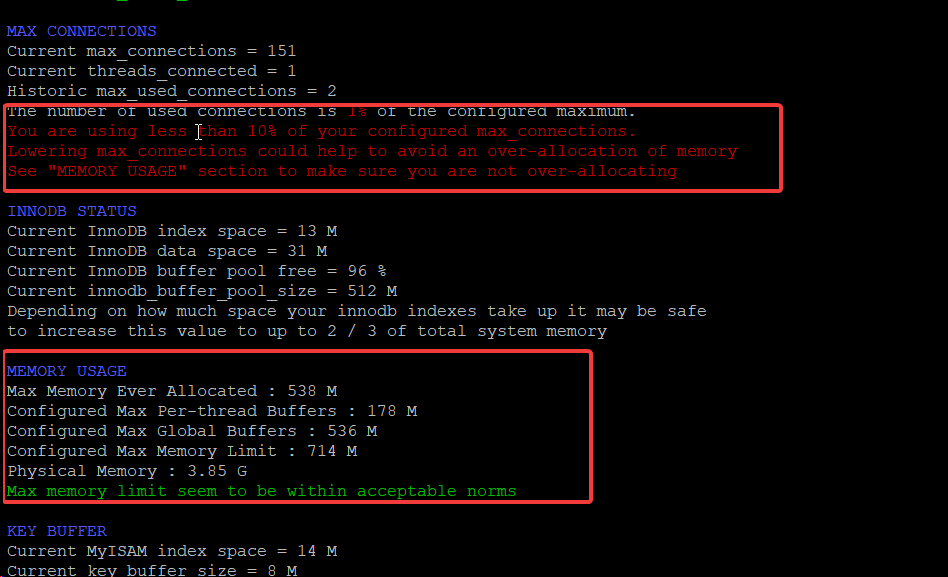
On top of this, you can learn more about MySQL RAM usage and your maximums by using the MySQL RAM Calculator.
Change PHP RAM allocation
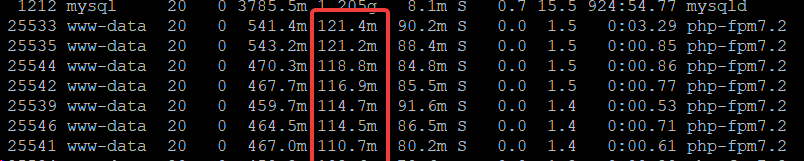
This is not a hard and fast rule unfortunately, because how much RAM is used per-PHP process is dependent on your theme and plugins in use on your site. To see how much RAM PHP is using on your site, you should check at a busy time and then run the top command:
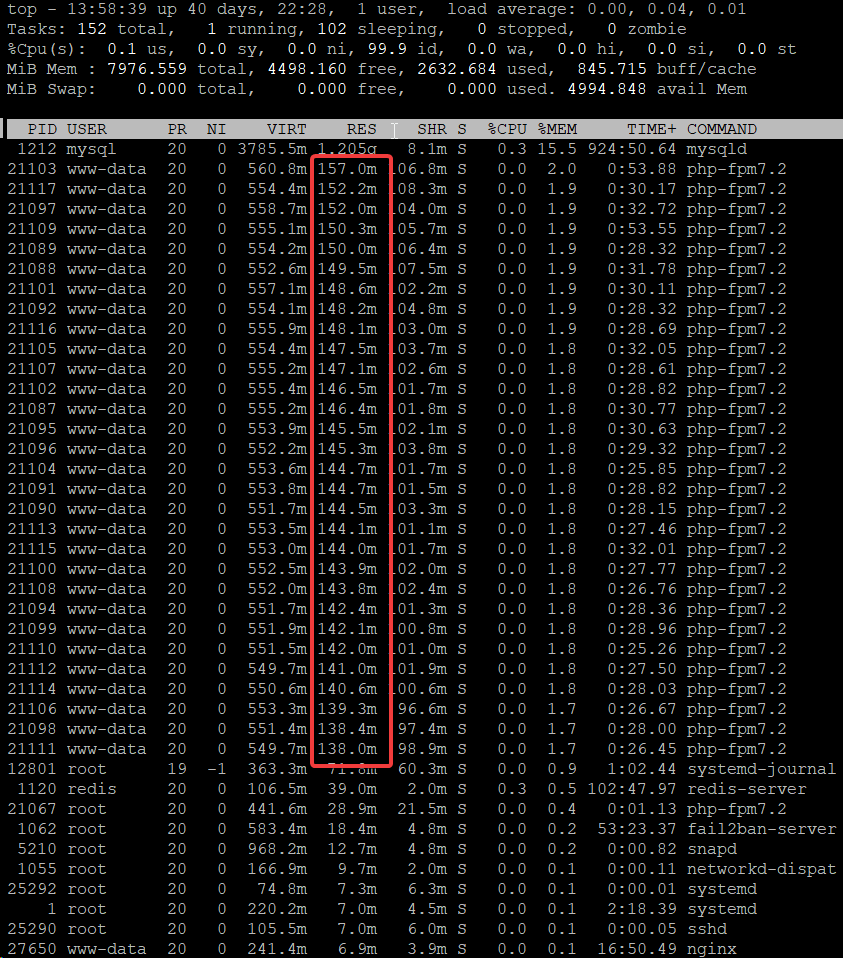
Some tips for using top:
- Run top through SSH using the command top
- Change to MB by pressing the key e
- Sort the list by RAM usage by pressing the letter capital M
- The RES column is the column to look at
You can see in the example above that each process is using about 150MB of RAM. So, if I want PHP to use up 2GB of RAM on this server, I need to set the maximum number of PHP processes to 2000/150 = 13. You can also change the memory usage per process, if your website supports it, by altering your /etc/php/7.x/fpm/php.ini file (replace .x with .2 or .3 depending which PHP you have).
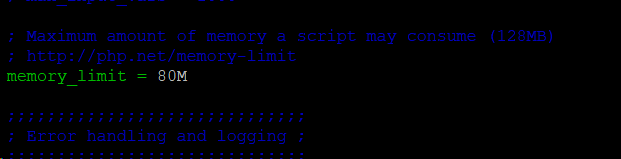
In the above example, I changed the memory_limit but then found with the top command that each PHP process was ultimately consuming more RAM than this. This server uses a lot of RAM per process because of the theme, plugins and custom code on it.
So – I’m changing it back to 150M in the php.ini file. This is because it takes time for each process to increase RAM on demand. You do what works for you.
Note: if you’re wondering about why the PHP processes managed to go past the max_memory limit – that’s because the max_memory limit is really a guideline and scripts are allowed to alter this to allocate themselves more RAM if needed. They do this using ini_set(‘memory_limit’, ‘256M’); If you want to enforce a strict rule for the max RAM per process, you can edit the pool.d/www.conf file and uncomment the php_admin_value[memory_limit] = 32M line.
Other PHP configurations
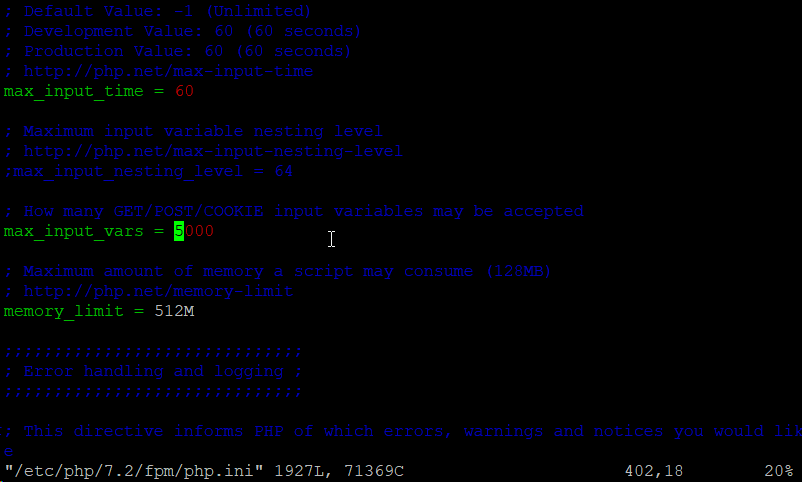
You should change your max_input_vars value – uncomment it and increase it significantly to prevent errors with a lot of WordPress plugins on larger websites.
Once you have changed your values for PHP, you can restart the service using the command below. Alter it to 7.3 if you are using PHP 7.3:
service php-fpm7.2 restart
MySQL administration, optimisation and monitoring
There is a new ‘authentication plugin’ in MySQL 8 which is causing a lot of issues for people. If you have run the mysql_secure_installation program, it recommends to change the default authentication plugin to ‘cached…’. Don’t take this recommendation or you will end up with database connection errors.
Resetting your root DB password
If you need to reset your root DB password, it’s possible. You do this easily as follows:
service mysql stop
mkdir /var/run/mysqld
chown mysql:mysql /var/run/mysqld
mysqld --skip-grant-tables &
mysql
UPDATE mysql.user SET authentication_string=null WHERE User='root';
FLUSH PRIVILEGES;
exit;
ps -fea | grep mysqld | awk {'print $2'} | xargs kill -9
service mysql start
mysql
ALTER USER 'root'@'localhost' IDENTIFIED BY 'MyNewPass';
FLUSH PRIVILEGES;
exit;
service mysql restart
The above is a mix of SSH and MySQL commands to firstly remove the password for root, then to create a fresh password. Replace MyNewPass with whatever you want your new password to be.
Change MySQL user authentication type
If you are experiencing database connection errors, you should attempt to connect manually using:
mysql -u username -p
Then enter or paste the password on the next line. If it connects, you know the password is correct. You should ensure it matches in your wp-config.php file, e.g. /home/826397.cloudwaysapps.com/vaxvhpbyme/public_html/wp-config.php
If you still experience connection errors, there’s a very good chance that the default authentication plugin has been altered. Connect to MySQL using the root user.
mysql -u root -p
Then run this:
select user, plugin from mysql.user;
If you see something like this:
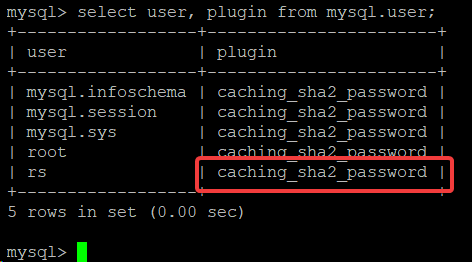
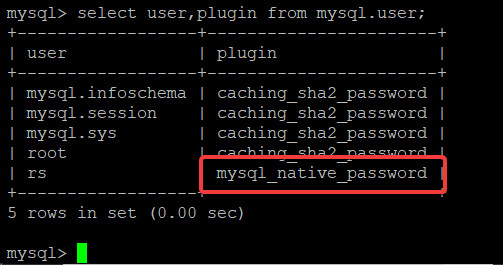
That caching_sha2_password plugin is the authentication plugin and it doesn’t yet seem to be compatible with WordPress. So – to fix, just delete the user then recreate using something like this:
drop user rs@localhost;
create user rs@localhost IDENTIFIED WITH mysql_native_password BY 'chooseastrongpassword';
GRANT ALL PRIVILEGES ON rocketstack.* TO 'rs'@'localhost'
Replace usernames, database names and passwords in the above. It deletes the user, creates the user with mysql_native_password and then grants all privileges on your WordPress database. You can check this has done what is required by running the same query again:
select user, plugin from mysql.users;
Nginx configuration and optimisation tips
These tips are based on my Rocket Stack build. You can adjust them as you see fit for other stack builds.
(optional) Add country to your nginx_fastcgi_cache configuration
This technique depends on whether you have any other content that differs per country. If you do, page-caching will cause issues since you could end up displaying US content to GB visitors etc.
Well written plugins, like the Price Based on Country for WooCommerce plugin will avoid this page-cache-busting problem by using Ajax to update the prices based on the GeoIP of the visitor. If you are using other plugins which are not so well written, and you want to use the fastcgi_page_cache then you will need to follow the steps in this section.
You can find the fastcgi_cache_key inside the /etc/nginx/snippets/fastcgi-cache.conf file. To make a different page cache per country you would need to change the fastcgi_cache_key to the following:
fastcgi_cache_key "$scheme$request_method$host$request_uri$geoip2_data_country_code";
However, by default, that $ geoip2_data_country_code is not available. To add it is complicated. Firstly, download the GeoLite2 database from maxmind:
mkdir /etc/nginx/geoip
cd /etc/nginx/geoip
wget https://geolite.maxmind.com/download/geoip/database/GeoLite2-Country.mmdb.gz
gunzip GeoLite2-Country.mmdb.gz
With maxmind downloaded to /etc/nginx/geoip, you can now follow this guide to rebuild your nginx with the GeoIp2 module loaded.
Now that you have the free maxmind GEO2 IP database downloaded and the module installed, you need to alter your nginx configuration to use it. Place the following inside your http {…} block:
geoip2 /etc/nginx/geoip/maxmind-country.mmdb {
         auto_reload 5m;
         $geoip2_metadata_country_build metadata build_epoch;
         $geoip2_data_country_code default=US source=$variable_with_ip country iso_code;
         $geoip2_data_country_name country names en;
 }
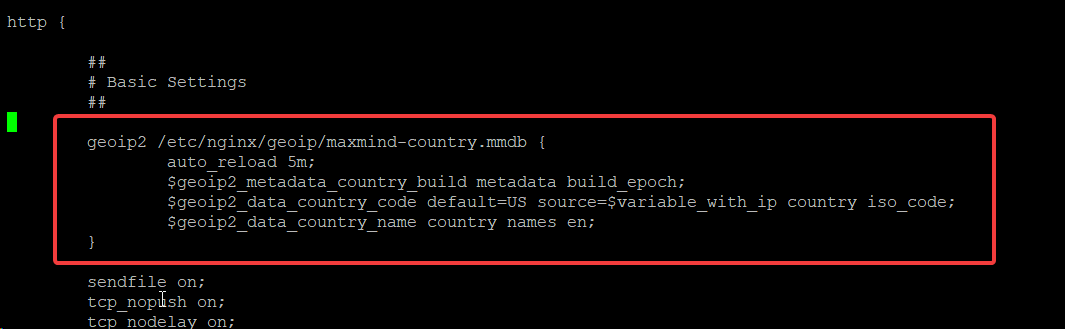
Save the file and test your config using nginx -t. Once you confirm it doesn’t give you an error, you can alter your fastcgi_cache_key in /etc/nginx/snippets/fastcgi-cache.conf

With the above edit in place, test your nginx config once more then restart the nginx service. You will now have a page-cache which is country-specific. Again – this is complicated, particularly building the nginx module, but it’s worth it if you have any plugins or theme functionality which displays country-specific information which does not use Ajax to display that information.
Testing configs
After any nginx configuration edits, you should test your config. You can do so using:
nginx -t
Allowing cross-server origin scripts
It’s unlikely you’ll want to do this for WordPress sites, but if there are JavaScript files on your site which other people or other websites use, and those scripts use ajax, you may wish to enable cross-origin scripting. To do so, modify /etc/nginx/snippets/security.conf and add this:
location ~* .json$ {
     add_header Access-Control-Allow-Origin *;
 }
Other snippets
You should take some time to look through the other snippets in the /etc/nginx/snippets folder. Most of them are configured perfectly already, but you may wish to make some alterations. There are comments throughout the files to assist.
Add SFTP users in the www-data group
When you’re uploading files directly (e.g. plugins, themes etc) to your website, it’s helpful if the files get the correct owner of www-data:www-data straight away. It’s also helpful to have SFTP access sometimes without using a key-file.
https://askubuntu.com/questions/420652/how-to-setup-a-restricted-sftp-server-on-ubuntu
Cloning your stack
With Digital Ocean, it’s trivial to clone your stack.
- Create a snapshot
- From the snapshot dropdown, click ‘create new droplet’
- Log into the new droplet and alter your nginx server_name values to reflect your cloned domain
- Point your DNS at the IP address of your new droplet
Summary
I’ve attempted to list all the key maintenace tasks you might wish to perform with your Rocket Stack. If I’ve missed anything, let me know and I’ll update the article.


Dave,
In this article, https://www.superspeedyplugins.com/2019/02/14/stack-configuration-customisation-and-optimisation-guide/
the number of seconds in a year should be 86400*365 = 31536000 rather than 331536000.
Thanks for sharing your tips.
Your mention of our web site would be appreciated for MySQL or MariaDB performance tuning. We can reciprocate with a link to your site.
Visit our Links page and give us text to include your superspeedyplugins.com
Hi Dave,
I was just starting to test out Wordfence, for the most part to prevent username enumeration and also to add 2FA (2 factor authentication) to my wordpress sites, as I think both of these are important to protect against user hacking / data loss.
If you recommend against Wordfence, can you make a recommendation to achieve those 2 things in its place?
Many thanks!
Thank you! Great job.
I suppose “Upgrading and optimising PHP” topic in this article you left without content… there is title only.
It would be nice if you share this knowledge!
That’s a misplaced header. If you look further up the article you’ll see some PHP optimisations.
I wish the country code part worked – is this going to be updated or left broken?
What issue are you seeing with the country code part?
I’ve copied the 3 files (including wordpress-extra.conf) from filter.d previously
It was only after I did sudo service fail2ban restart and re-enter the commands, that I got the below
So all was good actually
Status for the jail: wordpress-hard
|- Filter
| |- Currently failed: 0
| |- Total failed: 0
| `- File list: /var/log/auth.log
`- Actions
|- Currently banned: 0
|- Total banned: 0
`- Banned IP list:
Status for the jail: wordpress-soft
|- Filter
| |- Currently failed: 0
| |- Total failed: 0
| `- File list: /var/log/auth.log
`- Actions
|- Currently banned: 0
|- Total banned: 0
`- Banned IP list:
If you are getting
• Sorry but the jail ‘wordpress-soft’ does not exist
• Sorry but the jail ‘wordpress-hard’ does not exist
after
• sudo fail2ban-client status wordpress-soft
• sudo fail2ban-client status wordpress-hard
Try
• sudo service fail2ban restart
This means you didn’t copy the 2 files that exist in the fail2ban plugin folder. Look in the guide above for the cp command.
Hello,
i’ve tried everything to install geoip2 module, but no success so far.
the link is down: https://kenkogeek.com/en/english-maxmind-geoip2-and-nginx-on-ubuntu-16-04/
Could you help me ?
Thank you. I confirmed that I am on php 7.2, but surprisingly it worked now. Take care.
Hi, I love your guides, they are super easy to follow for a beginner like me!
I ran into a little issue after performing the commands in section “Other PHP configurations”, I tried resetting PHP using command “service php-fpm7.2 restart” and I got an error “Failed to restart php-fpm7.2.service: Unit php-fpm7.2.service not found.”
Any idea why this is happening? I’m using your Rocket Stack with PHP 7.2. Is there another way to restart it?
Thank you!
Sounds like you might have updated to 7.3. In putty/ssh, type: service php7 then hit tab, it’ll complete the service name for you then add a space and the word restart.